×
ToyotaParts- Hello
- Login or Register
- Quick Links
- Live Chat
- Track Order
- Parts Availability
- RMA
- Help Center
- Contact Us
- Shop for
- Toyota Parts
- Scion Parts
My Garage
My Account
Cart
OEM Toyota Matrix Window Motor
Window Lift Motor- Select Vehicle by Model
- Select Vehicle by VIN
Select Vehicle by Model
orMake
Model
Year
Select Vehicle by VIN
For the most accurate results, select vehicle by your VIN (Vehicle Identification Number).
4 Window Motors found


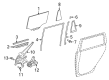
Toyota Matrix Window Motor Part Number: 85720-AE010
$316.64 MSRP: $452.09You Save: $135.45 (30%)Ships in 1-2 Business Days

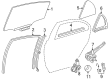
Toyota Matrix Window Motor Part Number: 85720-AA050
$316.64 MSRP: $452.09You Save: $135.45 (30%)Ships in 1-3 Business Days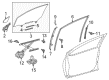
Toyota Matrix Window Motor Part Number: 85710-AE010
$316.64 MSRP: $452.09You Save: $135.45 (30%)Ships in 1-2 Business DaysToyota Matrix Window Motor Part Number: 85710-AA050
$316.64 MSRP: $452.09You Save: $135.45 (30%)Ships in 1-3 Business Days
Toyota Matrix Window Motor
Choose genuine Window Motor that pass strict quality control tests. You can trust the top quality and lasting durability. Shopping for OEM Window Motor for your Toyota Matrix? Our website is your one-stop destination. We stock an extensive selection of genuine Toyota Matrix parts. The price is affordable so you can save more. It only takes minutes to browse and find the exact fit. Easily add to cart and check out fast. Our hassle-free return policy will keep you stress-free. We process orders quickly for swift delivery. Your parts will arrive faster, so you can get back on the road sooner.
Toyota Matrix Window Motor is indispensable parts, which shows that Toyota's Matrix Series is trustworthy and will perform well. This window motor is ergonomically designed to enable a user to easily open or close a window through a remote control hence providing comfort and security. The model of Toyota Matrix was being manufactured from 2002 to 2014; different types of models available are Standard, XR, and XRS; all the model enjoy the advantage of The window motor helps to enhance the efficiency. This component equally has a significant function to enable drivers and passengers to have access to fresh air and at the same time shield them from bad weather. The Toyota Window Motor is one of the longest lasting motors on the market, but as any other mechanical part, it can wear out after some time, and show signs of slow movement or complete unresponsiveness. A higher degree of maintenance of the window motor and its eventual switch provides needful exploitation of the device. If there is a problem with the car, it is necessary to change window motor using only superior quality parts to bring it back to life. However, the most outstanding product within the automotive market is the Toyota Matrix Window Motor that fits all Matrix models and interfaces directly with the car's electrical system for proper functionality. This reliability is not only great for the feel of the car when driving but it also contributes to the safety of the car making the Toyota Matrix Window Motor a great feature for any Matrix.
Toyota Matrix Window Motor Parts and Q&A
- Q: How to install the front Window Motor assembly on Toyota Matrix?A:The installation of front power window regulator motor assembly requires positioning the regulator arm below the intermediate position. Fix the front power window regulator motor assembly to its location with 3 TORX T25 screws tightened to 5.4 Nm (55 kgf-cm, 48 in-lbf). Installation holes on new front window regulators are created by self-tapping screws. The sequence for installation includes the front door window regulator sub-assembly followed by installation of the front door glass sub-assembly. Follow the installation of the front door service hole cover for both power door lock configurations and then put in the front door inner glass Weather Strip. The repair procedure calls for installing front door lower frame bracket garnish regardless of whether the vehicle has Front No. 2 Speaker followed by front door inside handle sub-assembly and front door trim board sub-assembly. The last step of the installation requires adding the front armrest upper base panel and the front door inside handle bezel. Follow the last step by connecting the cable to the negative battery terminal.
- Q: How to remove the front door window motor for the LH side on Toyota Matrix?A:The first step to separate the front door window regulator motor from its position on the LH side begins by disconnecting the negative battery cable terminal and waiting for at least ninety seconds to deactivate the SRS system. You need to remove several components starting with the front door inside handle bezel followed by front armrest upper base panel and then front door trim board sub-assembly and concluding with front door inside handle sub-assembly. The front door lower frame bracket garnish can be removed separately while keeping or removing the front No. 2 speaker. The technician should begin by removing the front door inner glass Weather Strip and proceeding to remove the front door service hole cover based on power door lock availability. The service begins by removing the front door glass sub-assembly and the front door window regulator sub-assembly. The front power window regulator motor assembly requires removal through the use of a "TORX" driver (T25) which removes the 3 securing screws.


Related Toyota Matrix Parts
 Toyota Matrix Armrest
 Toyota Matrix Door Hinge
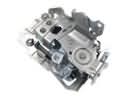 Toyota Matrix Door Latch Assembly
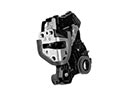 Toyota Matrix Door Lock
 Toyota Matrix Door Lock Cylinder
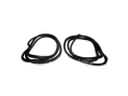 Toyota Matrix Door Seal
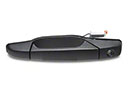 Toyota Matrix Exterior Door Handle
 Toyota Matrix Interior Door Handle
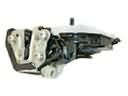 Toyota Matrix Rear Passenger Door Handle Latch
 Toyota Matrix Weather Strip
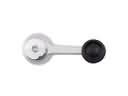 Toyota Matrix Window Crank Handle
 Toyota Matrix Window Run
Browse Toyota Matrix Window Motor by Years
2013
2012
2011
2010
2009
2008
2007
2006
2005
2004
2003