×
ToyotaParts- Hello
- Login or Register
- Quick Links
- Live Chat
- Track Order
- Parts Availability
- RMA
- Help Center
- Contact Us
- Shop for
- Toyota Parts
- Scion Parts
My Garage
My Account
Cart
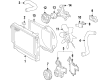
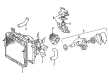
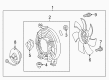
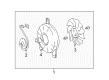
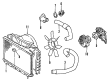
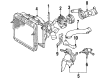
OEM Toyota Land Cruiser Cooling Fan Assembly
Engine Cooling Fan- Select Vehicle by Model
- Select Vehicle by VIN
Select Vehicle by Model
orMake
Model
Year
Select Vehicle by VIN
For the most accurate results, select vehicle by your VIN (Vehicle Identification Number).
Filter by Part Type
Filter by Part Type
12 Cooling Fan Assemblys found


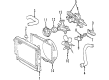
Toyota Land Cruiser Fan Part Number: 16361-50040
$165.08 MSRP: $233.68You Save: $68.60 (30%)Ships in 1-3 Business Days


Toyota Land Cruiser Fan Blade, Front Part Number: 16361-38020
$122.66 MSRP: $173.64You Save: $50.98 (30%)Ships in 1-3 Business Days


Toyota Land Cruiser Fan Blade Part Number: 16361-61020
$127.36 MSRP: $180.29You Save: $52.93 (30%)Ships in 1-2 Business Days
Toyota Land Cruiser Fan Blade Part Number: 16361-66020
$141.34 MSRP: $200.09You Save: $58.75 (30%)Ships in 1-3 Business Days


Toyota Land Cruiser Fan Blade Part Number: 88453-60020
$17.20 MSRP: $23.93You Save: $6.73 (29%)Ships in 1-3 Business Days


Toyota Land Cruiser Fan, Cooling (For Condenser) Part Number: 88453-60010
$22.69 MSRP: $31.59You Save: $8.90 (29%)
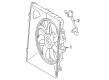
Toyota Land Cruiser Fan Assembly, With Motor Part Number: 16360-25090
$1467.20 MSRP: $2150.20You Save: $683.00 (32%)Ships in 1-2 Business Days
Toyota Land Cruiser Fan Blade Part Number: 16361-50170
$165.08 MSRP: $233.68You Save: $68.60 (30%)Ships in 1-3 Business Days
Toyota Land Cruiser Fan Blade Part Number: 16361-41090
$117.66 MSRP: $165.15You Save: $47.49 (29%)


Toyota Land Cruiser Blade Part Number: 16361-61050
$141.93 MSRP: $200.92You Save: $58.99 (30%)
Toyota Land Cruiser Blower Assembly Part Number: 16360-61030

Toyota Land Cruiser Blower Assembly Part Number: 16360-61015
Toyota Land Cruiser Cooling Fan Assembly
Choose genuine Cooling Fan Assembly that pass strict quality control tests. You can trust the top quality and lasting durability. Shopping for OEM Cooling Fan Assembly for your Toyota Land Cruiser? Our website is your one-stop destination. We stock an extensive selection of genuine Toyota Land Cruiser parts. The price is affordable so you can save more. It only takes minutes to browse and find the exact fit. Easily add to cart and check out fast. Our hassle-free return policy will keep you stress-free. We process orders quickly for swift delivery. Your parts will arrive faster, so you can get back on the road sooner.
Related Toyota Land Cruiser Parts
 Toyota Land Cruiser Radiator
 Toyota Land Cruiser Thermostat
 Toyota Land Cruiser Water Pump
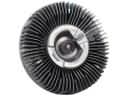 Toyota Land Cruiser Fan Clutch
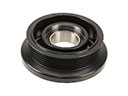 Toyota Land Cruiser A/C Idler Pulley
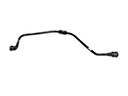 Toyota Land Cruiser Coolant Reservoir Hose
 Toyota Land Cruiser Fan Blade
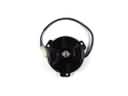 Toyota Land Cruiser Fan Motor
 Toyota Land Cruiser Radiator Hose
 Toyota Land Cruiser Thermostat Gasket
 Toyota Land Cruiser Thermostat Housing
 Toyota Land Cruiser Water Hose