×
ToyotaParts- Hello
- Login or Register
- Quick Links
- Live Chat
- Track Order
- Parts Availability
- RMA
- Help Center
- Contact Us
- Shop for
- Toyota Parts
- Scion Parts
My Garage
My Account
Cart
OEM Toyota Celica Rack And Pinion
Steering Gear- Select Vehicle by Model
- Select Vehicle by VIN
Select Vehicle by Model
orMake
Model
Year
Select Vehicle by VIN
For the most accurate results, select vehicle by your VIN (Vehicle Identification Number).
18 Rack And Pinions found


Toyota Celica Steering Gear Part Number: 44250-32210-84
$396.38 MSRP: $509.94You Save: $113.56 (23%)Ships in 1-3 Business Days
Toyota Celica Steering Gear Part Number: 44250-20470-84
$332.88 MSRP: $467.79You Save: $134.91 (29%)
Toyota Celica Gear Assembly Part Number: 45510-14040

Toyota Celica Gear Assembly Part Number: 44250-14040

Toyota Celica Rack Part Number: 44204-20360

Toyota Celica Rack Part Number: 44204-20180

Toyota Celica Rack Part Number: 44204-20100

Toyota Celica Rack Part Number: 44204-20070

Toyota Celica Rack Part Number: 44204-14030
Toyota Celica Rack Part Number: 44204-14020
Toyota Celica Rack Part Number: 45521-14042
Toyota Celica Rack Assembly, Front Part Number: 44204-20400

Toyota Celica Gear Assembly Part Number: 44250-20161
Toyota Celica Steering Gear Part Number: 44250-20100-84
Toyota Celica Steering Gear Part Number: 44250-14020-84
Toyota Celica Steering Gear Part Number: 44250-20480-84

Toyota Celica Steering Gear Part Number: 44200-20881

Toyota Celica Steering Gear Part Number: 44250-20640
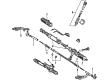
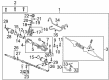
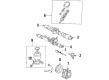
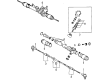
Toyota Celica Rack And Pinion
Choose genuine Rack And Pinion that pass strict quality control tests. You can trust the top quality and lasting durability. Shopping for OEM Rack And Pinion for your Toyota Celica? Our website is your one-stop destination. We stock an extensive selection of genuine Toyota Celica parts. The price is affordable so you can save more. It only takes minutes to browse and find the exact fit. Easily add to cart and check out fast. Our hassle-free return policy will keep you stress-free. We process orders quickly for swift delivery. Your parts will arrive faster, so you can get back on the road sooner.
This Toyota Celica Rack And Pinion is an important mating that takes the rotational movement of the steering wheel and produces a lateral movement of the front wheels. There exists a rack and pinion wherein there is a metal tube containing pinion gears and the rack gear is linked to tie-rods which turn the wheels. Almost all Celica cars have power steering systems using rack and pinion with hydraulic fluid control; assist pressure is supplied through a valve relying on pressurized fluid. Possible problems of the Steering Rack include leakage from the worn-out seal or hose, and wearing off of gears and inner tie-rod bearings. Signs of a worn Steering Rack are looseness in the steering wheel, wildness and pulling towards the side of the vehicle and this requires a change of the rack and pinion assembly for efficient operation of the steering.
Toyota Celica Rack And Pinion Parts and Q&A
- Q: How to disassemble the Rack And Pinion on Toyota Celica?A:The tool set of Special Service Tool: 09612-00012 and 09023-38200 should be used to secure the Rack And Pinion assembly in a vise before the tool set removes the 2 turn pressure tubes. The first step is to mark the tie rod end and rack end before lightly loosening the lock nut. Both tie rod ends and lock nuts should then be removed from their sides. Through needle nose plier usage, you should carefully free the wire and remove the boot and clip along with the wire. Ensure you protect the boot and label the RH and LH rack boots. Use a chisel and hammer to unstake the claw washer while safeguarding the rack and pinion from damage and apply a spanner to support the rack before removing the end with Special Service Tool: 09922-10010 to mark and detach both LH and RH rack ends and the claw washer. The service technician should remove the rack guide spring cap which leads to extraction of conical spring washer and rack guide sub-assembly then continues with rack housing cap and O-ring. The control valve assembly requires pull-out along with the necessary caution to keep the oil seal lip undamaged for continued safety. The cylinder end stopper requires removal using snap ring pliers to complete the process. Use Special Service Tool: 09950-70010 (09951-07200) to press out the rack and pinion and oil seal from their positions without allowing the rack and pinion to drop. Special Service Tools: 09950-60010 (09951-00280), 09950-70010 (09951-07360) will help press out the oil seal by protecting the rack housing from potential damage. Use a dial indicator to examine the rack and pinion for runout and inspect teeth wear as well as damage. The maximum acceptable runout should be 0.1 mm (0.004 inch) while an examination of the back surface for signs of wear or damage should also be performed. To replace the bearing use Special Service Tool: 09617-35020 for bearing guide nut and bearing removal. Apply molybdenum disulfide lithium base grease to a new bearing and torques the guide nut to 40 Nm (410 kgf-cm, 30 foot lbs.). Installation of a new oil seal needs screwdriver use with vinyl tape to remove the old component followed by fluid coating the new seal lip and pressing it in with Special Service Tool: 09950-60010 (09951-00210, 09951-00340, 09952-06010), 09950-70010 (09951-07100) for correct orientation. The new oil seal follows a replacement procedure using Special Service Tool: 09612-20010 and requires steering fluid coating of the lip before insertion with Special Service Tool: 09950-60010 (09951-00240, 09951-00350, 09952-06010), 09950-70010 (09951-07150) and a hammer. The procedure requires removal of the bearing using punch and hammer before treating a new bearing with grease then installing it using brass bar and hammer. When replacing old union seats start by extracting the old ones with a screw extractor followed by gently installing new ones after cleaning the rack housing. When changing the parts begin by extracting the old Teflon ring and O-ring using a screwdriver followed by O-ring coating in power steering fluid and proper installation then establish the new Teflon ring by fluid coating followed by appropriate placement. The procedure for control valve assembly involves removing 4 Teflon rings and expanding new ones before fluid coating them and installing them with precise application of Special Service Tool: 09631-20081. Install new parts by brushing power steering fluid or grease onto them before positioning them correctly with the oil seal set up in the right orientation and prevent any part reversal. First install the rack and pinion through Special Service Tool: 09631-20051 and then apply fluid during installation before removing the tool. Embed the oil seal inside the rack housing by avoiding any tilting motion and maintaining its correct placement before installing the cylinder end stopper through Special Service Tool: 09612-22011 with a hammer as well as a new snap ring. Test the air tightness using Special Service Tool: 09631-12071 by applying a 53 kPa (400 mmHg, 15.75 inch Hg) vacuum for 30 seconds followed by leakiness checks. After checking for any harm to Teflon rings and oil seal lips, install the control valve assembly before installing the rack housing cap with a fresh O-ring that received fluid treatment then torque it to 74 Nm (750 kgf-cm, 54 ft. lbs.). Fasten the rack guide sub-assembly together with a conical spring washer while using sealant on the threads of the rack guide spring cap. To adjust total preload install both RH and LH rack ends temporarily while torquing the rack guide spring cap to 25 Nm (250 kgf-cm, 18 ft. lbs.) and returning it 12° before using Special Service Tool: 09616-00011 to turn the control valve shaft. Slightly rotate the rack guide spring cap until the spring stops operating then retighten it for a preload between 0.9 to 1.3 Nm (9 to 13 kgf-cm, 8.0 to 11.5 inch lbs.) followed by staking and checking preload once again. To proceed replace the RH and LH rack ends along with installing new claw washers and rack ends before connecting them properly to the rack and pinion grooves then torque the rack end to 62 Nm (630 kgf-cm, 46 ft. lbs.) using Special Service Tool: 09922-10010. The installation process includes fitting both rack boot sections, wires, and clips but requires the rack and pinion opening free of obstruction before completing wire tensioning around the boot area. Follow the process of aligning matchmarks on the rack end before adjusting toe-in and tightening the lock nut to 74Nm (750kgf-cm, 54ft. lbs.). Then complete the procedure by installing the 2-turn pressure tubes using Special Service Tool: 09023-38200 and torquing them to 23Nm (230kgf-cm, 17ft. lbs.).
- Q: How to service and repair the Rack And Pinion on Toyota Celica?A:Security and subsequent repair of the rack and pinion starts with a vise application of Special Service Tool: 09612-00012 to hold the Rack And Pinion assembly after which 2 turn pressure tubes are removed by Special Service Tool: 09633-00020. You should mark the tie rod end and rack end before starting to loosen the lock nut and taking off both tie rod ends and lock nuts from the sides. You should use needle nose pliers to open the wire before you remove the clips, wires and rack boots while protecting the boots then mark the RH and LH rack boots. To remove the rack ends use Special Service Tool: 09922-10010 directed by the provided illustration, while maintaining steady control of the rack and pinion by keeping it secure with a spanner and unstaking the claw washers with a chisel and hammer. The rack guide spring cap along with the conical spring washer and rack guide sub-assembly should be removed first before taking off the rack housing cap and O-ring. Lift out the control valve assembly before stripping off the cylinder end stopper with snap ring pliers. Then extract the rack and pinion and oil seal together with Special Service Tool: 09950-70010 (09951-07200) while avoiding any contact that may damage the rack and pinion. The rack housing remains protected from damage by using Special Service Tool: 09950-60010 (09951-00280), 09950-70010 (09951-07360) to extract the oil seal. A dial indicator should be used to check rack and pinion runout while inspecting its teeth wear and damage. Maximum rack and pinion runout should not exceed 0.1 mm (0.004 inch). The installer should use Special Service Tool: 09617-35020 to install the new bearing after applying molybdenum disulfide lithium base grease and torquing the bearing guide nut to 40 Nm (410 kgf.cm, 30 ft. lbs.). The correct installation method for new oil seals involves the following steps: use a screwdriver with vinyl tape to remove the old seal, apply power steering fluid to the new seal lip before inserting it with Special Service Tool: 09950-60010 (09951-00210, 09951-00340, 09952-06010), 09950-70010 (09951-07100) while maintaining proper seal orientation. Special Service Tool: 09612-20010 allows the operator to repeat the oil seal replacement process and to substitute bearings by using a brass bar for tapping out and in. Clean the rack housing first before installing new replacement union seats through the use of a screw extractor and a hammer. The teflon ring and O-ring replacement requires a screwdriver to safely remove them followed by power steering fluid coating of the new O-ring and expanding and installing the new teflon ring properly. The control valve assembly requires removal of its four teflon rings after which new rings must be expanded and then coated with power steering fluid before correct installation. Power steering fluid or Molybdenum disulfide lithium base grease should be applied to indicated parts during reassembly while Special Service Tool: 09631-20051 will help with steady installation of the rack and pinion. To install the oil seal properly use Special Service Tool: 09612-22011 to drive in the cylinder end stopper while testing for its air tightness with Special Service Tool: 09631-12071. Maintain zero vacuum during the test. Place the control valve assembly and the rack housing cap with new O-ring coated in power steering fluid then torque to 74 Nm (750 kgf.cm, 54 ft. lbs.). Install the rack guide sub-assembly together with the conical spring washer and rack guide spring cap by treating the cap threads with adhesive sealant. Total preload adjustment can be performed using temporarily installed RH and LH rack ends while torquing the rack guide spring cap to 25 Nm (250 kgf.cm, 18 ft. lbs.), followed by returning the cap to 12 degrees. By utilizing Special Service Tool: 09616-00010 you can turn the control valve shaft while loosening the rack guide spring cap until it stops working before tighten it for a preload range of 0.9 - 1.3 Nm (9 - 13 kgf.cm, 8.0 - 11.5 inch lbs.). Stake the cap in opposite locations and verify the preload once more after conducting these steps. Complete this procedure by installing RH and LH claw washers and rack ends while aiming for rack and pinion groove alignment before you apply 62 Nm (630 kgf.cm, 46 ft. lbs.) torque with Special Service Tool: 09922-10010 to secure the rack end and then stake the washer. Take care to prevent contact with the rack and pinion. Neuken and connect the RH and LH rack boots while securing the wires with clips to exit the clear rack and pinion hole before installing the RH and LH tie rod ends with their matching marks correctly set and tightening the nuts to 74 Nm (750 kgf.cm, 54 ft. lbs.). The procedure ends with the 2 turn pressure tubes secured by Special Service Tool: 09633-00020 and torqued at 20 Nm (200 kgf.cm, 14 ft. lbs.).


Related Toyota Celica Parts
 Toyota Celica Steering Wheel
 Toyota Celica Ignition Switch
 Toyota Celica Power Steering Pump
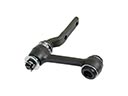 Toyota Celica Idler Arm
 Toyota Celica Power Steering Control Valve
 Toyota Celica Power Steering Cooler
 Toyota Celica Power Steering Reservoir
 Toyota Celica Rack and Pinion Boot
 Toyota Celica Steering Column
 Toyota Celica Steering Shaft
 Toyota Celica Tie Rod End
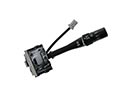 Toyota Celica Windshield Wiper Switch