×
ToyotaParts- Hello
- Login or Register
- Quick Links
- Live Chat
- Track Order
- Parts Availability
- RMA
- Help Center
- Contact Us
- Shop for
- Toyota Parts
- Scion Parts
My Garage
My Account
Cart
OEM Scion Starter Solenoid
Starter Solenoid Relay- Select Vehicle by Model
- Select Vehicle by VIN
Select Vehicle by Model
orMake
Model
Year
Select Vehicle by VIN
For the most accurate results, select vehicle by your VIN (Vehicle Identification Number).
10 Starter Solenoids found

Scion Drive Part Number: 28226-28041
$317.80 MSRP: $453.75You Save: $135.95 (30%)Ships in 1-3 Business DaysProduct Specifications- Other Name: Kit, Repair Service; Starter Solenoid; Housing; Solenoid; Starter Kit, Battery Terminal; Starter Kit, Motor Terminal; Starter Kit, Repair Service
- Manufacturer Note: NO.1


Scion Solenoid Part Number: 28226-37130
$104.09 MSRP: $146.10You Save: $42.01 (29%)Ships in 1-3 Business DaysProduct Specifications- Other Name: Kit, Repair Service; Starter Kit, Battery Terminal; Starter Kit, Repair Service


Scion Solenoid Part Number: 28150-WB001
$146.98 MSRP: $208.06You Save: $61.08 (30%)Ships in 1-3 Business DaysProduct Specifications- Other Name: Switch Assembly, Main; Switch Assembly, Magnet Starter

Scion Solenoid Part Number: 28226-36120
$193.67 MSRP: $276.52You Save: $82.85 (30%)Ships in 1-3 Business DaysProduct Specifications- Other Name: Kit, Repair Service; Switch Assembly, Magnet Starter
Scion Switch Assembly, Magnet Starter Part Number: 28150-31090
$59.48 MSRP: $83.48You Save: $24.00 (29%)Ships in 1-3 Business DaysProduct Specifications- Other Name: Switch Assembly, Main
- Replaces: 28150-31100

Scion Solenoid Part Number: SU003-00472
$191.43 MSRP: $254.19You Save: $62.76 (25%)Ships in 1-3 Business DaysProduct Specifications- Other Name: Switch Assembly-Magnetic; Switch Assembly, Magnet Starter
Scion Solenoid Part Number: SU003-00471
$214.64 MSRP: $285.00You Save: $70.36 (25%)Ships in 1-3 Business DaysProduct Specifications- Other Name: Switch Assembly-Magnetic; Switch Assembly, Magnet Starter


Scion Solenoid Part Number: 28226-22061
$107.35 MSRP: $150.68You Save: $43.33 (29%)Product Specifications- Other Name: Kit, Repair Service; Starter Solenoid; Starter Kit, Battery Terminal; Starter Kit, Repair Service
- Replaces: 28226-22060

Scion Starter Solenoid Part Number: 28226-28051
$104.15 MSRP: $146.19You Save: $42.04 (29%)Product Specifications- Other Name: Kit, Repair Service; Starter Repair Kit; Solenoid; Switch Assembly, Magnet Starter; Starter Kit, Motor Terminal; Starter Kit, Repair Service
- Manufacturer Note: NO.2
- Replaces: 28226-28050

Scion Solenoid Part Number: 28150-40130
$38.17 MSRP: $53.12You Save: $14.95 (29%)Product Specifications- Other Name: Switch Assembly, Main; Switch Assembly, Magnet Starter
- Replaces: 28150-0C080
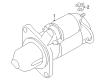
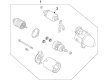
Scion Starter Solenoid
OEM parts deliver unmatched quality you can rely on. They pass extensive quality control inspections. Scion produces them to the official factory specifications. This process helps prevent defects and imperfections. So you can get exceptional lifespan and a flawless fit. Need new OEM Scion Starter Solenoid? You'll love our wide selection of genuine options. Shop in minutes and skip the hunt. Our prices are unbeatable, you'll save time and money. It's easy to shop and find the right piece. Our committed customer service team gives professional help from start to finish. Every part includes a manufacturer's warranty. We ship quickly, your parts will arrive fast at your door.
The Scion Starter Solenoid will allow your ride to start fast by being a rough kind of switch, which sends the battery power to the starter motor. In 2003, Scion was introduced, bringing brash hatchbacks and coupes that were easy to purchase, were sold in loud colors, and asked their owners to customize each and every inch, making every Scion a statement. Online build tools, virtual city events and exclusive Release Series trims attracted first time buyers who needed to have fun styling without trips to the dealership. Through selling over a million cars prior to 2016, Scion demonstrated that uncomplicated pricing and novel concepts could lure young motorists and impact the rest of the auto industry, which remains visible today in the Toyota technologies and design. The Starter Solenoid is a tiny device, however, it is essential since once triggered by a low current signal transmitted by the key, it closes a heavy duty connection allowing the starter to immediately crank the engine. An efficient Starter Solenoid eliminates slow starting. Installation of a new Scion Starter Solenoid is easy to do by the DIYers, just park on the level surface and cut the negative cable of the battery to turn off the power, and then trace the positive cable to the starter assembly and mark the position of each wire. Unscrew the mounting bolts, slide the old one out and place the replacement in the same spot and screw it firmly to provide good grounding. Reread the thick battery lead, motor cable, and control wire, clean and clear specific terminals of sharp edges or hot exhaust. Lastly reattach the battery, flip the key, hear the clack, and verify fasteners.