×
ToyotaParts- Hello
- Login or Register
- Quick Links
- Live Chat
- Track Order
- Parts Availability
- RMA
- Help Center
- Contact Us
- Shop for
- Toyota Parts
- Scion Parts
My Garage
My Account
Cart
OEM 2010 Toyota Yaris A/C Compressor
Air Conditioning Compressor- Select Vehicle by Model
- Select Vehicle by VIN
Select Vehicle by Model
orMake
Model
Year
Select Vehicle by VIN
For the most accurate results, select vehicle by your VIN (Vehicle Identification Number).
1 A/C Compressor found


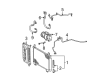
2010 Toyota Yaris Compressor Assembly
Part Number: 88310-52481$390.88 MSRP: $531.89You Save: $141.01 (27%)Ships in 1-3 Business DaysProduct Specifications- Other Name: Compressor Assembly, With Pulley; A/C Compressor; New A/C Compressor; Compressor; Compressor Assembly, W/Pulley
- Part Name Code: 88310
- Item Weight: 6.10 Pounds
- Item Dimensions: 11.4 x 11.6 x 9.3 inches
- Condition: New
- Fitment Type: Direct Replacement
- SKU: 88310-52481
- Warranty: This genuine part is guaranteed by Toyota's factory warranty.
2010 Toyota Yaris A/C Compressor
Looking for affordable OEM 2010 Toyota Yaris A/C Compressor? Explore our comprehensive catalogue of genuine 2010 Toyota Yaris A/C Compressor. All our parts are covered by the manufacturer's warranty. Plus, our straightforward return policy and speedy delivery service ensure an unparalleled shopping experience. We look forward to your visit!
2010 Toyota Yaris A/C Compressor Parts Q&A
- Q: How to install the A/C Compressor on 2010 Toyota Yaris?A: The installation process of the 1NZ-FE HVAC compressor requires an oil adjustment step where compressors discharge gas through the service valve until their oil contents match each other by measuring from the removed unit. This process includes draining all remaining oil from the condenser and cooling unit. A new compressor holds standard oil measurements at 90 (+15) cc equivalent to (3.0 (+0.51) fl.oz.). ND-OIL8 compressor oil serves as the correct option although one must maintain precise oil levels to stop refrigeration breakdown. Use a bolt to temporarily secure the compressor before applying final torque to four bolts at a pressure of 25 Nm (255 kgf-cm, 18 ft-lbf) while following proper bolt-tightening sequence. Start by installing the discharge refrigerant hose of No. 1 cooler through these steps: first remove vinyl tape then coat the O-ring with ND-OIL8 and fitting surface before placing the O-ring on the discharge hose then fasten it to the compressor with bolt at 9.8 Nm torque (100 kgf-cm, 87 in-lbf). Apply the same installation guide to connect the No. 1 cooler refrigerant suction hose. You must first install the generator V belt and fan before adjusting it for inspection testing. The RH engine under hood should be installed while the cable requires torque of 5.4 Nm (55 kgf-cm, 48 in-lbf) to connect to the negative battery terminal. The process ends with charging refrigerant followed by engine heating and then performing refrigerant leak testing.
Related 2010 Toyota Yaris Parts
 2010 Toyota Yaris Cabin Air Filter
 2010 Toyota Yaris Blower Motor
 2010 Toyota Yaris Evaporator
 2010 Toyota Yaris A/C Accumulator
 2010 Toyota Yaris A/C Condenser
 2010 Toyota Yaris A/C Expansion Valve
 2010 Toyota Yaris A/C Hose
 2010 Toyota Yaris Ambient Temperature Sensor
 2010 Toyota Yaris Blower Control Switches
 2010 Toyota Yaris Blower Motor Resistor
 2010 Toyota Yaris Heater Core