×
ToyotaParts- Hello
- Login or Register
- Quick Links
- Live Chat
- Track Order
- Parts Availability
- RMA
- Help Center
- Contact Us
- Shop for
- Toyota Parts
- Scion Parts
My Garage
My Account
Cart
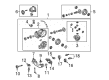
OEM 2009 Toyota Venza Differential
Front Differential- Select Vehicle by Model
- Select Vehicle by VIN
Select Vehicle by Model
orMake
Model
Year
Select Vehicle by VIN
For the most accurate results, select vehicle by your VIN (Vehicle Identification Number).
2 Differentials found

2009 Toyota Venza Differential Carrier, Rear
Part Number: 41110-58030$1093.56 MSRP: $1602.63You Save: $509.07 (32%)Ships in 1-3 Business DaysProduct Specifications- Other Name: Carrier Assembly, Differential; Drive Axle Assembly, Rear; Differential, Rear; Carrier; Differential; Carrier Assembly, Differential, Rear
- Manufacturer Note: *FGR=41:18=2.277
- Position: Rear
- Replaces: 41110-73011, 41110-73010, 41110-21052
- Part Name Code: 41110
- Item Weight: 30.60 Pounds
- Item Dimensions: 31.6 x 27.4 x 18.5 inches
- Condition: New
- Fitment Type: Direct Replacement
- SKU: 41110-58030
- Warranty: This genuine part is guaranteed by Toyota's factory warranty.

2009 Toyota Venza Case
Part Number: 41301-21030$535.82 MSRP: $785.26You Save: $249.44 (32%)Ships in 1-3 Business DaysProduct Specifications- Other Name: Case Sub-Assembly, Differential; Differential Carrier, Rear; Differential Housing, Rear; Differential; Case Sub-Assembly, Rear Differential
- Item Weight: 5.80 Pounds
- Item Dimensions: 7.5 x 7.1 x 6.6 inches
- Condition: New
- Fitment Type: Direct Replacement
- SKU: 41301-21030
- Warranty: This genuine part is guaranteed by Toyota's factory warranty.
2009 Toyota Venza Differential
Looking for affordable OEM 2009 Toyota Venza Differential? Explore our comprehensive catalogue of genuine 2009 Toyota Venza Differential. All our parts are covered by the manufacturer's warranty. Plus, our straightforward return policy and speedy delivery service ensure an unparalleled shopping experience. We look forward to your visit!
2009 Toyota Venza Differential Parts Q&A
- Q: How to remove and replace the rear differential carrier assembly on 2009 Toyota Venza?A: Begin by removing the differential oil through the use of hexagon wrench (10 mm) to extract the rear differential carrier cover plug and gasket and the rear differential drain plug and gasket. Begin your procedure by uninstalling both rear wheels together with the central exhaust pipe assembly. The first step requires users to detach the propeller and its center bearing shaft assembly along with splitting the rear speed sensors (LH and RH) from the unit and removing the rear axle shaft nuts (LH and RH). The next step should be to divide both No. 3 and No. 2 parking brake cable assemblies and then remove the No. 1 floor under cover and extract both rear strut rod assemblies (LH and RH). Working with HID headlight system vehicles first remove the rear height control sensor sub-assembly but after that you must take out the rear No. 2 suspension arm assemblies (LH and RH) followed by separating the rear No. 1 suspension arm assemblies (LH and RH). Rear drive shaft assemblies (LH and RH) along with their snap rings must be removed before setting the No. 3 floor wire apart (if HID headlight system is present) and extracting the frame wire. The technician should first remove the rear suspension member followed by the differential carrier assembly including differential support through removal of the 2 bolts and 2 nuts (noting their tabs will prevent rotation) and the 3 rear mounting bolts. The mechanism for differential support removal begins by disassembling the 3 bolts then progressing to the rear No. 1 differential support which requires removal of both 2 bolts and two nuts (noting the signature tabs on these fasteners). To replace the component you should first remove the bolt of the rear differential dynamic damper.
Related 2009 Toyota Venza Parts
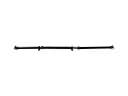 2009 Toyota Venza Drive Shaft
 2009 Toyota Venza Crankshaft Seal
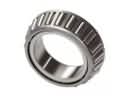 2009 Toyota Venza Differential Bearing
 2009 Toyota Venza Dipstick
 2009 Toyota Venza Exhaust Valve
 2009 Toyota Venza Intake Valve
 2009 Toyota Venza Pinion Bearing
 2009 Toyota Venza Rocker Arm
 2009 Toyota Venza Spool Valve
 2009 Toyota Venza Timing Cover
 2009 Toyota Venza Transfer Case Bearing
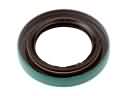 2009 Toyota Venza Transfer Case Seal