×
ToyotaParts- Hello
- Login or Register
- Quick Links
- Live Chat
- Track Order
- Parts Availability
- RMA
- Help Center
- Contact Us
- Shop for
- Toyota Parts
- Scion Parts
My Garage
My Account
Cart
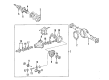
OEM 2009 Toyota Tacoma Differential
Front Differential- Select Vehicle by Model
- Select Vehicle by VIN
Select Vehicle by Model
orMake
Model
Year
Select Vehicle by VIN
For the most accurate results, select vehicle by your VIN (Vehicle Identification Number).
12 Differentials found


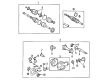
2009 Toyota Tacoma Differential Carrier, Rear
Part Number: 41110-35A21$2611.96 MSRP: $3827.86You Save: $1215.90 (32%)Ships in 1-3 Business DaysProduct Specifications- Other Name: Carrier Assembly, Differential; Differential Carrier, Rear; Differential; Carrier Assembly
- Position: Rear
- Replaces: 41110-35A20
- Item Weight: 73.50 Pounds
- Item Dimensions: 17.2 x 12.5 x 12.4 inches
- Condition: New
- SKU: 41110-35A21
- Warranty: This genuine part is guaranteed by Toyota's factory warranty.


2009 Toyota Tacoma Differential Carrier, Rear
Part Number: 41110-34341$1462.32 MSRP: $2143.05You Save: $680.73 (32%)Ships in 1-2 Business DaysProduct Specifications- Other Name: Carrier Assembly, Differential; Differential Carrier, Rear; Carrier Assembly; Carrier Assembly, Differential, Rear; Differential
- Manufacturer Note: *FGR=41:10=4.100
- Position: Rear
- Replaces: 41110-34340
- Part Name Code: 41110
- Item Weight: 78.80 Pounds
- Item Dimensions: 22.1 x 20.8 x 20.6 inches
- Condition: New
- Fitment Type: Direct Replacement
- SKU: 41110-34341
- Warranty: This genuine part is guaranteed by Toyota's factory warranty.
2009 Toyota Tacoma Differential Carrier, Rear
Part Number: 41110-35B21$2119.15 MSRP: $3105.64You Save: $986.49 (32%)Ships in 1-3 Business DaysProduct Specifications- Other Name: Carrier Assembly, Differential; Differential Carrier, Rear; Differential; Carrier Assembly
- Position: Rear
- Replaces: 41110-35B20
- Condition: New
- SKU: 41110-35B21
- Warranty: This genuine part is guaranteed by Toyota's factory warranty.

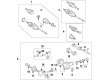
2009 Toyota Tacoma Differential Carrier, Front
Part Number: 41110-35A11$1900.21 MSRP: $2784.77You Save: $884.56 (32%)Ships in 1-3 Business DaysProduct Specifications- Other Name: Carrier Assembly, Differential; Differential, Front; Axle Shaft; Axle Assembly; Carrier; Carrier Assembly, Differential, Front; Differential
- Manufacturer Note: *FGR=41:11=3.727,PNC 41101A=TYPE A
- Position: Front
- Replaces: 41110-35A10
- Part Name Code: 41110F
- Item Weight: 58.90 Pounds
- Item Dimensions: 24.2 x 15.8 x 13.5 inches
- Condition: New
- Fitment Type: Direct Replacement
- SKU: 41110-35A11
- Warranty: This genuine part is guaranteed by Toyota's factory warranty.

2009 Toyota Tacoma Differential Carrier, Rear
Part Number: 41110-35A31$1381.40 MSRP: $2024.45You Save: $643.05 (32%)Ships in 1-3 Business DaysProduct Specifications- Other Name: Carrier Assembly, Differential; Differential Carrier, Rear; Carrier Assembly; Carrier Assembly, Differential, Rear; Differential
- Manufacturer Note: *FGR=43:13=3.307
- Position: Rear
- Replaces: 41110-35A30
- Part Name Code: 41110
- Condition: New
- Fitment Type: Direct Replacement
- SKU: 41110-35A31
- Warranty: This genuine part is guaranteed by Toyota's factory warranty.
2009 Toyota Tacoma Differential Carrier, Rear
Part Number: 41110-35A51$1462.32 MSRP: $2143.05You Save: $680.73 (32%)Ships in 1-3 Business DaysProduct Specifications- Other Name: Carrier Assembly, Differential; Differential Carrier, Rear; Carrier Assembly; Carrier Assembly, Differential, Rear; Differential
- Position: Rear
- Replaces: 41110-35A50
- Part Name Code: 41110
- Condition: New
- Fitment Type: Direct Replacement
- SKU: 41110-35A51
- Warranty: This genuine part is guaranteed by Toyota's factory warranty.

2009 Toyota Tacoma Differential Case, Rear
Part Number: 41301-60061$762.60 MSRP: $1117.59You Save: $354.99 (32%)Ships in 1-3 Business DaysProduct Specifications- Other Name: Case Sub-Assembly, Differential; Differential Carrier, Rear; Differential; Case
- Position: Rear
- Replaces: 41301-60060
- Condition: New
- SKU: 41301-60061
- Warranty: This genuine part is guaranteed by Toyota's factory warranty.

2009 Toyota Tacoma Carrier Case, Rear
Part Number: 41101-35151$416.42 MSRP: $610.27You Save: $193.85 (32%)Ships in 1-3 Business DaysProduct Specifications- Other Name: Carrier Sub-Assembly, Differential; Differential Carrier Housing, Rear; Differential Housing, Rear; Differential; Carrier Housing; Carrier
- Position: Rear
- Replaces: 41101-35150
- Condition: New
- SKU: 41101-35151
- Warranty: This genuine part is guaranteed by Toyota's factory warranty.
2009 Toyota Tacoma Differential Carrier, Rear
Part Number: 41110-35B40$1263.45 MSRP: $1851.59You Save: $588.14 (32%)Ships in 1-3 Business DaysProduct Specifications- Other Name: Carrier Assembly, Differential; Differential Carrier, Rear; Carrier Assembly; Carrier Assembly, Differential, Rear; Differential
- Position: Rear
- Part Name Code: 41110
- Item Weight: 82.50 Pounds
- Item Dimensions: 29.3 x 26.1 x 17.7 inches
- Condition: New
- Fitment Type: Direct Replacement
- SKU: 41110-35B40
- Warranty: This genuine part is guaranteed by Toyota's factory warranty.
2009 Toyota Tacoma Differential Case
Part Number: 41302-34010$426.18 MSRP: $624.57You Save: $198.39 (32%)Ships in 1-3 Business DaysProduct Specifications- Other Name: Case Sub-Assembly, Differential; Case Sub-Assembly, Rear Differential; Differential
- Manufacturer Note: WITH(LSD)
- Part Name Code: 41302
- Item Weight: 6.40 Pounds
- Item Dimensions: 6.9 x 6.8 x 6.4 inches
- Condition: New
- Fitment Type: Direct Replacement
- SKU: 41302-34010
- Warranty: This genuine part is guaranteed by Toyota's factory warranty.
2009 Toyota Tacoma Differential Carrier, Front
Part Number: 41110-71141$1970.01 MSRP: $2887.07You Save: $917.06 (32%)Product Specifications- Other Name: Carrier Assembly, Differential; Differential, Front; Carrier; Carrier Assembly, Differential, Front; Differential
- Manufacturer Note: *FGR=41:10=4.100
- Position: Front
- Replaces: 41110-71140
- Part Name Code: 41110F
- Condition: New
- Fitment Type: Direct Replacement
- SKU: 41110-71141
- Warranty: This genuine part is guaranteed by Toyota's factory warranty.
2009 Toyota Tacoma Differential Carrier, Rear
Part Number: 41110-35A41$1381.40 MSRP: $2024.45You Save: $643.05 (32%)Product Specifications- Other Name: Carrier Assembly, Differential; Differential Carrier, Rear; Carrier Assembly; Carrier Assembly, Differential, Rear; Differential
- Manufacturer Note: *FGR=43:12=3.583
- Position: Rear
- Replaces: 41110-35A40
- Part Name Code: 41110
- Condition: New
- Fitment Type: Direct Replacement
- SKU: 41110-35A41
- Warranty: This genuine part is guaranteed by Toyota's factory warranty.
2009 Toyota Tacoma Differential
Looking for affordable OEM 2009 Toyota Tacoma Differential? Explore our comprehensive catalogue of genuine 2009 Toyota Tacoma Differential. All our parts are covered by the manufacturer's warranty. Plus, our straightforward return policy and speedy delivery service ensure an unparalleled shopping experience. We look forward to your visit!
2009 Toyota Tacoma Differential Parts Q&A
- Q: How to remove and replace the rear differential carrier assembly with a differential lock on 2009 Toyota Tacoma?A: The process to change the rear differential carrier assembly with differential lock starts by disconnecting the negative battery cable followed by removing the rear wheel and draining brake fluid. The braking process starts by extracting the rear brake drum sub-assembly and then proceeding to remove the front and rear brake shoes. Drivers who possess 2WD drive systems need to eliminate either the regular cab propeller shaft or the propeller with center bearing shaft for models different from regular cab. The 4WD on each cabinet must undergo identical steps to specific cab arrangements. Start by drain the differential oil and proceed to disconnect the rear speed sensors on both left and right sides while applying the same method to the right side as for the left side. For cable assembly separation of No.3 then No.2 parking brake use the right side procedure which mirrors left side commands. The rear axle shaft must be detached with backing plate from both sides before finalizing the removal of the rear differential carrier assembly through connection disconnection of differential lock actuator and breather hose followed by differential carrier assembly nut removal. Caution should be applied to prevent damage of the contact surfaces on the differential carrier and rear axle housing before extracting the rear differential carrier gasket from the assembly.
Related 2009 Toyota Tacoma Parts
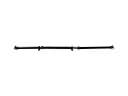 2009 Toyota Tacoma Drive Shaft
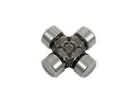 2009 Toyota Tacoma Universal Joint
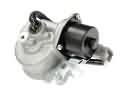 2009 Toyota Tacoma 4WD Actuator
 2009 Toyota Tacoma CV Joint Companion Flange
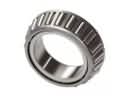 2009 Toyota Tacoma Differential Bearing
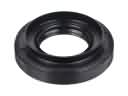 2009 Toyota Tacoma Differential Seal
 2009 Toyota Tacoma Pinion Bearing
 2009 Toyota Tacoma Transfer Case Bearing
 2009 Toyota Tacoma Transfer Case Seal