×
ToyotaParts- Hello
- Login or Register
- Quick Links
- Live Chat
- Track Order
- Parts Availability
- RMA
- Help Center
- Contact Us
- Shop for
- Toyota Parts
- Scion Parts
My Garage
My Account
Cart
OEM 2009 Toyota Sequoia Exhaust Pipe
Exhaust Tail Pipe- Select Vehicle by Model
- Select Vehicle by VIN
Select Vehicle by Model
orMake
Model
Year
Select Vehicle by VIN
For the most accurate results, select vehicle by your VIN (Vehicle Identification Number).
9 Exhaust Pipes found


2009 Toyota Sequoia Front Pipe
Part Number: 17410-0S070$1589.67 MSRP: $2133.80You Save: $544.13 (26%)Product Specifications- Other Name: Pipe Assembly, Exhaust; Catalytic Converter, Right; Exhaust Pipe; Pipe Assembly, Exhaust, Front
- Position: Front
- Part Name Code: 17410
- Item Weight: 13.10 Pounds
- Condition: New
- Fitment Type: Direct Replacement
- SKU: 17410-0S070
- Warranty: This genuine part is guaranteed by Toyota's factory warranty.


2009 Toyota Sequoia Front Pipe
Part Number: 17410-0S011$1746.75 MSRP: $2344.65You Save: $597.90 (26%)Product Specifications- Other Name: Pipe Assembly, Exhaust; Catalytic Converter, Right; Exhaust Pipe; Pipe Assembly, Exhaust, Front
- Position: Front
- Replaces: 17410-0S010
- Part Name Code: 17410
- Item Weight: 11.00 Pounds
- Item Dimensions: 48.6 x 18.4 x 9.1 inches
- Condition: New
- Fitment Type: Direct Replacement
- SKU: 17410-0S011
- Warranty: This genuine part is guaranteed by Toyota's factory warranty.

2009 Toyota Sequoia Tail Pipe
Part Number: 17430-0S021$272.25 MSRP: $356.03You Save: $83.78 (24%)Ships in 1-3 Business DaysProduct Specifications- Other Name: Pipe Assembly, Exhaust Tail; Exhaust Tail Pipe; Exhaust Pipe; Tailpipe; Pipe Assembly, Exhaust, Tail
- Replaces: 17430-0S020
- Part Name Code: 17430
- Item Weight: 11.00 Pounds
- Item Dimensions: 44.4 x 12.3 x 9.0 inches
- Condition: New
- Fitment Type: Direct Replacement
- SKU: 17430-0S021
- Warranty: This genuine part is guaranteed by Toyota's factory warranty.

2009 Toyota Sequoia Front Pipe, Driver Side
Part Number: 17450-0S140$1846.75 MSRP: $2478.87You Save: $632.12 (26%)Ships in 1-3 Business DaysProduct Specifications- Other Name: Pipe Assembly, Exhaust Front; Catalytic Converter, Left; Exhaust Pipe; Pipe Assembly, Exhaust, Front
- Position: Front Driver Side
- Replaces: 17450-0S011, 17450-0S010
- Part Name Code: 17450B
- Item Weight: 6.30 Pounds
- Condition: New
- Fitment Type: Direct Replacement
- SKU: 17450-0S140
- Warranty: This genuine part is guaranteed by Toyota's factory warranty.

2009 Toyota Sequoia Front Pipe, Driver Side
Part Number: 17450-0F120$1849.58 MSRP: $2482.68You Save: $633.10 (26%)Ships in 1-3 Business DaysProduct Specifications- Other Name: Pipe Assembly, Exhaust Front; Catalytic Converter, Left; Exhaust Pipe; Pipe Assembly, Exhaust, Front
- Position: Front Driver Side
- Part Name Code: 17450B
- Item Weight: 11.20 Pounds
- Item Dimensions: 40.8 x 14.4 x 8.7 inches
- Condition: New
- Fitment Type: Direct Replacement
- SKU: 17450-0F120
- Warranty: This genuine part is guaranteed by Toyota's factory warranty.

2009 Toyota Sequoia Front Pipe
Part Number: 17410-0F090$1934.48 MSRP: $2596.64You Save: $662.16 (26%)Ships in 1-3 Business DaysProduct Specifications- Other Name: Pipe Assembly, Exhaust; Catalytic Converter, Right; Exhaust Pipe; Pipe Assembly, Exhaust, Front
- Position: Front
- Part Name Code: 17410
- Item Weight: 11.00 Pounds
- Item Dimensions: 48.6 x 17.7 x 9.5 inches
- Condition: New
- Fitment Type: Direct Replacement
- SKU: 17410-0F090
- Warranty: This genuine part is guaranteed by Toyota's factory warranty.

2009 Toyota Sequoia Muffler & Pipe, Center
Part Number: 17420-0S040$485.20 MSRP: $651.28You Save: $166.08 (26%)Product Specifications- Other Name: Pipe Assembly, Exhaust; Exhaust Muffler; Exhaust Pipe; Tail Pipe; Muffler; Pipe Assembly, Exhaust, Center
- Position: Center
- Part Name Code: 17420
- Item Weight: 17.20 Pounds
- Item Dimensions: 50.9 x 20.0 x 9.1 inches
- Condition: New
- Fitment Type: Direct Replacement
- SKU: 17420-0S040
- Warranty: This genuine part is guaranteed by Toyota's factory warranty.
 Product Specifications
- Other Name: Pipe Assembly, Exhaust Tail; Exhaust Tail Pipe; Exhaust Pipe; Tailpipe; Pipe Assembly, Exhaust, Tail
- Part Name Code: 17430
- Item Weight: 11.00 Pounds
- Item Dimensions: 44.4 x 12.8 x 8.9 inches
- Condition: New
- Fitment Type: Direct Replacement
- SKU: 17430-0F020
- Warranty: This genuine part is guaranteed by Toyota's factory warranty.
 Product Specifications
- Other Name: Pipe Assembly, Exhaust; Exhaust Muffler; Exhaust Pipe; Tail Pipe; Muffler; Pipe Assembly, Exhaust, Center
- Position: Center
- Part Name Code: 17420
- Item Weight: 16.60 Pounds
- Item Dimensions: 51.9 x 19.6 x 9.1 inches
- Condition: New
- Fitment Type: Direct Replacement
- SKU: 17420-0F060
- Warranty: This genuine part is guaranteed by Toyota's factory warranty.
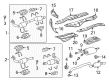
2009 Toyota Sequoia Exhaust Pipe
Looking for affordable OEM 2009 Toyota Sequoia Exhaust Pipe? Explore our comprehensive catalogue of genuine 2009 Toyota Sequoia Exhaust Pipe. All our parts are covered by the manufacturer's warranty. Plus, our straightforward return policy and speedy delivery service ensure an unparalleled shopping experience. We look forward to your visit!
2009 Toyota Sequoia Exhaust Pipe Parts Q&A
- Q: How to install the exhaust pipe and its components on 2009 Toyota Sequoia?A: Start the exhaust pipe installation by attaching the 4 converter protector stays and monolithic converter protector with 4 bolts and 4 nuts where torque reaches 11 Nm (107 kgf-cm, 8 ft-lbf) while keeping the protector inside its designated angle range. The installation of Bank 1 Sensor 2's heated oxygen sensor begins by using Special Service Tool: 09224-00010 until reaching 40 Nm (408 kgf-cm, 30 ft-lbf) torque for a direct wrench connection or it requires a 44 Nm (449 kgf-cm, 33 ft-lbf) torque when using the tool is not present. Duplicate the same procedure for the air fuel ratio sensor located at Bank 1 Sensor 1. Install a new gasket onto the front No. 2 exhaust pipe assembly and use three new nuts to fasten it while torquing them to 54 Nm (554 kgf-cm, 40 ft-lbf). Plugin the heated oxygen sensor and air fuel ratio sensor connectors after attachment. The front No. 1 monolithic converter protector needs installation with 4 bolts and 4 nuts that each require torquing to 11 Nm (107 kgf-cm, 8 ft-lbf) while maintaining correct angle alignment. Install the front No. 3 exhaust pipe sub-assembly by using a new gasket and connecting it to the exhaust pipe support before securing it with 2 bolts and 2 nuts which need torquing to 48 Nm (489 kgf-cm, 35 ft-lbf). Install the No. 1 monolithic converter protector according to the previous procedures. In order to install the heated oxygen sensor for Bank 2 Sensor 2 use Special Service Tool: 09224-00010 while maintaining the same torque requirements as before. Use the same tool and torque specifications to install the air fuel ratio sensor for Bank 2 Sensor 1. Install a new gasket to the front exhaust pipe assembly followed by connecting three new nuts that should be torqued to 54 Nm (554 kgf-cm, 40 ft-lbf) and attaching the sensor connectors accordingly. The center exhaust pipe assembly installation starts with two new gaskets before connecting it to the three exhaust pipe supports by tightening four bolts to 48 Nm (489 kgf-cm, 35 ft-lbf). Finish the installation by attaching a new gasket to the center exhaust pipe assembly, joining the tail exhaust pipe assembly to the exhaust pipe support using a new clamp which must be torqued to 32 Nm (326 kgf-cm, 24 ft-lbf) and checked for simultaneous compliance with the range of specified angle measurements.
Related 2009 Toyota Sequoia Parts
 2009 Toyota Sequoia Catalytic Converter
 2009 Toyota Sequoia Air Injection Pump
 2009 Toyota Sequoia Exhaust Manifold
 2009 Toyota Sequoia Muffler
 2009 Toyota Sequoia Canister Purge Valve
 2009 Toyota Sequoia Diverter Valve
 2009 Toyota Sequoia Exhaust Flange Gasket
 2009 Toyota Sequoia Exhaust Hanger
 2009 Toyota Sequoia Exhaust Heat Shield
 2009 Toyota Sequoia Exhaust Manifold Gasket
 2009 Toyota Sequoia PCV Valve
 2009 Toyota Sequoia Vapor Canister