×
ToyotaParts- Hello
- Login or Register
- Quick Links
- Live Chat
- Track Order
- Parts Availability
- RMA
- Help Center
- Contact Us
- Shop for
- Toyota Parts
- Scion Parts
My Garage
My Account
Cart
OEM 2009 Toyota Highlander Drive Shaft
Axle Shaft- Select Vehicle by Model
- Select Vehicle by VIN
Select Vehicle by Model
orMake
Model
Year
Select Vehicle by VIN
For the most accurate results, select vehicle by your VIN (Vehicle Identification Number).
1 Drive Shaft found

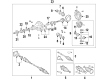
2009 Toyota Highlander Drive Shaft
Part Number: 37100-48030$785.52 MSRP: $1151.20You Save: $365.68 (32%)Ships in 1-3 Business DaysProduct Specifications- Other Name: Shaft Assembly, Propeller; Driveshaft; Shaft Assembly, Propeller W/Center Bearing
- Part Name Code: 37100
- Item Weight: 49.10 Pounds
- Item Dimensions: 104.0 x 8.2 x 7.2 inches
- Condition: New
- Fitment Type: Direct Replacement
- SKU: 37100-48030
- Warranty: This genuine part is guaranteed by Toyota's factory warranty.
2009 Toyota Highlander Drive Shaft
Looking for affordable OEM 2009 Toyota Highlander Drive Shaft? Explore our comprehensive catalogue of genuine 2009 Toyota Highlander Drive Shaft. All our parts are covered by the manufacturer's warranty. Plus, our straightforward return policy and speedy delivery service ensure an unparalleled shopping experience. We look forward to your visit!
2009 Toyota Highlander Drive Shaft Parts Q&A
- Q: How to install the Drive Shaft assembly on 2009 Toyota Highlander?A: A proper installation requires temporarily holding the propeller shaft in position by joining its flange with the differential companion while matching the alignment marks. Afterwards, the assembly needs four bolts, four washers, and four nuts to secure it. Insert the yoke into the transaxle and place four adjusting shims on the propeller shaft assembly with the center bearing. Secure four bolts with light torque then fully tighten them to 74 Nm (750 kgf-cm, 54 ft-lbf). Use a 6 mm hexagon wrench to secure the 6 bolts to 26 Nm (265 kgf-cm, 19 ft-lbf) torque while all cloth covering is removed from the joint area. After emptying the vehicle, adjust the distance between cover shaft rear surface and shaft to 58.0 +/- 0.5 mm (2.283 +/- 0.02 in.) before checking the dimension between center support bearing edge surface and cushion edge surface to 12.5 +/- 1.0 mm (0.492 +/- 0.039 in.) followed by a bolt torque of 37 Nm (375 kgf-cm, 27 ft-lbf). Check the bracket center line alignment with the shaft axial direction using a right angle and perform a joint angle check by manually rotating the propeller shaft to stabilize support bearings then raising and lowering the differential with a jack to stabilize the differential mounting cushion followed by removing the transfer dynamic damper. You must use Special Service Tool: 09370-50010 to measure the transfer installation angle (A) and front propeller shaft installation angle (B) before confirming that the No. 1 joint angle (A) - (B) is within the range of -1.3 degrees to -3.3 degrees. The measurement of the rear propeller shaft installation angle (C) and rear differential shaft installation angle (D) must yield a No. 2 joint angle (C) - (D) between 1.8 degrees to 3.5 degrees. The installation process requires adjusting the center support bearing with its adjusting shim until all measured angles reach their specified values. Then install the transfer dynamic damper while tightening it to 26 Nm (265 kgf-cm, 19 ft-lbf). Inspect and set the transfer oil as the last step of the process.
Related 2009 Toyota Highlander Parts
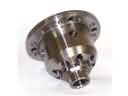 2009 Toyota Highlander Differential
 2009 Toyota Highlander CV Joint Companion Flange
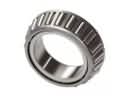 2009 Toyota Highlander Differential Bearing
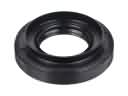 2009 Toyota Highlander Differential Seal
 2009 Toyota Highlander Pinion Bearing
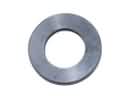 2009 Toyota Highlander Pinion Washer
 2009 Toyota Highlander Transfer Case Bearing
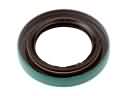 2009 Toyota Highlander Transfer Case Seal