×
ToyotaParts- Hello
- Login or Register
- Quick Links
- Live Chat
- Track Order
- Parts Availability
- RMA
- Help Center
- Contact Us
- Shop for
- Toyota Parts
- Scion Parts
My Garage
My Account
Cart
OEM 2009 Toyota Avalon Fuel Tank
Gas Tank- Select Vehicle by Model
- Select Vehicle by VIN
Select Vehicle by Model
orMake
Model
Year
Select Vehicle by VIN
For the most accurate results, select vehicle by your VIN (Vehicle Identification Number).
1 Fuel Tank found

 Product Specifications
- Other Name: Tank Sub-Assembly, Fuel; Fuel Tank
- Replaces: 77001-06111, 77001-33192
- Part Name Code: 77100
- Item Weight: 36.90 Pounds
- Item Dimensions: 15.3 x 10.5 x 49.7 inches
- Condition: New
- Fitment Type: Direct Replacement
- SKU: 77001-06112
- Warranty: This genuine part is guaranteed by Toyota's factory warranty.
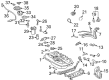
2009 Toyota Avalon Fuel Tank
Looking for affordable OEM 2009 Toyota Avalon Fuel Tank? Explore our comprehensive catalogue of genuine 2009 Toyota Avalon Fuel Tank. All our parts are covered by the manufacturer's warranty. Plus, our straightforward return policy and speedy delivery service ensure an unparalleled shopping experience. We look forward to your visit!
2009 Toyota Avalon Fuel Tank Parts Q&A
- Q: How to install the fuel tank assembly and related components on 2009 Toyota Avalon?A: Begin fuel tank assembly installation by adding 4 clip nuts after which you can add the 2 pin-equipped fuel tank bands. Connect the fuel tank vent hose along with the fuel tank inlet pipe using the fuel filter pipe clamp followed by tightening the 2 set bolts on the fuel tank bands to 39 Nm (400 kgf-cm, 29 ft-lbf). After connecting Fuel Tube Number 1 by inserting the connector into the pipe until a "click" sound indicates proper pairing the technician should verify the connection by attempting to separate the components. Use the fuel pump tube connector to push it into place until the retainer claws engage. Then check for damage as well as a secure connection. The fuel tank protector lower center requires installation torque of 5.4 Nm (55 kgf-cm, 48 in-lbf). Begin with parking brake cable assembly No. 3 installation using a bolt tightened to 6.0 Nm (61 kgf-cm, 53 in-lbf) then proceed to attach the nut to 8.5 Nm (87 kgf-cm, 75 in-lbf) before completing the installation with parking brake cable assembly No. 2 at the same torque values. Attach the exhaust pipe assembly center, alongside the fuel suction tube assembly joined to the pump and gauge with the fuel tank vent tube set plate. After connecting the fuel pump tube sub-assembly the system requires fuel addition prior to connecting the cable to the negative battery terminal but system initialization might be necessary after the process. Inspection for fuel and exhaust gas leaks should be followed by installation of rear floor service hole cover along with the rear seat cushion assembly.
Related 2009 Toyota Avalon Parts
 2009 Toyota Avalon Air Filter
 2009 Toyota Avalon Mass Air Flow Sensor
 2009 Toyota Avalon Air Duct
 2009 Toyota Avalon Air Intake Coupling
 2009 Toyota Avalon Fuel Filler Neck
 2009 Toyota Avalon Fuel Injector
 2009 Toyota Avalon Fuel Injector O-Ring
 2009 Toyota Avalon Fuel Level Sensor
 2009 Toyota Avalon Fuel Pressure Regulator
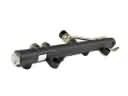 2009 Toyota Avalon Fuel Rail
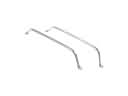 2009 Toyota Avalon Fuel Tank Strap
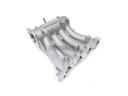 2009 Toyota Avalon Intake Manifold