×
ToyotaParts- Hello
- Login or Register
- Quick Links
- Live Chat
- Track Order
- Parts Availability
- RMA
- Help Center
- Contact Us
- Shop for
- Toyota Parts
- Scion Parts
My Garage
My Account
Cart
OEM 2008 Toyota Prius Fuel Injector
Gas Injector- Select Vehicle by Model
- Select Vehicle by VIN
Select Vehicle by Model
orMake
Model
Year
Select Vehicle by VIN
For the most accurate results, select vehicle by your VIN (Vehicle Identification Number).
1 Fuel Injector found


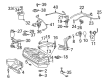
2008 Toyota Prius Injector
Part Number: 23209-21020$158.61 MSRP: $224.54You Save: $65.93 (30%)Ships in 1-3 Business DaysProduct Specifications- Other Name: Injector Set, Fuel; Fuel Injector; Injector Assembly, Fuel
- Part Name Code: 23250
- Item Weight: 0.60 Pounds
- Item Dimensions: 3.7 x 2.6 x 1.4 inches
- Condition: New
- Fitment Type: Direct Replacement
- Require Quantity: 4
- SKU: 23209-21020
- Warranty: This genuine part is guaranteed by Toyota's factory warranty.
2008 Toyota Prius Fuel Injector
Looking for affordable OEM 2008 Toyota Prius Fuel Injector? Explore our comprehensive catalogue of genuine 2008 Toyota Prius Fuel Injector. All our parts are covered by the manufacturer's warranty. Plus, our straightforward return policy and speedy delivery service ensure an unparalleled shopping experience. We look forward to your visit!
2008 Toyota Prius Fuel Injector Parts Q&A
- Q: How to install the fuel injector on 2008 Toyota Prius?A: The 1NZ-FXE fuel injector installation begins with applying spindle oil or gasoline to a fresh O-ring before mounting it onto each fuel injector after which the fuel delivery pipe surface that touches the O-ring needs treatment with the same oil and then the installation process starts. Follow the oil application on the O-ring by installing the fuel injector through right and left turning motions while pushing it onto the fuel delivery pipe while double-checking that the O-ring remains uncracked and unjammed. Examine the fuel injector movement for smooth performance because newly installed O-rings might need replacement if the fuel injector does not rotate without effort. You need to carefully install 4 new insulators and the 2 No. 1 delivery pipe spacers to the cylinder head while considering proper direction. Insert the fuel delivery pipe with all 4 fuel injectors before installing the 3 temporary bolts while avoiding droppage of the components. Verify the fuel injector rotation smoothness then torque bolts A and B to 19 Nm, 194 kgf-cm, 14 ft-lbf and 9.0 Nm, 92 kgf-cm, 80 in-lbf respectively. After fitting the fuel tube to the delivery pipe secure the No. 1 fuel pipe clamp. First, install the cylinder head cover sub-assembly and place the reservoir bracket through bolt 1 before tightening all three bolts to 8.5 Nm (87 kgf-cm, 75 in-lbf) according to a specified order. Place the connector clamp while also installing the wire harness clamp beside the No. 2 fuel vapor feed hose to its corresponding hose clamp. The brake master cylinder reservoir sub-assembly needs to be installed with 2 bolts done at 8.5 Nm (87 kgf-cm, 75 in-lbf) torque setting. Then connect the switch connector. The front outer cowl top panel sub-assembly receives 7 bolts tightened to 6.4 Nm (65 kgf-cm, 57 in-lbf) during assembly. This installation requires the connection of 4 wire harness clamps and the No. 2 engine room relay block requires 2 bolts to be tightened at 8.4 Nm (86 kgf-cm, 74 in-lbf). Wipe down and install the windshield wiper motor while linking it to the negative side of the battery before connecting the cable and examining for fuel leaks and completing initialization steps. Keep in mind that some systems need additional initialization when disconnecting then reconnecting the negative battery terminal.
Related 2008 Toyota Prius Parts
 2008 Toyota Prius Fuel Pump
 2008 Toyota Prius Fuel Tank
 2008 Toyota Prius Gas Cap
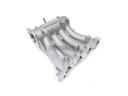 2008 Toyota Prius Intake Manifold
 2008 Toyota Prius Mass Air Flow Sensor
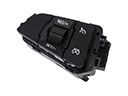 2008 Toyota Prius Cruise Control Switch
 2008 Toyota Prius Fuel Filler Neck
 2008 Toyota Prius Fuel Injector O-Ring
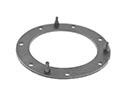 2008 Toyota Prius Fuel Pump Gasket
 2008 Toyota Prius Fuel Pump Seal
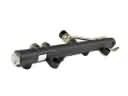 2008 Toyota Prius Fuel Rail
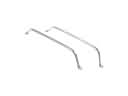 2008 Toyota Prius Fuel Tank Strap