×
ToyotaParts- Hello
- Login or Register
- Quick Links
- Live Chat
- Track Order
- Parts Availability
- RMA
- Help Center
- Contact Us
- Shop for
- Toyota Parts
- Scion Parts
My Garage
My Account
Cart
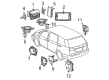
OEM 2007 Toyota Tundra Car Speakers
Audio Speakers- Select Vehicle by Model
- Select Vehicle by VIN
Select Vehicle by Model
orMake
Model
Year
Select Vehicle by VIN
For the most accurate results, select vehicle by your VIN (Vehicle Identification Number).
10 Car Speakers found


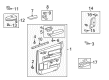
2007 Toyota Tundra Front Driver Speaker
Part Number: 86160-AC450$88.98 MSRP: $121.06You Save: $32.08 (27%)Ships in 1-2 Business DaysProduct Specifications- Other Name: Speaker Assembly, Radio; Speaker, Front, Front Rearward, Front Upper, Front Upper Outer, Rear Upper; Rear Driver Speaker; Speaker; Tweeter; Speaker Assembly, Front; Speaker Assembly, Rear
- Item Weight: 1.40 Pounds
- Item Dimensions: 10.1 x 7.1 x 7.3 inches
- Condition: New
- Fitment Type: Direct Replacement
- Require Quantity: 2
- SKU: 86160-AC450
- Warranty: This genuine part is guaranteed by Toyota's factory warranty.


2007 Toyota Tundra Front Driver Speaker, Rear
Part Number: 86160-AC280$171.30 MSRP: $235.03You Save: $63.73 (28%)Ships in 1-3 Business DaysProduct Specifications- Other Name: Speaker Assembly, Radio; Speaker, Center, Center Rear, Front Lower, Rear Lower, Rear Lower Outer; Rear Driver Speaker; Speaker; Speaker Assembly, Front; Speaker Assembly, Rear; Speaker Set, Rear
- Position: Rear
- Item Weight: 4.20 Pounds
- Item Dimensions: 15.1 x 13.1 x 6.7 inches
- Condition: New
- Fitment Type: Direct Replacement
- Require Quantity: 2
- SKU: 86160-AC280
- Warranty: This genuine part is guaranteed by Toyota's factory warranty.


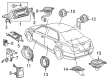
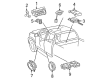
2007 Toyota Tundra Instrument Panel Speaker, Front
Part Number: 86160-0C070$154.27 MSRP: $211.66You Save: $57.39 (28%)Ships in 1-3 Business DaysProduct Specifications- Other Name: Speaker Assembly, Radio; Speaker, Inner, Outer; Speaker; Tweeter; Speaker Assembly, Front; Speaker Set, Front
- Position: Front
- Item Weight: 0.90 Pounds
- Condition: New
- Fitment Type: Direct Replacement
- SKU: 86160-0C070
- Warranty: This genuine part is guaranteed by Toyota's factory warranty.


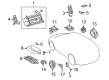
2007 Toyota Tundra Front Driver Speaker
Part Number: 86160-0C150$125.48 MSRP: $172.16You Save: $46.68 (28%)Ships in 1-2 Business DaysProduct Specifications- Other Name: Speaker Assembly, Radio; Speaker, Center Front, Front Lower; Speaker; Speaker Assembly, Front
- Part Name Code: 86160
- Item Weight: 4.30 Pounds
- Item Dimensions: 15.1 x 13.7 x 6.5 inches
- Condition: New
- Fitment Type: Direct Replacement
- Require Quantity: 2
- SKU: 86160-0C150
- Warranty: This genuine part is guaranteed by Toyota's factory warranty.


2007 Toyota Tundra Instrument Panel Speaker, Front
Part Number: 86160-AE010$120.91 MSRP: $171.16You Save: $50.25 (30%)Ships in 1-3 Business DaysProduct Specifications- Other Name: Speaker Assembly, Radio; Speaker, Front, Outer; Speaker; Tweeter; Speaker Assembly, Front; Speaker Set, Front
- Position: Front
- Item Weight: 0.90 Pounds
- Condition: New
- Fitment Type: Direct Replacement
- Require Quantity: 2
- SKU: 86160-AE010
- Warranty: This genuine part is guaranteed by Toyota's factory warranty.


2007 Toyota Tundra Instrument Panel Speaker
Part Number: 86160-AA440$188.36 MSRP: $268.93You Save: $80.57 (30%)Ships in 1-3 Business DaysProduct Specifications- Other Name: Speaker Assembly, Radio; Speaker, Center, Center Front, Front, Front Lower; Front Driver Speaker; Speaker; Speaker Assembly, Front
- Part Name Code: 86160
- Item Weight: 2.40 Pounds
- Item Dimensions: 12.4 x 9.5 x 7.3 inches
- Condition: New
- Fitment Type: Direct Replacement
- Require Quantity: 2
- SKU: 86160-AA440
- Warranty: This genuine part is guaranteed by Toyota's factory warranty.

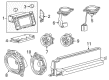
2007 Toyota Tundra Woofer
Part Number: 86150-0C020$616.18 MSRP: $875.21You Save: $259.03 (30%)Ships in 1-3 Business DaysProduct Specifications- Other Name: Speaker Assembly, With Box; Speaker; Speaker Assembly, W/Box
- Part Name Code: 86150
- Condition: New
- Fitment Type: Direct Replacement
- SKU: 86150-0C020
- Warranty: This genuine part is guaranteed by Toyota's factory warranty.
2007 Toyota Tundra Woofer
Part Number: 86150-0C010$622.08 MSRP: $883.59You Save: $261.51 (30%)Ships in 1-3 Business DaysProduct Specifications- Other Name: Speaker Assembly, With Box; Speaker; Speaker Assembly, W/Box
- Part Name Code: 86150
- Condition: New
- Fitment Type: Direct Replacement
- SKU: 86150-0C010
- Warranty: This genuine part is guaranteed by Toyota's factory warranty.

2007 Toyota Tundra Door Speaker, Rear
Part Number: 86160-AC290$139.13 MSRP: $196.96You Save: $57.83 (30%)Ships in 1-3 Business DaysProduct Specifications- Other Name: Speaker Assembly, Radio; Speaker, Center, Center Rear, Front, Front Lower, Rear, Rear Lower, Rear Lower Outer; Front Driver Speaker; Rear Driver Speaker; Speaker; Speaker Assembly, Front; Speaker Assembly, Rear; Speaker Set, Rear
- Position: Rear
- Item Weight: 4.20 Pounds
- Item Dimensions: 15.6 x 13.3 x 6.5 inches
- Condition: New
- Fitment Type: Direct Replacement
- Require Quantity: 2
- SKU: 86160-AC290
- Warranty: This genuine part is guaranteed by Toyota's factory warranty.

2007 Toyota Tundra Instrument Panel Speaker, Center
Part Number: 86160-AC260$217.84 MSRP: $311.03You Save: $93.19 (30%)Ships in 1-3 Business DaysProduct Specifications- Other Name: Speaker Assembly, Radio; Speaker, Center, Front Inner; Speaker; Speaker Assembly, Stereo Component; Speaker Assembly, Front
- Position: Center
- Item Weight: 0.60 Pounds
- Condition: New
- Fitment Type: Direct Replacement
- SKU: 86160-AC260
- Warranty: This genuine part is guaranteed by Toyota's factory warranty.
2007 Toyota Tundra Car Speakers
Looking for affordable OEM 2007 Toyota Tundra Car Speakers? Explore our comprehensive catalogue of genuine 2007 Toyota Tundra Car Speakers. All our parts are covered by the manufacturer's warranty. Plus, our straightforward return policy and speedy delivery service ensure an unparalleled shopping experience. We look forward to your visit!
2007 Toyota Tundra Car Speakers Parts Q&A
- Q: How to remove and install the Instrument Panel Car Speakers for Double Cab on 2007 Toyota Tundra?A: The first step to remove the Instrument Panel Speaker for Double Cab starts with taking off the negative battery cable terminal while allowing enough time before restarting the ignition (at least 90 seconds). The first step requires removal of Front Pillar Garnish LH and RH which must be followed by detachment of the 4 clips and claw from the No.1 Instrument Panel Speaker Panel Sub-Assembly by using a screwdriver with a taped tip. The removal procedure for the No.2 Instrument Panel Speaker Panel Sub-Assembly should follow the same step-by-step process. Trainees must detach the 2 bolts from Front No.2 Speaker Assembly LH and RH before disconnection of connectors while refraining from touching speaker cones. The removal of the No.3 Instrument Panel Speaker Panel Sub-Assembly happens through disconnection of six clips and two claws. Relocate the Front No.4 Speaker Assembly in vehicles with 10 speakers by first disconnecting the connector and secondly removing the 2 bolts while keeping the cone part free from contact. Install the Front No.4 Speaker Assembly by connecting it to the instrument panel while temporarily aligning it with 2 bolts then secure them without causing wire damage. To install the No.3 Instrument Panel Speaker Panel Sub-Assembly begin by attaching the 6 clips and 2 claws followed by the Front No.2 Speaker Assembly RH and LH by connecting speaker connectors then alignment and securing it with 2 bolts taking care with wires. Reattach the instrument panel speaker panel sub-assemblies no.2 and no.1 while fitting their clips and claws in place before reinserting the front pillar garnishes RH and LH along with reconnecting the negative battery terminal cable. System initialization might be necessary after reconnecting in some cases.
Related 2007 Toyota Tundra Parts
 2007 Toyota Tundra Armrest
 2007 Toyota Tundra Door Check
 2007 Toyota Tundra Door Seal
 2007 Toyota Tundra Window Regulator
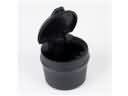 2007 Toyota Tundra Ashtray
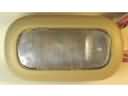 2007 Toyota Tundra Dome Light
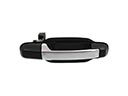 2007 Toyota Tundra Door Handle
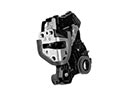 2007 Toyota Tundra Door Lock
 2007 Toyota Tundra Door Lock Cylinder
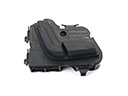 2007 Toyota Tundra Seat Switch
 2007 Toyota Tundra Weather Strip
 2007 Toyota Tundra Window Crank Handles