×
ToyotaParts- Hello
- Login or Register
- Quick Links
- Live Chat
- Track Order
- Parts Availability
- RMA
- Help Center
- Contact Us
- Shop for
- Toyota Parts
- Scion Parts
My Garage
My Account
Cart
OEM 2007 Toyota Corolla Shock Absorber
Suspension Shock Absorber- Select Vehicle by Model
- Select Vehicle by VIN
Select Vehicle by Model
orMake
Model
Year
Select Vehicle by VIN
For the most accurate results, select vehicle by your VIN (Vehicle Identification Number).
4 Shock Absorbers found


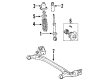
2007 Toyota Corolla Shock Absorber
Part Number: 48530-09F90$114.22 MSRP: $160.33You Save: $46.11 (29%)Ships in 1-3 Business DaysProduct Specifications- Other Name: Absorber Assembly Set, S; Rear Shock Absorber; Suspension Strut Kit; Complete Strut; Absorber Assembly, Shock, Rear Passenger Side; Absorber Assembly, Shock, Rear Driver Side; Shock
- Manufacturer Note: MARK 48530-02341
- Replaces: 48530-09750
- Item Weight: 6.10 Pounds
- Item Dimensions: 26.1 x 6.8 x 5.7 inches
- Condition: New
- Fitment Type: Direct Replacement
- SKU: 48530-09F90
- Warranty: This genuine part is guaranteed by Toyota's factory warranty.

2007 Toyota Corolla Shock Absorber
Part Number: 48530-A9560$113.16 MSRP: $158.84You Save: $45.68 (29%)Ships in 1-3 Business DaysProduct Specifications- Other Name: Absorber Assembly Set, S; Rear Shock Absorber; Suspension Strut Kit; Complete Strut; Strut; Absorber Assembly, Shock, Rear Passenger Side; Absorber Assembly, Shock, Rear Driver Side; Shock
- Manufacturer Note: MARK 48530-AB031
- Replaces: 48530-A9160, 48530-A9440, 48530-80281, 48530-A9270
- Item Weight: 5.30 Pounds
- Item Dimensions: 26.6 x 6.6 x 5.9 inches
- Condition: New
- Fitment Type: Direct Replacement
- SKU: 48530-A9560
- Warranty: This genuine part is guaranteed by Toyota's factory warranty.

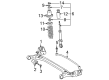
2007 Toyota Corolla Strut, Front Driver Side
Part Number: 48520-09711$127.24 MSRP: $180.13You Save: $52.89 (30%)Ships in 1 Business DayProduct Specifications- Other Name: Absorber Assembly, Shock; Suspension Strut, Front Left; Strut Assembly Kit; Complete Strut Kit; Shock Absorber; Absorber Assembly, Shock, Front Driver Side
- Position: Front Driver Side
- Replaces: 48520-09710
- Part Name Code: 48520
- Item Weight: 7.40 Pounds
- Item Dimensions: 26.6 x 8.3 x 7.6 inches
- Condition: New
- Fitment Type: Direct Replacement
- SKU: 48520-09711
- Warranty: This genuine part is guaranteed by Toyota's factory warranty.
2007 Toyota Corolla Strut Mount, Front Driver Side
Part Number: 48520-A9180$124.54 MSRP: $176.30You Save: $51.76 (30%)Product Specifications- Other Name: Absorber Assembly, Shock; Suspension Strut, Front Left; Strut Assembly Kit; Complete Strut Kit; Shock Absorber; Strut; Absorber Assembly, Shock, Front Driver Side
- Manufacturer Note: MARK 48520-AB031
- Position: Front Driver Side
- Replaces: 48520-A9150
- Part Name Code: 48520
- Item Weight: 11.40 Pounds
- Item Dimensions: 26.9 x 8.2 x 7.6 inches
- Condition: New
- Fitment Type: Direct Replacement
- SKU: 48520-A9180
- Warranty: This genuine part is guaranteed by Toyota's factory warranty.
2007 Toyota Corolla Shock Absorber
Looking for affordable OEM 2007 Toyota Corolla Shock Absorber? Explore our comprehensive catalogue of genuine 2007 Toyota Corolla Shock Absorber. All our parts are covered by the manufacturer's warranty. Plus, our straightforward return policy and speedy delivery service ensure an unparalleled shopping experience. We look forward to your visit!
2007 Toyota Corolla Shock Absorber Parts Q&A
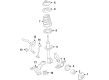
- Q: How to service and repair the rear shock absorber on 2007 Toyota Corolla?A: The maintenance of the rear shock absorber begins by removing the rear wheel and subsequent components which consist of spare wheel cover assembly and rear floor finish plate with luggage compartment trim cover inner LH. You must start by lifting the rear axle beam using a jack before removing first the bolt and 2 nuts and then the washer along with shock absorber nut and shock absorber. When working with the rear shock absorber assembly you should use Special Service Tool: 09727-30021 along with caution to avoid damaging it through impact wrench usage while compressing the coil spring. The maintenance process requires a 6 mm hexagon wrench to hold the piston rod while loosening the nut for further removal of support plate, cushion, spring bracket, upper insulator, suspension support, spring bumper, and coil spring. The rear shock absorber assembly LH should be tested through rod compression and extension which requires replacement when it produces abnormal feedback or strange noises. Installation requires use of Special Service Tool 09727-30021 to compress the coil spring before placing it into the shock absorber assembly while checking that the lower end fits in the spring lower seat gap. Then mount the spring bumper followed by the suspension support then the upper insulator and finally position the rear spring front bracket. First install the cushion and support plate before tightening a new center nut temporarily using Special Service Tool: 09727-30021 until you can check the suspension bracket position before tightening the nut to 39 Nm (397 kgf-cm, 29 ft. lbs.). To install the shock absorber with its coil spring, apply 2 nuts and bolt at 80 Nm (816 kgf-cm, 59 ft. lbs.) torque before placing the shock absorber head cover. Perform suspension stabilization through addition of the rear wheel followed by lowering the vehicle while bouncing it multiple times. Tighten the nut on the coil spring rear shock absorber all the way to 80 Nm (816 kgf-cm, 59 ft. lbs.). After that release the luggage compartment trim cover inner LH, rear floor finish plate, and spare wheel cover assembly to inspect the rear wheel alignment. Before throwing away the shock absorber assembly rear LH, users must expand the shock absorber rod completely and use a hole-drilling tool to vent the gas inside while preventing flying debris and understanding that the released gas has no odor and is harmless to health.
Related 2007 Toyota Corolla Parts
 2007 Toyota Corolla Ball Joint
 2007 Toyota Corolla Control Arm Bushing
 2007 Toyota Corolla Steering Knuckle
 2007 Toyota Corolla Alignment Bolt
 2007 Toyota Corolla Axle Shaft
 2007 Toyota Corolla Bump Stop
 2007 Toyota Corolla Control Arm Bolt
 2007 Toyota Corolla Front Cross-Member
 2007 Toyota Corolla Shock And Strut Mount
 2007 Toyota Corolla Shock and Strut Boot
 2007 Toyota Corolla Strut Housing
 2007 Toyota Corolla Sway Bar Bushing