×
ToyotaParts- Hello
- Login or Register
- Quick Links
- Live Chat
- Track Order
- Parts Availability
- RMA
- Help Center
- Contact Us
- Shop for
- Toyota Parts
- Scion Parts
My Garage
My Account
Cart
OEM 2005 Toyota Matrix Exhaust Pipe
Exhaust Tail Pipe- Select Vehicle by Model
- Select Vehicle by VIN
Select Vehicle by Model
orMake
Model
Year
Select Vehicle by VIN
For the most accurate results, select vehicle by your VIN (Vehicle Identification Number).
7 Exhaust Pipes found


2005 Toyota Matrix Front Pipe
Part Number: 17410-0D341$1367.66 MSRP: $1835.80You Save: $468.14 (26%)Product Specifications- Other Name: Pipe Assembly, Exhaust; Catalytic Converter; Exhaust Pipe; Converter & Pipe
- Replaces: 17410-0D340
- Item Weight: 11.30 Pounds
- Item Dimensions: 47.2 x 18.0 x 9.6 inches
- Condition: New
- SKU: 17410-0D341
- Warranty: This genuine part is guaranteed by Toyota's factory warranty.

2005 Toyota Matrix Front Pipe
Part Number: 17410-0D301$1586.72 MSRP: $2129.84You Save: $543.12 (26%)Ships in 1-3 Business DaysProduct Specifications- Other Name: Pipe Assembly, Exhaust; Catalytic Converter; Exhaust Pipe; Converter & Pipe
- Replaces: 17410-0D300
- Item Weight: 11.50 Pounds
- Item Dimensions: 48.2 x 18.0 x 9.3 inches
- Condition: New
- SKU: 17410-0D301
- Warranty: This genuine part is guaranteed by Toyota's factory warranty.
2005 Toyota Matrix Front Pipe
Part Number: 17410-0D190$169.31 MSRP: $219.52You Save: $50.21 (23%)Ships in 1-3 Business DaysProduct Specifications- Other Name: Pipe Assembly, Exhaust; Exhaust Pipe; Pipe Assembly, Exhaust, Front
- Position: Front
- Part Name Code: 17410
- Item Weight: 11.00 Pounds
- Item Dimensions: 48.6 x 18.2 x 9.4 inches
- Condition: New
- Fitment Type: Direct Replacement
- SKU: 17410-0D190
- Warranty: This genuine part is guaranteed by Toyota's factory warranty.

2005 Toyota Matrix Intermediate Pipe, Center
Part Number: 17420-0D100$1277.66 MSRP: $1714.99You Save: $437.33 (26%)Ships in 1-3 Business DaysProduct Specifications- Other Name: Pipe Assembly, Exhaust; Catalytic Converter; Exhaust Pipe; Converter & Pipe; Pipe Assembly, Exhaust, Center
- Position: Center
- Part Name Code: 17420
- Item Weight: 14.30 Pounds
- Item Dimensions: 51.4 x 20.4 x 9.2 inches
- Condition: New
- Fitment Type: Direct Replacement
- SKU: 17420-0D100
- Warranty: This genuine part is guaranteed by Toyota's factory warranty.

2005 Toyota Matrix Muffler & Pipe
Part Number: 17430-0D250$509.31 MSRP: $683.63You Save: $174.32 (26%)Ships in 1-3 Business DaysProduct Specifications- Other Name: Pipe Assembly, Exhaust Tail; Exhaust Pipe; Tail Pipe; Muffler; Pipe Assembly, Exhaust, Tail
- Part Name Code: 17430
- Item Weight: 10.80 Pounds
- Item Dimensions: 43.2 x 12.6 x 9.2 inches
- Condition: New
- Fitment Type: Direct Replacement
- SKU: 17430-0D250
- Warranty: This genuine part is guaranteed by Toyota's factory warranty.

2005 Toyota Matrix Muffler & Pipe
Part Number: 17430-0D370$533.89 MSRP: $716.64You Save: $182.75 (26%)Ships in 1-3 Business DaysProduct Specifications- Other Name: Pipe Assembly, Exhaust Tail; Direct-Fit System Kit; Muffler; Pipe Assembly, Exhaust, Tail
- Part Name Code: 17430
- Item Weight: 11.10 Pounds
- Item Dimensions: 44.4 x 12.5 x 8.8 inches
- Condition: New
- Fitment Type: Direct Replacement
- SKU: 17430-0D370
- Warranty: This genuine part is guaranteed by Toyota's factory warranty.
2005 Toyota Matrix Muffler & Pipe
Part Number: 17430-0D210$474.08 MSRP: $636.35You Save: $162.27 (26%)Ships in 1-3 Business DaysProduct Specifications- Other Name: Pipe Assembly, Exhaust Tail; Muffler Assembly; Direct-Fit Exhaust; System Kit; Pipe; Tail; Muffler; Pipe Assembly, Exhaust, Tail
- Part Name Code: 17430
- Item Weight: 10.70 Pounds
- Item Dimensions: 43.2 x 12.8 x 9.0 inches
- Condition: New
- Fitment Type: Direct Replacement
- SKU: 17430-0D210
- Warranty: This genuine part is guaranteed by Toyota's factory warranty.
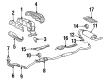
2005 Toyota Matrix Exhaust Pipe
Looking for affordable OEM 2005 Toyota Matrix Exhaust Pipe? Explore our comprehensive catalogue of genuine 2005 Toyota Matrix Exhaust Pipe. All our parts are covered by the manufacturer's warranty. Plus, our straightforward return policy and speedy delivery service ensure an unparalleled shopping experience. We look forward to your visit!
2005 Toyota Matrix Exhaust Pipe Parts Q&A
- Q: How to service and repair the exhaust pipe on 2005 Toyota Matrix?A: Service and repair of the exhaust pipe requires the first step to be disconnecting the negative terminal from the battery. Use a screwdriver taping the tip for removal of the front door scuff plate RH, cowl side trim board RH, rear door scuff plate RH, and center pillar garnish lower RH. The service begins by taking out the right-hand side front seat assembly. When repairing the heated oxygen sensor you must first detach the clip with a clip remover while removing the floor carpet front as well as disconnecting the connector before removing the grommet to complete the removal task using Special Service Tool: 09224-00010. To take out the heated oxygen sensor you must disconnect the connector of the 4WD drive type before using the specified service tool. The exhaust pipe assembly tail needs its components removed through two bolts and two springs for 2WD drive type vehicles but requires bolt and clamp removal for 4WD drive type vehicles before removing the pipe and gasket. The floor panel front brace front can be removed by disconnecting its 2 nuts. For the 4WD drive model, you must first remove the exhaust pipe assembly center with its 2 bolts and 2 springs before proceeding with the floor panel brace front removal operation. Take off the exhaust pipe front from its installation point. Use vernier calipers to check the compression spring free length in the exhaust pipe front installation process and replace it if the reading falls below 41.5 mm (1.6339 inch). Use a new gasket on the exhaust manifold by tapping it until it is flush with the exhaust manifold before checking for proper installation and avoiding any reusage of removed gaskets. Fit the exhaust pipe front onto the two exhaust pipe supports at No. 4 while securing it with 2 compression springs and 2 bolts tightened to 43 Nm (440 kgf-cm, 32 ft. lbs.). Reattach the floor panel brace front with 2 nuts which need tightening at 30 Nm (302 kgf-cm, 22 ft. lbs.). During exhaust pipe assembly center work verify the compression spring free length reaches at least 38.5mm (1.5158 inch) otherwise perform a replacement. Apply a new gasket properly to the exhaust pipe front while avoiding the reuse of the previously removed gasket. The exhaust pipe front should be installed onto the 2 supports at position No. 4. Secure the 2 compression springs and 2 bolts with a torque setting of 43 Nm (440 kgf-cm, 32 ft. lbs.). Check the free length of the compression spring on the exhaust pipe assembly tail for 2WD drive type vehicles to ensure it reaches at least 38.5 mm (1.5158 inch); if the length is insufficient replace it. The replacement gasket should be installed correctly on the exhaust pipe front while it is essential to avoid using the discarded gasket. The exhaust pipe tail must be installed onto exhaust pipe supports No. 4 while tightening both compression springs and bolts to 43 Nm (440 kgf-cm, 32 ft. lbs.). For the 4WD drive type mount the tail pipe assembly with one bolt secured at 32 Nm (330 kgf-cm, 24 ft. lbs.). Specially designed tool number 09224-00010 will be used to install the heated oxygen sensor before torquing it to 44 Nm (450 kgf-cm, 33 ft. lbs.). Attach the heated oxygen sensor connector by verifying the sensor wire remains untwisted. The technician should tighten the battery negative terminal with 5.4 Nm (55 kgf-cm, 48 inch lbs.) torque before inspecting exhaust gas leakage and reinstalling the front seat assembly RH for 4WD drive vehicles.
Related 2005 Toyota Matrix Parts
 2005 Toyota Matrix Catalytic Converter
 2005 Toyota Matrix Exhaust Heat Shield
 2005 Toyota Matrix Exhaust Manifold
 2005 Toyota Matrix Muffler
 2005 Toyota Matrix PCV Valve
 2005 Toyota Matrix Canister Purge Valve
 2005 Toyota Matrix Exhaust Flange Gasket
 2005 Toyota Matrix Exhaust Hanger
 2005 Toyota Matrix Exhaust Manifold Gasket
 2005 Toyota Matrix Vapor Canister
 2005 Toyota Matrix Vapor Pressure Sensor