×
ToyotaParts- Hello
- Login or Register
- Quick Links
- Live Chat
- Track Order
- Parts Availability
- RMA
- Help Center
- Contact Us
- Shop for
- Toyota Parts
- Scion Parts
My Garage
My Account
Cart
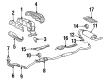
OEM 2004 Toyota Matrix Exhaust Pipe
Exhaust Tail Pipe- Select Vehicle by Model
- Select Vehicle by VIN
Select Vehicle by Model
orMake
Model
Year
Select Vehicle by VIN
For the most accurate results, select vehicle by your VIN (Vehicle Identification Number).
7 Exhaust Pipes found

2004 Toyota Matrix Front Pipe
Part Number: 17410-0D151$1845.39 MSRP: $2477.05You Save: $631.66 (26%)Ships in 1-3 Business DaysProduct Specifications- Other Name: Pipe Assembly, Exhaust; Catalytic Converter; Exhaust Pipe; Converter & Pipe
- Replaces: 17410-0D150
- Item Weight: 11.80 Pounds
- Item Dimensions: 47.2 x 18.4 x 9.1 inches
- Condition: New
- SKU: 17410-0D151
- Warranty: This genuine part is guaranteed by Toyota's factory warranty.

2004 Toyota Matrix Front Pipe
Part Number: 17410-0D301$1586.72 MSRP: $2129.84You Save: $543.12 (26%)Ships in 1-3 Business DaysProduct Specifications- Other Name: Pipe Assembly, Exhaust; Catalytic Converter; Exhaust Pipe; Converter & Pipe
- Replaces: 17410-0D300
- Item Weight: 11.50 Pounds
- Item Dimensions: 48.2 x 18.0 x 9.3 inches
- Condition: New
- SKU: 17410-0D301
- Warranty: This genuine part is guaranteed by Toyota's factory warranty.

2004 Toyota Matrix Muffler & Pipe
Part Number: 17430-0D192$507.79 MSRP: $681.60You Save: $173.81 (26%)Ships in 1-3 Business DaysProduct Specifications- Other Name: Pipe Assembly, Exhaust Tail; Direct-Fit Exhaust; Exhaust System Kit; Exhaust Pipe; Tail Pipe; Muffler
- Replaces: 17430-0D191
- Item Weight: 10.30 Pounds
- Item Dimensions: 43.6 x 12.6 x 9.0 inches
- Condition: New
- SKU: 17430-0D192
- Warranty: This genuine part is guaranteed by Toyota's factory warranty.
2004 Toyota Matrix Front Pipe
Part Number: 17410-0D190$169.31 MSRP: $219.52You Save: $50.21 (23%)Ships in 1-3 Business DaysProduct Specifications- Other Name: Pipe Assembly, Exhaust; Exhaust Pipe; Pipe Assembly, Exhaust, Front
- Position: Front
- Part Name Code: 17410
- Item Weight: 11.00 Pounds
- Item Dimensions: 48.6 x 18.2 x 9.4 inches
- Condition: New
- Fitment Type: Direct Replacement
- SKU: 17410-0D190
- Warranty: This genuine part is guaranteed by Toyota's factory warranty.

2004 Toyota Matrix Intermediate Pipe, Center
Part Number: 17420-0D100$1277.66 MSRP: $1714.99You Save: $437.33 (26%)Ships in 1-3 Business DaysProduct Specifications- Other Name: Pipe Assembly, Exhaust; Catalytic Converter; Exhaust Pipe; Converter & Pipe; Pipe Assembly, Exhaust, Center
- Position: Center
- Part Name Code: 17420
- Item Weight: 14.30 Pounds
- Item Dimensions: 51.4 x 20.4 x 9.2 inches
- Condition: New
- Fitment Type: Direct Replacement
- SKU: 17420-0D100
- Warranty: This genuine part is guaranteed by Toyota's factory warranty.

2004 Toyota Matrix Muffler & Pipe
Part Number: 17430-0D250$509.31 MSRP: $683.63You Save: $174.32 (26%)Ships in 1-3 Business DaysProduct Specifications- Other Name: Pipe Assembly, Exhaust Tail; Exhaust Pipe; Tail Pipe; Muffler; Pipe Assembly, Exhaust, Tail
- Part Name Code: 17430
- Item Weight: 10.80 Pounds
- Item Dimensions: 43.2 x 12.6 x 9.2 inches
- Condition: New
- Fitment Type: Direct Replacement
- SKU: 17430-0D250
- Warranty: This genuine part is guaranteed by Toyota's factory warranty.
2004 Toyota Matrix Muffler & Pipe
Part Number: 17430-0D210$474.08 MSRP: $636.35You Save: $162.27 (26%)Ships in 1-3 Business DaysProduct Specifications- Other Name: Pipe Assembly, Exhaust Tail; Muffler Assembly; Direct-Fit Exhaust; System Kit; Pipe; Tail; Muffler; Pipe Assembly, Exhaust, Tail
- Part Name Code: 17430
- Item Weight: 10.70 Pounds
- Item Dimensions: 43.2 x 12.8 x 9.0 inches
- Condition: New
- Fitment Type: Direct Replacement
- SKU: 17430-0D210
- Warranty: This genuine part is guaranteed by Toyota's factory warranty.
2004 Toyota Matrix Exhaust Pipe
Looking for affordable OEM 2004 Toyota Matrix Exhaust Pipe? Explore our comprehensive catalogue of genuine 2004 Toyota Matrix Exhaust Pipe. All our parts are covered by the manufacturer's warranty. Plus, our straightforward return policy and speedy delivery service ensure an unparalleled shopping experience. We look forward to your visit!
2004 Toyota Matrix Exhaust Pipe Parts Q&A
- Q: How to Service and Repair an Exhaust Pipe on 2004 Toyota Matrix?A: Begin service and repair of the exhaust pipe by using a screwdriver to remove the right-hand front door scuff plate while taping the screwdriver tip. Remove the cowl side trim board RH by breaking away its clip then put away the rear door scuff plate RH using the screwdriver which has tape on the tip. Begin removing the center pillar garnish lower RH through the use of a screwdriver and follow up by taking out the front seat assembly RH. The removal process of the oxygen sensor includes first removing a clip on 2WD drive types followed by pulling the floor mat then disconnecting the oxygen sensor connector before extracting the sensor. The procedure for a 4WD drive type requires disconnecting the oxygen sensor connector before removing the sensor. The tail pipe assembly requires removal through two bolts and two springs on a 2WD drive type although a 4WD drive type needs one bolt and clamp to be removed before extracting both pipe and gasket. You must remove 2 bolts and 2 springs from the exhaust pipe assembly center of a 4WD drive type but use 2 nuts to remove the front floor panel brace on a 2WD drive type. Place a new gasket over the exhaust pipe front before fastening it with 2 bolts and 2 springs that need to reach 43 Nm (440 kgf-cm, 32 ft. lbs.) of torque. Replace the front floor panel brace by tightening its 2 nuts to 30 Nm (302 kgf-cm, 22 ft. lbs.). The 4WD drive type exhaust pipe assembly center requires a compression spring measurement of 40 mm (1.575 inch); if the measurement deviates from the specifications, replace it followed by installing a new gasket while securing it with 2 bolts and 2 springs at 43 Nm (440 kgf-cm, 32 ft. lbs.). The free length measurement of the compression spring for the 2WD drive type tail pipe assembly should be 40 mm (1.575 inch). If the spring measurement differs from the specification replace it then install a new gasket and tighten the exhaust tail pipe with 2 bolts and 2 nuts to 43 Nm (440 kgf-cm, 32 ft. lbs.). A bolt needs to be tightened to 32 Nm (330 kgf-cm) or 24 foot pounds for installing the tail pipe assembly on vehicles with 4WD drive types. The oxygen sensor installation on the exhaust pipe front must be at 44 Nm (450 kgf-cm, 33 ft. lbs.) after which the oxygen sensor connector needs to be joined while verifying the sensor wire is untwisted because any twisting requires removing and reinstalling the oxygen sensor. Check for exhaust gas leaks as the closing step.
Related 2004 Toyota Matrix Parts
 2004 Toyota Matrix Catalytic Converter
 2004 Toyota Matrix Exhaust Heat Shield
 2004 Toyota Matrix Exhaust Manifold
 2004 Toyota Matrix Muffler
 2004 Toyota Matrix PCV Valve
 2004 Toyota Matrix Canister Purge Valve
 2004 Toyota Matrix Exhaust Flange Gasket
 2004 Toyota Matrix Exhaust Hanger
 2004 Toyota Matrix Exhaust Manifold Gasket
 2004 Toyota Matrix Vapor Canister
 2004 Toyota Matrix Vapor Pressure Sensor