×
ToyotaParts- Hello
- Login or Register
- Quick Links
- Live Chat
- Track Order
- Parts Availability
- RMA
- Help Center
- Contact Us
- Shop for
- Toyota Parts
- Scion Parts
My Garage
My Account
Cart
OEM 2004 Scion xA Throttle Body
Fuel Injection Throttle Body- Select Vehicle by Model
- Select Vehicle by VIN
Select Vehicle by Model
orMake
Model
Year
Select Vehicle by VIN
For the most accurate results, select vehicle by your VIN (Vehicle Identification Number).
1 Throttle Body found


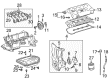
2004 Scion xA Throttle Body
Part Number: 22210-21020$365.46 MSRP: $535.58You Save: $170.12 (32%)Ships in 1-2 Business DaysProduct Specifications- Other Name: Body Assembly, Throttle
- Part Name Code: 22210
- Item Weight: 2.50 Pounds
- Item Dimensions: 8.7 x 7.6 x 5.8 inches
- Condition: New
- Fitment Type: Direct Replacement
- SKU: 22210-21020
- Warranty: This genuine part is guaranteed by Toyota's factory warranty.
2004 Scion xA Throttle Body
Looking for affordable OEM 2004 Scion xA Throttle Body? Explore our comprehensive catalogue of genuine 2004 Scion xA Throttle Body. All our parts are covered by the manufacturer's warranty. Plus, our straightforward return policy and speedy delivery service ensure an unparalleled shopping experience. We look forward to your visit!
2004 Scion xA Throttle Body Parts Q&A
- Q: How to service and repair the throttle body on 2004 Scion xA?A: A driver should begin throttle body servicing and repairs by draining engine coolant. The air cleaner service begins with unfastening connections for the mass air flow meter connector along with VSV connector and wire harness clamp and fuel vapor feed hoses No. 1 and No. 2 and ventilation hose before unlocking the 2 clamp hooks then loosening the hose clamp to extract the air cleaner cap and filter element followed by removing the 4 bolts securing the air cleaner case. Unfasten the nut connecting parts of the accelerator control cable assembly. Separated transmission oil level gauge and oil filler tube assemblies by disconnecting throttle position sensor wire along with hose and unthreading clamp bolt and oil cooler tube but also disconnecting transmission oil pipe and its O-ring to remove. The procedure to remove throttle body assembly starts by disconnecting ISC valve connector and throttle position sensor connector (M/T transaxle) before removing the wire harness clamp and the bolt and 2 nuts to separate the accelerator control cable bracket and throttle body while also removing the gasket from the intake manifold and disconnecting water bypass hoses. Workplace requires the removal of ISC valve through 3 screw and gasket extraction followed by throttle position sensor removal operated through 2 screws. The throttle position sensor needs to be installed with closed throttle valve position while rotating it 45 degrees clockwise before tightening it to 2.0 N.m (20 kgf.cm, 17 in.lbf). Place a new gasket on the throttle body followed by installing the ISC valve through its three screws while torquing to 3.4 N.m (35 kgf.cm, 30 in.lbf). The installation involves connecting water bypass hoses while using a new intake manifold gasket before bolt and nut installation of the throttle body and accelerator control bracket which requires 30 N.m (306 kgf.cm, 22 ft.lbf) torque followed by wire harness clamp and throttle position sensor connector (M/T transaxle) and ISC valve connector. Connect and tighten the transmission oil filler tube sub-assembly using a new O-ring, bolt, 5.5 N.m torque (56 kgf.cm, 49 in.lbf) and the oil cooler tube clamp with the bolt at 5.5 N.m (56 kgf.cm, 49 in.lbf) followed by hose and throttle position sensor connector. The technician should install the transmission oil level gauge sub-assembly and then the accelerator control cable assembly while torquing both components to 13 N.m (133 kgf.cm, 10 ft.lbf). You will complete the air cleaner installation by using three bolts to join the air cleaner case to its bracket with 7.8 N.m torque (80 kgf.cm or 69 in.lbf) before fastening the inlet to the engine compartment using a bolt torqued to 7.5 N.m (76 kgf.cm or 66 in.lbf). Engine coolant addition follows then a leak check must be performed.
Related 2004 Scion xA Parts
 2004 Scion xA Air Filter
 2004 Scion xA Fuel Filter
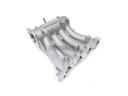 2004 Scion xA Intake Manifold
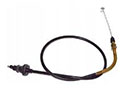 2004 Scion xA Accelerator Cable
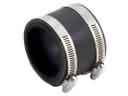 2004 Scion xA Air Intake Coupling
 2004 Scion xA Fuel Filler Hose
 2004 Scion xA Fuel Filler Neck
 2004 Scion xA Fuel Injector
 2004 Scion xA Fuel Pressure Regulator
 2004 Scion xA Fuel Rail
 2004 Scion xA Throttle Body Gasket
 2004 Scion xA Throttle Cable