×
ToyotaParts- Hello
- Login or Register
- Quick Links
- Live Chat
- Track Order
- Parts Availability
- RMA
- Help Center
- Contact Us
- Shop for
- Toyota Parts
- Scion Parts
My Garage
My Account
Cart
OEM 2003 Toyota Sienna Air Bag Sensor
Air Bag Impact Sensor- Select Vehicle by Model
- Select Vehicle by VIN
Select Vehicle by Model
orMake
Model
Year
Select Vehicle by VIN
For the most accurate results, select vehicle by your VIN (Vehicle Identification Number).
4 Air Bag Sensors found

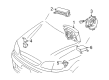
2003 Toyota Sienna Front Sensor, Driver Side
Part Number: 89173-49045$107.82 MSRP: $130.00You Save: $22.18 (18%)Ships in 1-3 Business DaysProduct Specifications- Other Name: Sensor, Air Bag, Front; Air Bag Impact Sensor, Front Left; Air Bag Sensor
- Manufacturer Note: LH
- Position: Front Driver Side
- Part Name Code: 89173
- Item Weight: 0.80 Pounds
- Item Dimensions: 4.2 x 2.6 x 1.7 inches
- Condition: New
- Fitment Type: Direct Replacement
- SKU: 89173-49045
- Warranty: This genuine part is guaranteed by Toyota's factory warranty.
 Product Specifications
- Other Name: Sensor Assembly, Side Air Bag; Air Bag Sensor; Sensor; Sensor Assembly, Side Air Bag, Driver Side
- Position: Driver Side
- Part Name Code: 89860A
- Item Weight: 0.60 Pounds
- Item Dimensions: 4.2 x 2.6 x 2.1 inches
- Condition: New
- Fitment Type: Direct Replacement
- SKU: 89830-45010
- Warranty: This genuine part is guaranteed by Toyota's factory warranty.
 Product Specifications
- Other Name: Sensor Assembly, Side Air Bag; Air Bag Sensor; Sensor; Sensor Assembly, Side Air Bag, Passenger Side
- Position: Passenger Side
- Part Name Code: 89860
- Item Weight: 0.60 Pounds
- Item Dimensions: 4.3 x 2.5 x 2.0 inches
- Condition: New
- Fitment Type: Direct Replacement
- SKU: 89860-45010
- Warranty: This genuine part is guaranteed by Toyota's factory warranty.
 Product Specifications
- Other Name: Sensor, Air Bag, Front; Air Bag Impact Sensor, Front Right; Air Bag Sensor
- Manufacturer Note: RH
- Position: Front Passenger Side
- Part Name Code: 89173
- Item Weight: 0.80 Pounds
- Item Dimensions: 4.3 x 2.7 x 1.7 inches
- Condition: New
- Fitment Type: Direct Replacement
- SKU: 89173-49035
- Warranty: This genuine part is guaranteed by Toyota's factory warranty.
2003 Toyota Sienna Air Bag Sensor
Looking for affordable OEM 2003 Toyota Sienna Air Bag Sensor? Explore our comprehensive catalogue of genuine 2003 Toyota Sienna Air Bag Sensor. All our parts are covered by the manufacturer's warranty. Plus, our straightforward return policy and speedy delivery service ensure an unparalleled shopping experience. We look forward to your visit!
2003 Toyota Sienna Air Bag Sensor Parts Q&A
- Q: How to remove and install the front Air Bag sensor on 2003 Toyota Sienna?A: Proceed to remove the front Air Bag sensor by first disconnecting its connector on the LH side then unfastening the 2 bolts that secure it. First on the RH side remove the fender liner set screws then detach the wire harness from the front Air Bag sensor while removing the connectors from the front Air Bag sensor followed by extracting the 2 bolts and sensor. The sensors must be placed correctly based on arrows showing vehicle forward direction before tightening them to 20 N.m (200 kgf.cm, 14 ft.lbf). Install the sensor to its specified torque value while discarding any sensor which has dropped or presents structural damage to replace with fresh set bolts because they have anti-rust protection treatment. Universally, shake the sensor before securing the connection check mechanism because misaligned wiring can result in a malfunction diagnosis from the diagnostic system. Finally, reinstall any removed parts.
Related 2003 Toyota Sienna Parts
 2003 Toyota Sienna TPMS Sensor
 2003 Toyota Sienna Antenna
 2003 Toyota Sienna Clock Spring
 2003 Toyota Sienna Coolant Temperature Sensor
 2003 Toyota Sienna Dimmer Switch
 2003 Toyota Sienna Power Window Switch
 2003 Toyota Sienna Speedometer
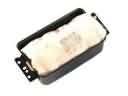 2003 Toyota Sienna Air Bag
 2003 Toyota Sienna Air Bag Control Module
 2003 Toyota Sienna Door Jamb Switch
 2003 Toyota Sienna Hazard Warning Switch
 2003 Toyota Sienna Mirror Switch