×
ToyotaParts- Hello
- Login or Register
- Quick Links
- Live Chat
- Track Order
- Parts Availability
- RMA
- Help Center
- Contact Us
- Shop for
- Toyota Parts
- Scion Parts
My Garage
My Account
Cart
OEM 2003 Toyota Sequoia A/C Expansion Valve
Air Conditioning Expansion Valve- Select Vehicle by Model
- Select Vehicle by VIN
Select Vehicle by Model
orMake
Model
Year
Select Vehicle by VIN
For the most accurate results, select vehicle by your VIN (Vehicle Identification Number).
2 A/C Expansion Valves found

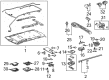
2003 Toyota Sequoia Expansion Valve
Part Number: 88515-08080$63.15 MSRP: $88.64You Save: $25.49 (29%)Ships in 1-3 Business DaysProduct Specifications- Other Name: Valve, Expansion, No; A/C Expansion Valve, Rear; Valve, Rear Cooling Unit Expansion; Valve, Cooler Expansion; A/C Expansion Valve
- Replaces: 88515-0C030
- Item Weight: 1.10 Pounds
- Item Dimensions: 9.2 x 7.7 x 5.6 inches
- Condition: New
- Fitment Type: Direct Replacement
- SKU: 88515-08080
- Warranty: This genuine part is guaranteed by Toyota's factory warranty.

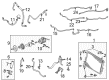
2003 Toyota Sequoia Expansion Valve, Front
Part Number: 88515-0C070$61.73 MSRP: $86.65You Save: $24.92 (29%)Ships in 1-3 Business DaysProduct Specifications- Other Name: Valve, Expansion, No; A/C Expansion Valve, Front; Valve, Cooler Expansion; A/C Expansion Valve
- Position: Front
- Replaces: 88515-0C020
- Part Name Code: 88515
- Item Weight: 1.10 Pounds
- Item Dimensions: 8.4 x 6.1 x 4.3 inches
- Condition: New
- Fitment Type: Direct Replacement
- SKU: 88515-0C070
- Warranty: This genuine part is guaranteed by Toyota's factory warranty.
2003 Toyota Sequoia A/C Expansion Valve
Looking for affordable OEM 2003 Toyota Sequoia A/C Expansion Valve? Explore our comprehensive catalogue of genuine 2003 Toyota Sequoia A/C Expansion Valve. All our parts are covered by the manufacturer's warranty. Plus, our straightforward return policy and speedy delivery service ensure an unparalleled shopping experience. We look forward to your visit!
2003 Toyota Sequoia A/C Expansion Valve Parts Q&A
- Q: How to service and repair the rear A/C expansion valve on 2003 Toyota Sequoia?A: The process of repairing the rear A/C expansion valve begins with refrigerant discharge from the system followed by evacuating the air and adding 1050 plus or minus 50 g (37.03 plus or minus 1.76 oz.) of refrigerant along with leak inspection. Engine coolant drainage from the radiator is required yet there is no need to empty all coolant. The next step requires removing the rear seat outer belt floor anchors followed by backdoor scuff plate, rear door scuff plate RH, upper back door garnish, rear window side garnish RH, and then removing rear quarter trim panel RH and quarter pillar garnish RH. To avoid moisture or dirt contamination close the tubing connections with caps after using a 5.4 N.m (55 kgf.cm, 48 in.lbf) torque to remove the 2 bolts that detach suction and liquid tubes. Install two new O-rings which received compressor oil lubrication onto the tubes. Start by removing all clips and cover from the rear A/C unit while simultaneously disconnecting its connectors and wire harness clamps after removing the 2 air ducts. The expansion valve requires removal of 4 screws, 2 brackets and careful packing extraction before using a 5.0 mm hexagon wrench to untighten 2 bolts which should be torqued to 5.4 N.m (55 kgf.cm, 48 in.lbf) and then removing 3 more bolts. Lifting the A/C unit allows you to detach the tube and accessory and afterwards remove the evaporator by taking all 8 screws and cover before you can pull it out. The assembly process of installation will proceed exactly opposite to how removal occurred.
Related 2003 Toyota Sequoia Parts
 2003 Toyota Sequoia Blend Door Actuator
 2003 Toyota Sequoia Blower Motor
 2003 Toyota Sequoia Heater Control Valve
 2003 Toyota Sequoia A/C Clutch
 2003 Toyota Sequoia A/C Compressor Cut-Out Switches
 2003 Toyota Sequoia A/C Condenser
 2003 Toyota Sequoia A/C Hose
 2003 Toyota Sequoia Ambient Temperature Sensor
 2003 Toyota Sequoia Blower Control Switches
 2003 Toyota Sequoia Blower Motor Resistor
 2003 Toyota Sequoia Evaporator
 2003 Toyota Sequoia Heater Core