×
ToyotaParts- Hello
- Login or Register
- Quick Links
- Live Chat
- Track Order
- Parts Availability
- RMA
- Help Center
- Contact Us
- Shop for
- Toyota Parts
- Scion Parts
My Garage
My Account
Cart
OEM 2002 Toyota MR2 Spyder Shock Absorber
Suspension Shock Absorber- Select Vehicle by Model
- Select Vehicle by VIN
Select Vehicle by Model
orMake
Model
Year
Select Vehicle by VIN
For the most accurate results, select vehicle by your VIN (Vehicle Identification Number).
2 Shock Absorbers found

2002 Toyota MR2 Spyder Strut, Rear Driver Side
Part Number: 48540-19375$149.33 MSRP: $211.39You Save: $62.06 (30%)Ships in 1-2 Business DaysProduct Specifications- Other Name: Absorber Assembly, Shock; Suspension Strut, Rear Left; Shock Absorber; Absorber Assembly, Shock, Rear Driver Side
- Manufacturer Note: MARK 48540-17230
- Position: Rear Driver Side
- Replaces: 48540-19366, 48540-19365
- Part Name Code: 48540
- Item Weight: 6.50 Pounds
- Item Dimensions: 26.4 x 6.6 x 5.8 inches
- Condition: New
- Fitment Type: Direct Replacement
- SKU: 48540-19375
- Warranty: This genuine part is guaranteed by Toyota's factory warranty.
2002 Toyota MR2 Spyder Strut, Rear Passenger Side
Part Number: 48530-80078$142.75 MSRP: $202.08You Save: $59.33 (30%)Ships in 1-3 Business DaysProduct Specifications- Other Name: Absorber Assembly, Shock; Suspension Strut, Rear Right; Shock Absorber; Absorber Assembly, Shock, Rear Passenger Side
- Manufacturer Note: MARK 48530-17230
- Position: Rear Passenger Side
- Replaces: 48530-80027, 48530-80060
- Part Name Code: 48530
- Item Weight: 6.90 Pounds
- Item Dimensions: 25.6 x 6.6 x 5.7 inches
- Condition: New
- Fitment Type: Direct Replacement
- SKU: 48530-80078
- Warranty: This genuine part is guaranteed by Toyota's factory warranty.
2002 Toyota MR2 Spyder Shock Absorber
Looking for affordable OEM 2002 Toyota MR2 Spyder Shock Absorber? Explore our comprehensive catalogue of genuine 2002 Toyota MR2 Spyder Shock Absorber. All our parts are covered by the manufacturer's warranty. Plus, our straightforward return policy and speedy delivery service ensure an unparalleled shopping experience. We look forward to your visit!
2002 Toyota MR2 Spyder Shock Absorber Parts Q&A
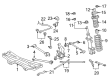
- Q: How to service and repair the Shock Absorber on 2002 Toyota MR2 Spyder?A: Disassemble the coil spring by squeezing it with Special Service Tool: 09727-30021 (09727-00010, 09727-00021, 09727-00031) to prevent tool damage from impact wrench usage. The spring seat requires screwdriver support while you unscrew the nut which must be done without harming the spring seat. Begin by removing the suspension support and following it with the dust seal and spring seat and upper insulator and coil spring and spring bumper. Examine the shock absorber rod during inspection by both compressing and extending it. Investigate any abnormal resistance or unusual noises; shock absorber replacement should occur in these cases. To dispose of the shock absorber extend the rod to its maximum length before drilling a hole in the cylinder while avoiding chip damage and recognizing the gas as non-toxic and nonvolatile and invisible. To rebuild the shock absorber install the spring bumper on the piston rod before reusing the special servicing tool to compress the coil spring and fitting it to the shock absorber precisely into the spring lower seat gap. Install the upper insulator and then add the spring seat while positioning the piston rod notch with the spring seat hole. First place the dust seal on the shock absorber followed by the new suspension support nut installation with a screwdriver keeping the suspension support steady while tightening the nut to 51 Nm (520 kgf-cm, 38 ft. lbs.). Take extra caution to prevent spring seat damage. The special service tool needs removal while the suspension support receives MP grease application before installing the cap.
Related 2002 Toyota MR2 Spyder Parts
 2002 Toyota MR2 Spyder Bump Stop
 2002 Toyota MR2 Spyder CV Boot
 2002 Toyota MR2 Spyder Coil Springs
 2002 Toyota MR2 Spyder Lateral Link
 2002 Toyota MR2 Spyder Rear Crossmember
 2002 Toyota MR2 Spyder Shock And Strut Mount
 2002 Toyota MR2 Spyder Suspension Strut Rod
 2002 Toyota MR2 Spyder Sway Bar Bracket
 2002 Toyota MR2 Spyder Sway Bar Bushing
 2002 Toyota MR2 Spyder Sway Bar Kit
 2002 Toyota MR2 Spyder Sway Bar Link
 2002 Toyota MR2 Spyder Transfer Case Output Shaft Snap Ring