×
ToyotaParts- Hello
- Login or Register
- Quick Links
- Live Chat
- Track Order
- Parts Availability
- RMA
- Help Center
- Contact Us
- Shop for
- Toyota Parts
- Scion Parts
My Garage
My Account
Cart
OEM 2001 Toyota Sienna Fuel Injector
Gas Injector- Select Vehicle by Model
- Select Vehicle by VIN
Select Vehicle by Model
orMake
Model
Year
Select Vehicle by VIN
For the most accurate results, select vehicle by your VIN (Vehicle Identification Number).
1 Fuel Injector found

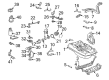
2001 Toyota Sienna Injector Assembly, Fuel
Part Number: 23209-0A010$193.38 MSRP: $276.10You Save: $82.72 (30%)Ships in 1-3 Business DaysProduct Specifications- Other Name: Injector Set, Fuel; Fuel Injector
- Replaces: 23209-20020
- Part Name Code: 23250
- Item Weight: 0.50 Pounds
- Item Dimensions: 3.8 x 2.8 x 1.5 inches
- Condition: New
- Fitment Type: Direct Replacement
- Require Quantity: 6
- SKU: 23209-0A010
- Warranty: This genuine part is guaranteed by Toyota's factory warranty.
2001 Toyota Sienna Fuel Injector
Looking for affordable OEM 2001 Toyota Sienna Fuel Injector? Explore our comprehensive catalogue of genuine 2001 Toyota Sienna Fuel Injector. All our parts are covered by the manufacturer's warranty. Plus, our straightforward return policy and speedy delivery service ensure an unparalleled shopping experience. We look forward to your visit!
2001 Toyota Sienna Fuel Injector Parts Q&A
- Q: How to service and repair fuel injectors on 2001 Toyota Sienna?A: Begin the fuel injector service and repair work by taking out the outer FR cowl top panel assembly together with the V-bank cover, air cleaner cap joined to the hose and the air intake chamber assembly. The service requires disconnecting the injector connectors along with the air assist hoses and pipe from their respective attach points by detaching the air assist pipe from the bracket on the No.1 fuel pipe while removing the air assist hoses from the intake manifold. When disconnecting the No.1 fuel pipe start by removing its fuel hose clamp followed by removing the pipe (fuel tube connector) from the fuel pipe while observing safety procedures due to fuel pressure retention inside the pipe line. You must take out the delivery pipes together with the 6 injectors and fuel pipe using the 5 bolts and then detach the 4 spacers mounted on the intake manifold. Fetch the 6 injectors from delivery pipes then remove 2 O-rings and 2 grommets from each injector. Installation requires new insulators and grommets to be fitted to every injector before applying a small amount of spindle oil or gasoline to the pair of fresh O-rings and placing them on the injectors. Before installing the delivery pipes onto the injectors, brush spindle oil or gasoline over both contact points between delivery pipes and O-rings. When you turn an injector you should push it into delivery pipes before installing the 6 injectors with their connectors fully facing outward. After placing the four spacers on the intake manifold, apply a thin layer of spindle oil or gasoline where the intake manifold meets the injector O-rings followed by positioning the delivery pipes and fuel pipe which contains the six injectors on the intake manifold. Install the delivery pipes' 4 bolts and fuel pipe bolt temporarily before checking the injector's smooth rotation; repeat the O-ring replacement if the injectors do not rotate properly. Seam the 4 delivery pipe bolts at 10 N.m (100 kgf.cm, 7 ft.lbf) torque while torqueing the fuel pipe bolt to 19.5 N.m (200 kgf/cm, 14 ft.lbf). Secure the No.1 fuel pipe (fuel tube connector) to the fuel filter while ensuring that the fuel hose clamp produces a distinct "click" sound and also check for complete fixation by pulling it upward. Migrate the air assist hoses into the intake manifold before attaching the air assist pipe to the bracket facing the No.1 fuel pipe. Proceed with the connector installation of injector connectors while placing the air intake chamber assembly along with the air cleaner cap with hose and subsequently ending with the outer FR cowl top panel assembly installation. Verify the system for fuel leakage as the last step.
Related 2001 Toyota Sienna Parts
 2001 Toyota Sienna Fuel Tank
 2001 Toyota Sienna Gas Cap
 2001 Toyota Sienna Fuel Filter
 2001 Toyota Sienna Fuel Pump
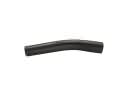 2001 Toyota Sienna Fuel Filler Hose
 2001 Toyota Sienna Fuel Filler Neck
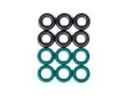 2001 Toyota Sienna Fuel Injector O-Ring
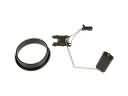 2001 Toyota Sienna Fuel Level Sensor
 2001 Toyota Sienna Fuel Pressure Regulator
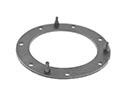 2001 Toyota Sienna Fuel Pump Gasket
 2001 Toyota Sienna Fuel Pump Seal
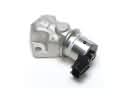 2001 Toyota Sienna Idle Control Valve