×
ToyotaParts- Hello
- Login or Register
- Quick Links
- Live Chat
- Track Order
- Parts Availability
- RMA
- Help Center
- Contact Us
- Shop for
- Toyota Parts
- Scion Parts
My Garage
My Account
Cart
OEM 2001 Toyota Celica Fan Motor
Cooling Fan Motor- Select Vehicle by Model
- Select Vehicle by VIN
Select Vehicle by Model
orMake
Model
Year
Select Vehicle by VIN
For the most accurate results, select vehicle by your VIN (Vehicle Identification Number).
2 Fan Motors found

2001 Toyota Celica Fan Motor, Passenger Side
Part Number: 16363-22060$234.27 MSRP: $334.49You Save: $100.22 (30%)Ships in 1-3 Business DaysProduct Specifications- Other Name: Motor, Cooling Fan; Engine Cooling Fan Motor, Right; Dual Radiator Condenser Fan Assembly; Cooling Fan Assembly; Motor
- Position: Passenger Side
- Part Name Code: 16363A
- Item Weight: 10.20 Pounds
- Item Dimensions: 30.8 x 5.9 x 19.1 inches
- Condition: New
- Fitment Type: Direct Replacement
- SKU: 16363-22060
- Warranty: This genuine part is guaranteed by Toyota's factory warranty.

2001 Toyota Celica Fan Motor, Driver Side
Part Number: 16363-22050$234.27 MSRP: $334.49You Save: $100.22 (30%)Ships in 1-3 Business DaysProduct Specifications- Other Name: Motor, Cooling Fan; Engine Cooling Fan Motor, Left; Dual Radiator Condenser Fan Assembly; Cooling Fan Assembly; Motor
- Position: Driver Side
- Part Name Code: 16363
- Item Weight: 2.20 Pounds
- Item Dimensions: 7.0 x 6.2 x 4.6 inches
- Condition: New
- Fitment Type: Direct Replacement
- SKU: 16363-22050
- Warranty: This genuine part is guaranteed by Toyota's factory warranty.
2001 Toyota Celica Fan Motor
Looking for affordable OEM 2001 Toyota Celica Fan Motor? Explore our comprehensive catalogue of genuine 2001 Toyota Celica Fan Motor. All our parts are covered by the manufacturer's warranty. Plus, our straightforward return policy and speedy delivery service ensure an unparalleled shopping experience. We look forward to your visit!
2001 Toyota Celica Fan Motor Parts Q&A
- Q: How to service and repair the Radiator Cooling Fan Motor on 2001 Toyota Celica?A: First service Radiator Cooling Fan Motor repairs by taking out upper front fender apron seal and upper radiator support seal followed by draining engine coolant. Start by removing the bumper cover and the radiator upper support through a procedure involving the engine coolant reservoir, hood lock bolts, center brace and two additional bolts, two nuts, two condenser upper supports as well as the air cleaner assembly and three hood lock bolts. The first step is to disconnect the cruise control actuator by removing its bolt when the system exists. After disconnecting the actuator the two radiator upper support bolts can be removed safely. The cooling fan requires connection removal of its two connectors while needing two bolts taken out to extract the assembly. The disassembly process requires you to first remove the fan along with its nut before disconnecting the wire and connector holder from the fan shroud which allows you to take out the fan motor using three screws. Cautiously insert the fan motor through three screws which must achieve 2.55 Nm (26 kgf-cm, 23 inch lbs.) torque while securing the wire and connector holder onto the fan shroud. After installing the fan with the specified torque of 6.18 Nm (63 kgf-cm, 55 inch lbs.) on the nut, proceed with installing the cooling fan by using two bolts torqued to 5.0 Nm (51 kgf-cm, 44 inch lbs.). Additionally, connect both cooling fan connectors. The upper support goes on with two bolts while three bolts will do the same job for the cruise control actuator. The installation procedure includes fitting both condenser upper supports with bolts and nuts and installing the center brace using two bolts and using three bolts for installing the hood lock and adding the engine coolant reservoir while installing the air cleaner assembly. The procedure ends with front bumper reinstallation followed by engine coolant filling and engine start-up to check for coolant leakage.
Related 2001 Toyota Celica Parts
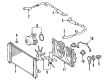
 2001 Toyota Celica Radiator
 2001 Toyota Celica Thermostat
 2001 Toyota Celica Water Pump
 2001 Toyota Celica Radiator Cap
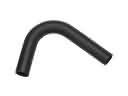 2001 Toyota Celica Radiator Hose
 2001 Toyota Celica Cooling Fan Assembly
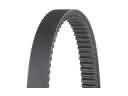 2001 Toyota Celica Drive Belt
 2001 Toyota Celica Fan Blade
 2001 Toyota Celica Fan Shroud
 2001 Toyota Celica Thermostat Gasket
 2001 Toyota Celica Thermostat Housing
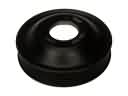 2001 Toyota Celica Water Pump Pulley