×
ToyotaParts- Hello
- Login or Register
- Quick Links
- Live Chat
- Track Order
- Parts Availability
- RMA
- Help Center
- Contact Us
- Shop for
- Toyota Parts
- Scion Parts
My Garage
My Account
Cart
OEM 2000 Toyota Solara A/C Switch
Air Conditioning Switch- Select Vehicle by Model
- Select Vehicle by VIN
Select Vehicle by Model
orMake
Model
Year
Select Vehicle by VIN
For the most accurate results, select vehicle by your VIN (Vehicle Identification Number).
1 A/C Switch found

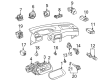
2000 Toyota Solara A/C Switch
Part Number: 84660-06030$44.68 MSRP: $62.19You Save: $17.51 (29%)Ships in 1-3 Business DaysProduct Specifications- Other Name: Switch Assembly, Cooler; A/C Control Switch; HVAC Pressure Switch; Switch, Cooler
- Part Name Code: 84660C
- Item Weight: 0.80 Pounds
- Item Dimensions: 3.3 x 1.2 x 1.0 inches
- Condition: New
- Fitment Type: Direct Replacement
- SKU: 84660-06030
- Warranty: This genuine part is guaranteed by Toyota's factory warranty.
2000 Toyota Solara A/C Switch
Looking for affordable OEM 2000 Toyota Solara A/C Switch? Explore our comprehensive catalogue of genuine 2000 Toyota Solara A/C Switch. All our parts are covered by the manufacturer's warranty. Plus, our straightforward return policy and speedy delivery service ensure an unparalleled shopping experience. We look forward to your visit!
2000 Toyota Solara A/C Switch Parts Q&A
- Q: How to troubleshoot an A/C Switch on 2000 Toyota Solara?A: The service and repair process for the control assembly starts by taking out the front door scuff plate LH and cowl side trim LH as well as the lower No.1 panel and lower LH insert and center cluster finish panel. You must disconnect the air mix damper control cable after securing stable expanse for the cable avoiding any bends. Begin by disconnecting the A/C control assembly connectors after pulling it out while removing its 4 screws. Begin the installation process by joining the connectors from the A/C control assembly then direct the air mix damper control cable beyond the brace before installing the four set screws. Connect the air mix damper control cable while setting the temperature control dial on "MAX. COOL". Attach the cable connector by securing it against the left air mix link pin of the A/C unit and clamp the cable outer into place without forcing it through. The next procedure requires checking the heater dial control after cable connection. To complete the installation the technician should replace the lower LH insert followed by the lower No.1 panel and cowl side trim LH and finish with front door scuff plate LH.
Related 2000 Toyota Solara Parts
 2000 Toyota Solara A/C Accumulator
 2000 Toyota Solara A/C Clutch
 2000 Toyota Solara A/C Compressor
 2000 Toyota Solara A/C Condenser
 2000 Toyota Solara A/C Expansion Valve
 2000 Toyota Solara A/C Hose
 2000 Toyota Solara Ambient Temperature Sensor
 2000 Toyota Solara Blend Door Actuator
 2000 Toyota Solara Blower Motor
 2000 Toyota Solara Blower Motor Resistor
 2000 Toyota Solara HVAC Pressure Switch
 2000 Toyota Solara Heater Core