×
ToyotaParts- Hello
- Login or Register
- Quick Links
- Live Chat
- Track Order
- Parts Availability
- RMA
- Help Center
- Contact Us
- Shop for
- Toyota Parts
- Scion Parts
My Garage
My Account
Cart
OEM 2000 Toyota Sienna Windshield
Glass Windshield- Select Vehicle by Model
- Select Vehicle by VIN
Select Vehicle by Model
orMake
Model
Year
Select Vehicle by VIN
For the most accurate results, select vehicle by your VIN (Vehicle Identification Number).
2 Windshields found

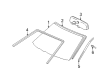
2000 Toyota Sienna Windshield, Front
Part Number: 56101-08020-83$586.94 MSRP: $860.17You Save: $273.23 (32%)Ships in 1-3 Business DaysProduct Specifications- Other Name: Glass Sub-Assembly, Windshield; Windshield Glass, Front
- Position: Front
- Condition: New
- SKU: 56101-08020-83
- Warranty: This genuine part is guaranteed by Toyota's factory warranty.
- Product Specifications
- Other Name: Glass Sub Assembly, Windshield; Windshield Glass, Front
- Position: Front
- Replaces: 56101-08010
- Condition: New
- SKU: 56101-08010-83
- Warranty: This genuine part is guaranteed by Toyota's factory warranty.
2000 Toyota Sienna Windshield
Looking for affordable OEM 2000 Toyota Sienna Windshield? Explore our comprehensive catalogue of genuine 2000 Toyota Sienna Windshield. All our parts are covered by the manufacturer's warranty. Plus, our straightforward return policy and speedy delivery service ensure an unparalleled shopping experience. We look forward to your visit!
2000 Toyota Sienna Windshield Parts Q&A
- Q: How to remove and reinstall a windshield on 2000 Toyota Sienna?A: The first step to remove the windshield requires using a screwdriver to take off front door scuff plates together with cowl side boards then front door opening trim covers and front pillar garnish while taping the screwdriver tip for protection. To remove the tweeter speaker users should disconnect its connector. Sun visors with holders along with assist grip and the sliding roof opening trim moulding need to be removed as a first step. The XLE and LE grades require disconnecting the connector after removing lenses and screws from the roof drip side channels and roof console box. Continue the process by removing wiper arms followed by hood to cowl top seal and cowl top ventilator louvers before disconnecting washer hoses when required. To cut external moulding rivet flanges use a drill with a rivet cutter attachment while being cautious not to harm the rivet hole. Remove the upper outside moulding with a knife before you proceed to cut the windshield glass using piano wire between its assembly and glass while connecting wooden blocks to the ends to cut the adhesive without harming the paint or ornaments. Clean the contact surface of the body while keeping as much adhesive intact and scrape and clean the removed glass before proceeding. The destroyed stoppers and dams require replacement after cleaning the repair zones prior to new installation. Clean the contact area of the glass followed by application of Primer "M" on the body surface before fixing the glass position and inspecting for equal surface contact. Allow the Primer to dry before continuing. First apply Primer "G" to the glass surface and then distribute Part No. 08850-00801 adhesive from the cartridge or an equivalent solution before it reaches its expiration date. Secure the glass installation by centering it at reference points while applying adhesive at the rim and using protective tape until the adhesive becomes solid. The technician should verify for leakage after the hardening period and apply sealant Part No. 08833-00030 or equivalent to fix any detected leaks. Attachment of appropriate adhesive occurs on the moulding installation area before installing upper outside moulding followed by securing outside moulding with three rivets from an air or hand riveter and repeating this procedure on the second side. The cowl top ventilator louvers with hood to cowl top seal must be reinstalled along with wiper arms, roof console box, roof drip side channels before installing sliding roof opening trim moulding (if applicable) and assist grip, sun visors and holders, front pillar garnishes, front door opening trim covers, and cowl side boards and front door scuff plates.
Related 2000 Toyota Sienna Parts
 2000 Toyota Sienna Windshield Washer Nozzle
 2000 Toyota Sienna Wiper Arm
 2000 Toyota Sienna Car Mirror
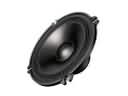 2000 Toyota Sienna Car Speakers
 2000 Toyota Sienna Floor Pan
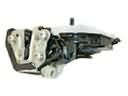 2000 Toyota Sienna Rear Passenger Door Handle Latch
 2000 Toyota Sienna Washer Pump
 2000 Toyota Sienna Washer Reservoir
 2000 Toyota Sienna Windshield Wiper
 2000 Toyota Sienna Wiper Blade
 2000 Toyota Sienna Wiper Linkage
 2000 Toyota Sienna Wiper Motor