×
ToyotaParts- Hello
- Login or Register
- Quick Links
- Live Chat
- Track Order
- Parts Availability
- RMA
- Help Center
- Contact Us
- Shop for
- Toyota Parts
- Scion Parts
My Garage
My Account
Cart
OEM 2000 Toyota RAV4 Shock Absorber
Suspension Shock Absorber- Select Vehicle by Model
- Select Vehicle by VIN
Select Vehicle by Model
orMake
Model
Year
Select Vehicle by VIN
For the most accurate results, select vehicle by your VIN (Vehicle Identification Number).
9 Shock Absorbers found


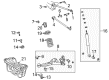
2000 Toyota RAV4 Shock Absorber, Rear
Part Number: 48531-49275$54.96 MSRP: $76.50You Save: $21.54 (29%)Ships in 1-3 Business DaysProduct Specifications- Other Name: Absorber, Shock, Rear; Suspension Kit; Strut Assembly; Shock Set; Complete Strut
- Position: Rear
- Replaces: 48531-49087, 48531-49086, 48531-49077, 48531-49088, 48531-49205, 48531-49075, 48531-49085, 48531-49076
- Item Weight: 1.40 Pounds
- Item Dimensions: 26.4 x 6.6 x 5.8 inches
- Condition: New
- SKU: 48531-49275
- Warranty: This genuine part is guaranteed by Toyota's factory warranty.

2000 Toyota RAV4 Shock Absorber, Rear
Part Number: 48531-49098$62.91 MSRP: $88.31You Save: $25.40 (29%)Ships in 1-3 Business DaysProduct Specifications- Other Name: Absorber, Shock, Rear; Suspension Kit; Strut Assembly; Shock Set; Complete Strut; Shock; Absorber Assembly, Shock, Rear Passenger Side; Absorber Assembly, Shock, Rear Driver Side
- Position: Rear
- Replaces: 48531-49065, 48531-49095, 48531-49097, 48531-49096, 48531-49067, 48531-49066
- Item Weight: 4.10 Pounds
- Item Dimensions: 26.4 x 6.6 x 5.7 inches
- Condition: New
- Fitment Type: Direct Replacement
- SKU: 48531-49098
- Warranty: This genuine part is guaranteed by Toyota's factory warranty.

2000 Toyota RAV4 Shock Absorber, Rear
Part Number: 48531-49148$48.71 MSRP: $67.80You Save: $19.09 (29%)Ships in 1-3 Business DaysProduct Specifications- Other Name: Absorber, Shock, Rear; Suspension Kit; Strut Assembly; Shock Set; Complete Strut; Shock; Absorber Assembly, Shock, Rear Passenger Side; Absorber Assembly, Shock, Rear Driver Side
- Manufacturer Note: W(ELECTRIC MOON ROOF)
- Position: Rear
- Replaces: 48531-49147, 48531-49146, 48531-49145
- Item Weight: 6.80 Pounds
- Item Dimensions: 25.6 x 6.6 x 5.8 inches
- Condition: New
- Fitment Type: Direct Replacement
- SKU: 48531-49148
- Warranty: This genuine part is guaranteed by Toyota's factory warranty.

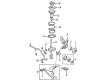
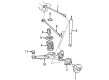
2000 Toyota RAV4 Strut Assembly, Front Driver Side
Part Number: 48520-49067$146.01 MSRP: $206.69You Save: $60.68 (30%)Ships in 1-3 Business DaysProduct Specifications- Other Name: Absorber Assembly, Shock; Front Left Suspension Strut; Shock Absorber Kit; Complete Strut Set.; Strut
- Position: Front Driver Side
- Replaces: 48520-49066, 48520-49065
- Item Weight: 14.80 Pounds
- Item Dimensions: 26.9 x 8.2 x 7.6 inches
- Condition: New
- SKU: 48520-49067
- Warranty: This genuine part is guaranteed by Toyota's factory warranty.
2000 Toyota RAV4 Strut Assembly, Front Driver Side
Part Number: 48520-49027$150.04 MSRP: $212.40You Save: $62.36 (30%)Ships in 1-3 Business DaysProduct Specifications- Other Name: Absorber Assembly, Shock; Front Left Suspension Strut; Shock Absorber Kit; Complete Strut Set.; Strut
- Position: Front Driver Side
- Replaces: 48520-49015, 48520-49025, 48520-49026, 48520-49016
- Item Weight: 12.50 Pounds
- Item Dimensions: 26.1 x 8.6 x 7.7 inches
- Condition: New
- SKU: 48520-49027
- Warranty: This genuine part is guaranteed by Toyota's factory warranty.
2000 Toyota RAV4 Strut Assembly, Front Passenger Side
Part Number: 48510-49067$144.87 MSRP: $205.07You Save: $60.20 (30%)Ships in 1-3 Business DaysProduct Specifications- Other Name: Absorber Assembly, Shock; Front Right Suspension Strut; Shock Absorber Kit; Complete Strut; Strut
- Position: Front Passenger Side
- Replaces: 48510-49065, 48510-49066
- Item Weight: 11.80 Pounds
- Item Dimensions: 26.4 x 8.4 x 7.4 inches
- Condition: New
- SKU: 48510-49067
- Warranty: This genuine part is guaranteed by Toyota's factory warranty.
2000 Toyota RAV4 Strut Assembly, Front Passenger Side
Part Number: 48510-49017$144.87 MSRP: $205.07You Save: $60.20 (30%)Ships in 1-3 Business DaysProduct Specifications- Other Name: Absorber Assembly, Shock; Front Right Suspension Strut; Shock Absorber Kit; Complete Strut; Strut
- Position: Front Passenger Side
- Replaces: 48510-49025, 48510-49016, 48510-49015, 48510-49026
- Item Weight: 11.80 Pounds
- Item Dimensions: 26.6 x 8.2 x 7.4 inches
- Condition: New
- SKU: 48510-49017
- Warranty: This genuine part is guaranteed by Toyota's factory warranty.

2000 Toyota RAV4 Shock Absorber, Rear
Part Number: 48531-49137$55.32 MSRP: $77.00You Save: $21.68 (29%)Ships in 1-3 Business DaysProduct Specifications- Other Name: Absorber, Shock, Rear; Suspension Kit; Strut Assembly; Shock Set; Complete Strut; Absorber Assembly, Shock, Rear Passenger Side; Absorber Assembly, Shock, Rear Driver Side; Shock
- Manufacturer Note: W(235/60R16 TIRE)
- Position: Rear
- Replaces: 48531-49136
- Item Weight: 6.50 Pounds
- Item Dimensions: 26.1 x 6.6 x 5.8 inches
- Condition: New
- Fitment Type: Direct Replacement
- SKU: 48531-49137
- Warranty: This genuine part is guaranteed by Toyota's factory warranty.
2000 Toyota RAV4 Shock Absorber, Rear
Part Number: 48531-49128$50.66 MSRP: $70.52You Save: $19.86 (29%)Product Specifications- Other Name: Absorber, Shock, Rear; Suspension Kit; Strut Assembly; Shock Set; Complete Strut; Absorber Assembly, Shock, Rear Passenger Side; Absorber Assembly, Shock, Rear Driver Side
- Manufacturer Note: W(235/60R16 TIRE)
- Position: Rear
- Replaces: 48531-49126, 48531-49125, 48531-49127
- Item Weight: 6.90 Pounds
- Item Dimensions: 26.1 x 6.6 x 5.9 inches
- Condition: New
- Fitment Type: Direct Replacement
- SKU: 48531-49128
- Warranty: This genuine part is guaranteed by Toyota's factory warranty.
2000 Toyota RAV4 Shock Absorber
Looking for affordable OEM 2000 Toyota RAV4 Shock Absorber? Explore our comprehensive catalogue of genuine 2000 Toyota RAV4 Shock Absorber. All our parts are covered by the manufacturer's warranty. Plus, our straightforward return policy and speedy delivery service ensure an unparalleled shopping experience. We look forward to your visit!
2000 Toyota RAV4 Shock Absorber Parts Q&A
- Q: How to Service and Repair a Shock Absorber on 2000 Toyota RAV4?A: One should begin shock absorber repair by taking off the rear wheel while maintaining a torque value of 103 Nm (1,050 kgf-cm, 76 ft. lbs.). To initiate the shock absorber removal procedure start with suspension cap removal and then unscrew each of the two nuts as well as remove the two retainers and cushion while torquing at 15 Nm (150 kgf-cm, 11 ft. lbs.). Use a jack with wood chip to support the cast iron Number One suspension arm while removing the bolt and retaining two pieces along with shock absorber at 37 Nm torque (380 kgf-cm or 27 ft. lbs.). The procedure requires replacing the lower bushing from the shock absorber. Inspect the shock absorber by compressing then extending its rod for detection of irregular resistance or odd operating sounds; in case you find any irregularities you should change the shock absorber with a new one. Before discarding the shock absorber users must extend the shock absorber rod and then drill a hole in the cylinder center to remove gas contents while taking precautions against flying chip hazards. The procedure follows the opposite sequence of removal steps to perform installation.
Related 2000 Toyota RAV4 Parts
 2000 Toyota RAV4 Ball Joint
 2000 Toyota RAV4 Control Arm
 2000 Toyota RAV4 Control Arm Bushing
 2000 Toyota RAV4 Sway Bar Bushing
 2000 Toyota RAV4 Coil Spring Insulator
 2000 Toyota RAV4 Crossmember Bushing
 2000 Toyota RAV4 Rear Crossmember
 2000 Toyota RAV4 Sway Bar Bracket
 2000 Toyota RAV4 Sway Bar Link
 2000 Toyota RAV4 Trailing Arm
 2000 Toyota RAV4 Trailing Arm Bushing
 2000 Toyota RAV4 Wheel Seal