×
ToyotaParts- Hello
- Login or Register
- Quick Links
- Live Chat
- Track Order
- Parts Availability
- RMA
- Help Center
- Contact Us
- Shop for
- Toyota Parts
- Scion Parts
My Garage
My Account
Cart
OEM 2000 Toyota RAV4 Rack And Pinion
Steering Rack And Pinion- Select Vehicle by Model
- Select Vehicle by VIN
Select Vehicle by Model
orMake
Model
Year
Select Vehicle by VIN
For the most accurate results, select vehicle by your VIN (Vehicle Identification Number).
2 Rack And Pinions found

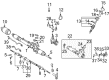
2000 Toyota RAV4 Rack, Front
Part Number: 44204-42021$322.10 MSRP: $459.89You Save: $137.79 (30%)Ships in 1-3 Business DaysProduct Specifications- Other Name: Rack Sub-Assembly, Power; Rack And Pinion Rack Gear, Front; Steering Gearbox; Steering Rack; Rack Sub-Assembly, Power Steering
- Position: Front
- Part Name Code: 44204
- Item Weight: 5.50 Pounds
- Item Dimensions: 32.1 x 3.2 x 2.8 inches
- Condition: New
- Fitment Type: Direct Replacement
- SKU: 44204-42021
- Warranty: This genuine part is guaranteed by Toyota's factory warranty.
 Product Specifications
- Other Name: Gear Assembly, Power Steering; Rack and Pinion Assembly; Steering Gearbox; Rack & Pinion; Gear Assembly; Gear Assembly, Power Steering(For Rack & Pinion)
- Replaces: 44250-42022, 44250-42080, 44250-42021, 44250-42041, 44250-42042
- Part Name Code: 44250
- Item Weight: 17.00 Pounds
- Item Dimensions: 50.7 x 10.8 x 6.6 inches
- Condition: New
- Fitment Type: Direct Replacement
- SKU: 44250-42100
- Warranty: This genuine part is guaranteed by Toyota's factory warranty.
2000 Toyota RAV4 Rack And Pinion
Looking for affordable OEM 2000 Toyota RAV4 Rack And Pinion? Explore our comprehensive catalogue of genuine 2000 Toyota RAV4 Rack And Pinion. All our parts are covered by the manufacturer's warranty. Plus, our straightforward return policy and speedy delivery service ensure an unparalleled shopping experience. We look forward to your visit!
2000 Toyota RAV4 Rack And Pinion Parts Q&A
- Q: How to remove and install the Rack And Pinion on 2000 Toyota RAV4?A: First position the front wheels at ninety degrees before removing the steering wheel pad and the steering wheel from the vehicle. The procedure starts with uninstalling the 13 under cover engine bolts from each side and disconnecting the tie rod ends and removing the pipe with 2 bolts, 2 nuts and 3 gaskets. The next step includes taking out the stabilizer bar with its link and disconnecting No.2 intermediate shaft while using Special Service Tool: 09631-22020 for pressure feed and return tube removal. To detach the pressure feed and return tubing clamps you must first take away the bolt which enables the disconnect. Then disconnect the RH and LH lower suspension arms. Begin by suspending the rack and pinion assembly securely and then remove the front suspension crossmember assembly when all the 2 Rack And Pinion assembly set bolts and nuts have been taken off. The first step for installation includes clamping pressure feed and return tubes before tightening the bolt to 13 Nm (130 kgf-cm, 9 ft. lbs.). Following this, install the front suspension crossmember assembly. Screw in the 2 Rack And Pinion assembly set bolts and nuts while tightening them to 113 Nm (1,150 kgf-cm, 83 ft. lbs.). After that, connect the RH and LH lower suspension arms and attach the stabilizer bar with link. The front exhaust pipe installation requires new gasket torquing on 2 bolts to 48 Nm (490 kgf-cm, 35 ft. lbs.) followed by torquing 3 new gasketed nuts to 62 Nm (630 kgf-cm, 46 ft. lbs.). Use Special Service Tool: 09631-22020 to connect the tubes while torquing to 36 Nm (365 kgf-cm, 26 ft. lbs.) with the tool in a parallel position to the torque wrench and ensure the rack and pinion assembly remains firmly suspended. The front of the vehicle must have the No.2 intermediate shaft and both RH and LH tie rod ends connected. Installation of the RH and LH engine under covers follows by bolting them correctly. Put the front wheels in a forward position before placing the spiral cable at its center point. Then install the steering wheel by matching its markings on the wheel and steering column main shaft. Next tighten the wheel set nut only temporarily while you connect the connector. Power steering system bleeding should be performed before checking steering wheel center alignment and securing the wheel set nut at 34 Nm torque. The steering wheel pad installation follows wheel alignment verification.
Related 2000 Toyota RAV4 Parts
 2000 Toyota RAV4 Steering Wheel
 2000 Toyota RAV4 Ignition Switch
 2000 Toyota RAV4 Power Steering Pump
 2000 Toyota RAV4 Power Steering Reservoir
 2000 Toyota RAV4 Drag Link
 2000 Toyota RAV4 Power Steering Control Valve
 2000 Toyota RAV4 Power Steering Hose
 2000 Toyota RAV4 Rack and Pinion Boot
 2000 Toyota RAV4 Steering Column Cover
 2000 Toyota RAV4 Steering Gear Box
 2000 Toyota RAV4 Steering Shaft
 2000 Toyota RAV4 Tie Rod End