×
ToyotaParts- Hello
- Login or Register
- Quick Links
- Live Chat
- Track Order
- Parts Availability
- RMA
- Help Center
- Contact Us
- Shop for
- Toyota Parts
- Scion Parts
My Garage
My Account
Cart
OEM 2000 Toyota Corolla Shock Absorber
Suspension Shock Absorber- Select Vehicle by Model
- Select Vehicle by VIN
Select Vehicle by Model
orMake
Model
Year
Select Vehicle by VIN
For the most accurate results, select vehicle by your VIN (Vehicle Identification Number).
3 Shock Absorbers found


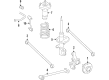
2000 Toyota Corolla Strut, Rear Passenger Side
Part Number: 48530-A9060$139.58 MSRP: $197.59You Save: $58.01 (30%)Ships in 1-3 Business DaysProduct Specifications- Other Name: Absorber Assembly, Shock; Rear Right Suspension Strut; Complete Strut Kit; Shock Absorber; Absorber Assembly, Shock, Rear Passenger Side
- Position: Rear Passenger Side
- Replaces: 48530-80009, 48530-A9040
- Part Name Code: 48530
- Item Weight: 6.60 Pounds
- Item Dimensions: 26.6 x 6.6 x 5.7 inches
- Condition: New
- Fitment Type: Direct Replacement
- SKU: 48530-A9060
- Warranty: This genuine part is guaranteed by Toyota's factory warranty.

2000 Toyota Corolla Strut, Rear Driver Side
Part Number: 48540-A9060$134.76 MSRP: $190.77You Save: $56.01 (30%)Ships in 1-3 Business DaysProduct Specifications- Other Name: Absorber Assembly, Shock; Rear Left Suspension Strut; Complete Strut Kit; Shock Absorber; Absorber Assembly, Shock, Rear Driver Side
- Position: Rear Driver Side
- Replaces: 48540-A9040, 48540-19265
- Part Name Code: 48540
- Item Weight: 10.80 Pounds
- Item Dimensions: 26.1 x 6.7 x 5.7 inches
- Condition: New
- Fitment Type: Direct Replacement
- SKU: 48540-A9060
- Warranty: This genuine part is guaranteed by Toyota's factory warranty.


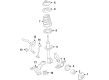
2000 Toyota Corolla Strut, Front Passenger Side
Part Number: 48510-A9060$133.70 MSRP: $189.28You Save: $55.58 (30%)Ships in 1-3 Business DaysProduct Specifications- Other Name: Absorber Assembly, Shock; Front Right Suspension Strut; Complete Strut Kit; Shock Absorber; Absorber Assembly, Shock, Front Passenger Side
- Position: Front Passenger Side
- Part Name Code: 48510
- Item Weight: 9.60 Pounds
- Item Dimensions: 26.9 x 8.3 x 7.5 inches
- Condition: New
- Fitment Type: Direct Replacement
- SKU: 48510-A9060
- Warranty: This genuine part is guaranteed by Toyota's factory warranty.
2000 Toyota Corolla Shock Absorber
Looking for affordable OEM 2000 Toyota Corolla Shock Absorber? Explore our comprehensive catalogue of genuine 2000 Toyota Corolla Shock Absorber. All our parts are covered by the manufacturer's warranty. Plus, our straightforward return policy and speedy delivery service ensure an unparalleled shopping experience. We look forward to your visit!
2000 Toyota Corolla Shock Absorber Parts Q&A
- Q: How to remove and install the Shock Absorber on 2000 Toyota Corolla?A: Starting the suspension strut removal process begins with seat adjustments in a vehicle with a rear seat one-piece fixed type by taking away the seat cushion then the seatback or a rear seat separated type required the rear seatback to be tilted forward. Next, remove the rear wheel. Detaching the wire harness clamp from the ABS speed sensor becomes necessary when ABS is present. The brake fluid should go into a container during the flexible hose removal with Special Service Tool: 09023-00100 while you also remove the clip. To disconnect the stabilizer bar link begin by taking off the nut while applying a hexagon wrench to hold the ball joint stud if it moves independently. Detach the shock absorber with coil spring by unfastening the 2 nuts and bolts at the axle carrier and removing the cap and winding down the central suspension support nut to a point before full removal. Disassembling the shock absorber renders the nut unnecessary for service. The procedure ends with removing the shock absorber fitted with the coil spring after disconnecting its three nuts. Install the shock absorber together with the coil spring first before securing it with 3 nuts at 39 Nm (400 kgf.cm, 29 ft. lbs.), afterward attach it to the rear axle carrier using 2 bolts and nuts torqued to 142 Nm (1,450 kgf.cm, 105 ft. lbs.). If the shock absorber was not disassembled, you would not need to torque the nut that is in the suspension support center to 49 Nm (500 kgf.cm, 36 ft. lbs.). Use a hexagon (5mm) wrench to prevent the ball joint from turning when you install the stabilizer bar link while torquing it to 44 Nm (450 kgf.cm, 33 ft. lbs.). Attach the flexible hose to a new clip through the use of Special Service Tool: 09023-00100 and apply torque at 15 Nm (155 kgf.cm, 11 ft. lbs.). First reconnect the ABS speed sensor wire harness clamp before installing the rear wheel with a torque of 103 Nm (1,050 kgf.cm, 76 ft. lbs.). Then proceed with setting the rear seatback for separated types or installing the one-piece fixed type seat cushions and seatbacks while torquing to 7.9 Nm (80 kgf.cm, 69 inch lbs.). You need to bleed the brake system after completing the alignment check of the rear wheel.
Related 2000 Toyota Corolla Parts
 2000 Toyota Corolla Ball Joint
 2000 Toyota Corolla Steering Knuckle
 2000 Toyota Corolla Alignment Bolt
 2000 Toyota Corolla Axle Shaft
 2000 Toyota Corolla Bump Stop
 2000 Toyota Corolla Control Arm Bolt
 2000 Toyota Corolla Control Arm Bracket
 2000 Toyota Corolla Front Cross-Member
 2000 Toyota Corolla Shock And Strut Mount
 2000 Toyota Corolla Strut Housing
 2000 Toyota Corolla Suspension Strut Rod
 2000 Toyota Corolla Sway Bar Bushing