×
ToyotaParts- Hello
- Login or Register
- Quick Links
- Live Chat
- Track Order
- Parts Availability
- RMA
- Help Center
- Contact Us
- Shop for
- Toyota Parts
- Scion Parts
My Garage
My Account
Cart
OEM 2000 Toyota 4Runner Brake Pad Set
Disc Brake Pad Set- Select Vehicle by Model
- Select Vehicle by VIN
Select Vehicle by Model
orMake
Model
Year
Select Vehicle by VIN
For the most accurate results, select vehicle by your VIN (Vehicle Identification Number).
1 Brake Pad Set found


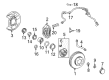
2000 Toyota 4Runner Brake Pads, Front
Part Number: 04465-35240$75.25 MSRP: $104.50You Save: $29.25 (28%)Ships in 1 Business DayProduct Specifications- Other Name: Pad Kit, Disc Brake; Disc Brake Pad Kit; Disc Brake Pad Set; Front Pads; Pad Kit, Disc Brake, Front
- Position: Front
- Replaces: 04465-35190, 04465-35230
- Part Name Code: 04465
- Item Weight: 4.60 Pounds
- Item Dimensions: 15.8 x 11.3 x 3.3 inches
- Condition: New
- Fitment Type: Direct Replacement
- SKU: 04465-35240
- Warranty: This genuine part is guaranteed by Toyota's factory warranty.
2000 Toyota 4Runner Brake Pad Set
Looking for affordable OEM 2000 Toyota 4Runner Brake Pad Set? Explore our comprehensive catalogue of genuine 2000 Toyota 4Runner Brake Pad Set. All our parts are covered by the manufacturer's warranty. Plus, our straightforward return policy and speedy delivery service ensure an unparalleled shopping experience. We look forward to your visit!
2000 Toyota 4Runner Brake Pad Set Parts Q&A
- Q: How to replace the Brake Pad Set on 2000 Toyota 4Runner?A: The brake pad replacement process begins with front wheel removal to check how much pad lining has deteriorated below 1.0 mm (0.039 inch) before pad replacement. Follow these steps to disassemble the brake components by taking out the clip and pins and anti-rattle spring together with 2 pads and 4 anti-squeal shims while noting the anti-rattle spring is usable when it stays deformed, cracked, and worn free from rust and foreign substances. Before pad installation check the disk thickness along with runout values while replacing all anti-squeal shims. Using a monkey wrench handle or equivalent tool with taped ends, push the brake pistons in and draw brake fluid from the reservoir before changing the pad from one wheel at a time to avoid the opposing piston from escaping. When a piston becomes stubborn to force in, loosen the bleeder plug to let out some fluid. Insert the front anti-squeal shims onto the newly installed pads before applying disc brake grease to both shim surfaces. Mount the pads into their position without exposing any lubricant to their friction contact points. The installation process ends with fitting the anti-rattle spring then the two pins followed by the clip before reinstalling the front wheel.
Related 2000 Toyota 4Runner Parts
 2000 Toyota 4Runner Brake Line
 2000 Toyota 4Runner Speed Sensor
 2000 Toyota 4Runner Wheel Bearing
 2000 Toyota 4Runner Wheel Hub
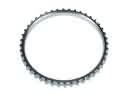 2000 Toyota 4Runner ABS Reluctor Ring
 2000 Toyota 4Runner Brake Caliper Piston
 2000 Toyota 4Runner Brake Disc
 2000 Toyota 4Runner Brake Master Cylinder
 2000 Toyota 4Runner Brake Shoe Set
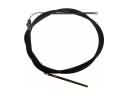 2000 Toyota 4Runner Parking Brake Cable
 2000 Toyota 4Runner Parking Brake Shoe
 2000 Toyota 4Runner Wheel Cylinder Repair Kit