×
ToyotaParts- Hello
- Login or Register
- Quick Links
- Live Chat
- Track Order
- Parts Availability
- RMA
- Help Center
- Contact Us
- Shop for
- Toyota Parts
- Scion Parts
My Garage
My Account
Cart
A/C Condenser, Compressor & Lines
2009 Scion xB A/C Compressor, A/C Condenser, A/C Hose
Currently shopping for
2009 Scion xB
Change VehicleVehicle Options
Base; 4 Cyl 2.4 L GASVehicle Options
Base; 4 Cyl 2.4 L GASCategories Close X
Currently selected
A/C & Heating
Other Categories
Air & Fuel Delivery
Belts & Cooling
Body & Hardware
Brakes
Charging & Starting
Driveline & Axles
Electrical
Emission Control & Exhaust
Engine
Headlights & Lighting
Interior & Exterior Trim
Maintenance & Lubrication
Steering
Suspension
Transmission
Categories Close X
How to use OE catalog
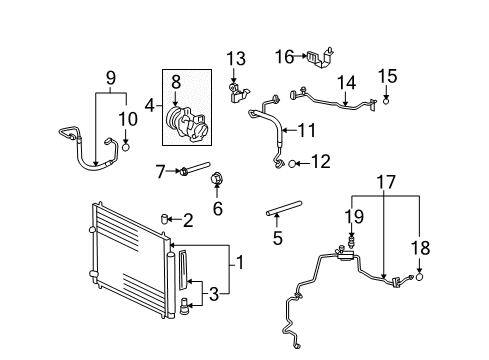
Diagram (1 of 1): Air conditioner & heater - Condenser, compressor & lines
Sort by:
Ref No.
Ref No.
Part No. & Part Description
Price & Qty.
Part No. &
Part Description
Part Description
- 1
 MSRP: $370.25 Your Price: $259.321
 - 1MSRP: $190.10 Your Price: $134.501
- 2

 MSRP: $5.14 Your Price: $3.691
- 3


 MSRP: $133.88 Your Price: $95.381
- 4
 MSRP: $563.20 Your Price: $384.301
- 5
 MSRP: $5.97 Your Price: $4.291
- 6

 MSRP: $1.98 Your Price: $1.421
- 7

 MSRP: $2.48 Your Price: $1.781
- 9
 MSRP: $145.20 Your Price: $103.441
- 10

 MSRP: $6.30 Your Price: $4.5310
- 11
 MSRP: $155.51 Your Price: $110.791
- 12

 MSRP: $7.47 Your Price: $5.371
- 13
 MSRP: $23.44 Your Price: $16.841
- 14
 MSRP: $148.53 Your Price: $105.811
- 15
 MSRP: $7.47 Your Price: $5.371
- 16
 MSRP: $43.12 Your Price: $30.971
- 17
 MSRP: $394.03 Your Price: $275.981
- 18

 MSRP: $3.64 Your Price: $2.6210
- 19


 MSRP: $311.86 Your Price: $218.431
")
") MSRP: $1.65 Your Price: $1.18
MSRP: $1.65 Your Price: $1.18
")
") MSRP: $6.80 Your Price: $4.89
MSRP: $6.80 Your Price: $4.89
")
") MSRP: $1.81 Your Price: $1.30
MSRP: $1.81 Your Price: $1.30
")
") MSRP: $7.47 Your Price: $5.37
MSRP: $7.47 Your Price: $5.37
")
") MSRP: $1.98 Your Price: $1.42
MSRP: $1.98 Your Price: $1.42
 88310-1A730
Compressor Assy, W/Pulley- Production Date: 03/2007-03/2010
- Fitting Vehicle Options: AZE151
- Part Name Code: 88310
MSRP: $2364.33 Your Price: $1613.31
 MSRP: $1.65 Your Price: $1.18
")
") MSRP: $6.30 Your Price: $4.53
MSRP: $6.30 Your Price: $4.53
OEM 2009 Scion xB Parts for A/C Condenser, Compressor & Lines
Genuine 2009 Scion xB parts are produced by Scion with the official design and standards, thus they ensure a high quality throughout the production process. OEM parts are the ideal choice for people looking for new A/C Condenser, Compressor & Lines parts. With our competitive prices, we offer 2009 Scion xB A/C Compressor, A/C Condenser, A/C Hose that fit tight budgets, while still including the manufacturer warranties, a hassle-free returns policy and quick shipping options.
A/C Compressor, A/C Condenser Installation and Repair Tips for 2009 Scion xB
- Q: How to install an A/C Condenser on 2009 Scion xB?A: In order to fit the condenser, install it in the car without breaking it. Put compressor oil in a new condenser, take off the vinyl tape in the air conditioning tube and put oil on the O-ring. Fix tube and discharge hose to condenser. Install the fan shroud, radiator support, etc and fill the refrigerant and check again.
- Q: How to remove the A/C Compressor on 2009 Scion xB?A: To access the compressor of the HVAC to the 2AZ-FE engine, it is necessary to first remove refrigerant in the system. Disassemble the engine under covers, fan and generator V belt. Unhose the suction and discharge sub-assemblies and cover the holes with vinyl tape. Lastly, pull out the compressor part by untexting the connector and bolts.