×
ToyotaParts- Hello
- Login or Register
- Quick Links
- Live Chat
- Track Order
- Parts Availability
- RMA
- Help Center
- Contact Us
- Shop for
- Toyota Parts
- Scion Parts
My Garage
My Account
Cart
OEM Toyota Venza Intake Manifold
Engine Intake Manifold- Select Vehicle by Model
- Select Vehicle by VIN
Select Vehicle by Model
orMake
Model
Year
Select Vehicle by VIN
For the most accurate results, select vehicle by your VIN (Vehicle Identification Number).
4 Intake Manifolds found

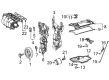
Toyota Venza Intake Manifold Part Number: 17120-F0020
$383.73 MSRP: $562.36You Save: $178.63 (32%)Ships in 1-2 Business Days
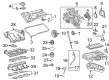
Toyota Venza Manifold, Intake, Lower Part Number: 17111-31141
$404.50 MSRP: $592.80You Save: $188.30 (32%)Ships in 1-3 Business Days
Toyota Venza Manifold, Intake, Lower Part Number: 17111-0P030
$416.87 MSRP: $610.93You Save: $194.06 (32%)Ships in 1-3 Business Days
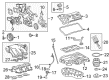
Toyota Venza Intake Manifold Part Number: 17120-36030
$840.91 MSRP: $1232.36You Save: $391.45 (32%)Ships in 1-3 Business Days
Toyota Venza Intake Manifold
Choose genuine Intake Manifold that pass strict quality control tests. You can trust the top quality and lasting durability. Shopping for OEM Intake Manifold for your Toyota Venza? Our website is your one-stop destination. We stock an extensive selection of genuine Toyota Venza parts. The price is affordable so you can save more. It only takes minutes to browse and find the exact fit. Easily add to cart and check out fast. Our hassle-free return policy will keep you stress-free. We process orders quickly for swift delivery. Your parts will arrive faster, so you can get back on the road sooner.
The Toyota Venza Intake Manifold is one of the important parts that help to boost the performance of the Toyota Venza cars. Being a critical component of the engine, the Intake Manifold is responsible for providing the required flow of air or the air/fuel mixture for the cylinder head intake port with ease with a view of improving on the power and efficiency of the engine. Present Toyota Venza models incorporate New Engine Technologies in terms of Intake Manifolds; composed of composite plastic materials that contributes not only to better fuel efficiency but reduced air temperature for more efficient combustion. This is accompanied by Variable Length Intake Manifolds (VLIM) to raise the Venza's performance by varying the length of the intake tract relative to the load, aero-acoustic technique like Venturi effect and Helmholtz resonance. Through this technology, Toyota Venza continues to be an ideal car for any driver who wants to drive a car that is powerful as well as safe. This cross over SUV is a mid-size car which has received commendation for various safety aspects some of them being the IIHS' Top Safety Pick. The Intake Manifold works; this is because the different models of Venza must possess the same efficiency and safety features. Some of them include; Super Electronically Controlled Transmission (Super ECT) new features in the facelifted version that put the Toyota Venza on the map in the auto market. In conclusion the Toyota Venza Intake Manifold presents the company in the premier way possible that is quality, performance and innovation.
Toyota Venza Intake Manifold Parts and Q&A
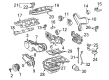
- Q: How to remove the intake manifold on Toyota Venza?A:Discharging fuel system pressure stands as the first step when removing the intake manifold. Users need to disconnect the negative battery cable followed by a potential system initialization procedure after reconnecting the cable. You should begin by taking off the Throttle Body assembly after disconnecting the vacuum switching valve assembly for ACIS and removing its two vacuum hoses, two union to connector tube hoses, clamp and connector before removing the bolt. Remove the No. 2 ventilation hose from the intake manifold then disconnect its union to connector tube hose. The next step requires removal of the fuel delivery pipe sub-assembly. The intake manifold removal process involves removing two bolts along with two wire harness brackets and disconnecting the fuel vapor feed hose and its clamp and connector and extracting the bolt combined with a wire harness bracket. The procedure takes between 1 and 3 seconds to apply battery voltage to the connector terminals while closing tumble control valves. The technique must not surpass 3 seconds because it could damage the actuator. Proceed to remove the bolt while detaching both clamp mechanisms from the intake manifold along with bracket until the intake air control valve actuator connector disconnectes and all six bolts securing the intake manifold are removed. Tumble control valves can sustain damage when the intake manifold installation occurs without pre-closing them. Eliminate the intake manifold gasket while unplugging the two vacuum hoses situated at the intake manifold and extracting the check valve. The last step includes removing the bolt as well as the wiring harness clamp bracket after which you can take out the three bolts that secure the engine mounting damper.
- Q: How to install the intake manifold on Toyota Venza?A:Before mounting the intake manifold you must secure the engine mounting damper through 3 bolts which need to be torqued at 9.0 Nm (92 kgf-cm, 80 in-lbf). Attach the wiring harness clamp bracket to the manifold through a torqued bolt which amounts to 8.4 Nm (86 kgf-cm, 74 in-lbf). Fit the check valve into position through the 2 vacuum hoses attached to the intake manifold. The tumble control valves should be closed through terminal connection of the actuator to the battery to avoid installation damage. Place a new gasket on the intake manifold and fasten it through six bolts following a specific installation sequence while requiring 21 Nm torque (214 kgf-cm or 15 ft-lbf). Secure the intake air control actuator connector and tighten 2 clamps onto the intake manifold and bracket while installing the wire harness through a 8.4 Nm (86 kgf-cm, 74 in-lbf) torquing process. Experience follows by bolting and torquing another bracket assembly. Then link the fuel vapor feed hose through its clamp and connector before attaching the two wire harness brackets with 2 bolts at 8.4 Nm (86 kgf-cm, 74 in-lbf). The installation procedure begins with the sub-assembly followed by connecting the hose between the union and connector tube to the intake manifold. Finally, connect the ventilation hose at position number two. Replace the vacuum switching valve assembly (which has ACIS functionality) by tightening its bolt to 9.0 Nm (92 kgf-cm, 80 in-lbf) before installing its 2 vacuum hoses, 2 union to connector tube hoses and connector as well as clamp. Install the Throttle Body followed by connecting the cable to the negative battery terminal while system initialization requirements may arise after the reconnection process. Finally, inspect for fuel leaks.


Related Toyota Venza Parts
 Toyota Venza Air Filter
 Toyota Venza Gas Cap
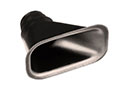 Toyota Venza Air Duct
 Toyota Venza Air Filter Box
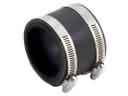 Toyota Venza Air Intake Coupling
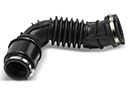 Toyota Venza Air Intake Hose
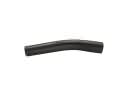 Toyota Venza Fuel Filler Hose
 Toyota Venza Fuel Pressure Regulator
 Toyota Venza Fuel Tank
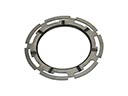 Toyota Venza Fuel Tank Lock Ring
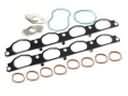 Toyota Venza Intake Manifold Gasket
 Toyota Venza Mass Air Flow Sensor