×
ToyotaParts- Hello
- Login or Register
- Quick Links
- Live Chat
- Track Order
- Parts Availability
- RMA
- Help Center
- Contact Us
- Shop for
- Toyota Parts
- Scion Parts
My Garage
My Account
Cart
OEM Toyota Venza Front Cross-Member
Front Engine Cross Member- Select Vehicle by Model
- Select Vehicle by VIN
Select Vehicle by Model
orMake
Model
Year
Select Vehicle by VIN
For the most accurate results, select vehicle by your VIN (Vehicle Identification Number).
5 Front Cross-Members found


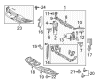
Toyota Venza Lower Tie Bar, Front Part Number: 57104-07022
$317.10 MSRP: $452.75You Save: $135.65 (30%)Ships in 1-3 Business Days
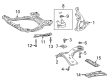
Toyota Venza Engine Cradle, Front Part Number: 51100-0R012
$1551.87 MSRP: $2274.29You Save: $722.42 (32%)Ships in 1-2 Business Days
Toyota Venza Engine Cradle, Front Part Number: 51100-0T021
$1089.80 MSRP: $1597.11You Save: $507.31 (32%)Ships in 1-3 Business DaysToyota Venza Engine Cradle, Front Part Number: 51100-0T023
$1351.32 MSRP: $1980.37You Save: $629.05 (32%)
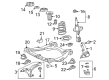
Toyota Venza Lower Tie Bar, Front Part Number: 57104-0R050
$141.93 MSRP: $200.92You Save: $58.99 (30%)Ships in 1-2 Business Days
Toyota Venza Front Cross-Member
Choose genuine Front Cross-Member that pass strict quality control tests. You can trust the top quality and lasting durability. Shopping for OEM Front Cross-Member for your Toyota Venza? Our website is your one-stop destination. We stock an extensive selection of genuine Toyota Venza parts. The price is affordable so you can save more. It only takes minutes to browse and find the exact fit. Easily add to cart and check out fast. Our hassle-free return policy will keep you stress-free. We process orders quickly for swift delivery. Your parts will arrive faster, so you can get back on the road sooner.
Toyota Venza Front Cross-Member Parts and Q&A
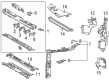
- Q: How to install the Front Cross-Member and associated components on Toyota Venza?A:First secure the new front suspension member body mounting rear cushion LH according to its correct orientation by using Special Service Tool: 09830-10010 to clamp it down until no space remains between the front suspension member and the cushion. The same tool should be used to mount the front suspension member body mounting rear cushion RH. Move the front suspension member body mounting front cushion into place after making sure of its correct orientation and fasten it using Special Service Tool: 09830-10010 then verify that no clearance exists. After installing the front suspension member body mounting rear stopper and front stopper the technician must fit the front suspension member dynamic damper for 2WD by using two bolts which require a torque of 29 Nm (296 kgf-cm, 21 ft-lbf). Both front lower suspension arms require installation following identical procedures on the left-hand and right-hand sides. The technician should tighten front engine mounting insulator assembly and engine mounting insulator LH, engine mounting insulator RH, and rear engine mounting insulator for the 2GR-FE. Then they must install the front frame assembly of this same engine. The complete torque tightening for the 2GR-FE engine involves assembling front engine mounting insulator and both engine mounting insulators LH and RH and rear engine mounting insulator. Perform the partial and complete tightening methods two times on the 1AR-FE AWD engine components consisting of the front engine mounting insulator assembly along with engine mounting insulator LH and engine mounting insulator RH and rear engine mounting insulator. The last step consists of fitting the steering link assembly with the front stabilizer bar along with the front stabilizer link assembly followed by the front No. 1 stabilizer bracket LH and RH until the engine assembly with transaxle installation is finished for both the 2GR-FE and 1AR-FE engines.
- Q: How to remove the front cross-member on Toyota Venza?A:Your first step must be to remove both 2GR-FE and 1AR-FE engine assemblies with transaxles in order to proceed with front cross-member removal. The removal process starts with the unstabilization of front No. 1 stabilizer brackets on both left and right sides of the vehicle before disassembling the stabilizer bar along with its attached stabilizer link assembly and steering link assembly. Begin with 2GR-FE engine front frame assembly disconnection before proceeding to take out the front engine mounting insulator assembly and left and right engine mounting insulators together with the 2GR-FE engine rear mounting insulator. The 1AR-FE AWD requires removal of the front frame assembly together with the front engine mounting insulator assembly and engine mounting insulators from both sides and the rear engine mounting insulator. The next operation requires front lower suspension arm removal from both sides followed by removal of the front suspension member dynamic damper through its two bolt mounts. To uninstall the front suspension member body mounting front stopper, rear stopper and front cushion use Special Service Tool 09830-10010 which must anchor onto the mounting front cushion while tightening slowly with uniform effort and indicating that the front mounting cushion cannot be reinstalled. You should perform this operation on the front suspension member body mounting rear cushion left-hand and right-hand components with the same Special Service Tool alongside identical precautions for both mounts.


Related Toyota Venza Parts
 Toyota Venza Shock Absorber
 Toyota Venza Bump Stop
 Toyota Venza Coil Spring Insulator
 Toyota Venza Coil Springs
 Toyota Venza Control Arm
 Toyota Venza Control Arm Bolt
 Toyota Venza Shock and Strut Boot
 Toyota Venza Strut Bearing
 Toyota Venza Strut Housing
 Toyota Venza Strut Mounts
 Toyota Venza Sway Bar Bushing
 Toyota Venza Sway Bar Link