×
ToyotaParts- Hello
- Login or Register
- Quick Links
- Live Chat
- Track Order
- Parts Availability
- RMA
- Help Center
- Contact Us
- Shop for
- Toyota Parts
- Scion Parts
My Garage
My Account
Cart
OEM Toyota Sienna Radiator Cap
Cooling Radiator Cap- Select Vehicle by Model
- Select Vehicle by VIN
Select Vehicle by Model
orMake
Model
Year
Select Vehicle by VIN
For the most accurate results, select vehicle by your VIN (Vehicle Identification Number).
9 Radiator Caps found


Toyota Sienna Cap Sub-Assembly(For Water Outlet) Part Number: 16401-62090
$23.17 MSRP: $32.25You Save: $9.08 (29%)Ships in 1-3 Business Days


Toyota Sienna Radiator Cap Part Number: 16401-36030
$17.67 MSRP: $24.60You Save: $6.93 (29%)Ships in 1-3 Business Days

Toyota Sienna Radiator Cap Part Number: 16475-28140
$24.13 MSRP: $33.58You Save: $9.45 (29%)Ships in 1 Business Day


Toyota Sienna Cap Sub-Assembly, Water Filler Part Number: 16401-31480
$17.55 MSRP: $24.43You Save: $6.88 (29%)Ships in 1-3 Business Days

Toyota Sienna Reservoir Cap Part Number: 16471-03010
$6.80 MSRP: $9.46You Save: $2.66 (29%)Ships in 1-2 Business Days


Toyota Sienna Cap Sub-Assembly, Reserve Tank Part Number: 16405-0P040
$15.52 MSRP: $21.61You Save: $6.09 (29%)Ships in 1-3 Business Days

Toyota Sienna Cap Sub-Assembly, Reserve Tank Part Number: 16471-0A030
$6.80 MSRP: $9.46You Save: $2.66 (29%)Ships in 1-3 Business Days
Toyota Sienna Radiator Cap Part Number: 16401-31830
$16.84 MSRP: $23.44You Save: $6.60 (29%)Ships in 1-3 Business Days

Toyota Sienna Cap Sub-Assembly, Reserve Tank Part Number: 16405-F0030
$5.37 MSRP: $7.47You Save: $2.10 (29%)Ships in 1-3 Business Days
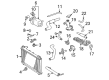
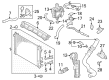
Toyota Sienna Radiator Cap
Choose genuine Radiator Cap that pass strict quality control tests. You can trust the top quality and lasting durability. Shopping for OEM Radiator Cap for your Toyota Sienna? Our website is your one-stop destination. We stock an extensive selection of genuine Toyota Sienna parts. The price is affordable so you can save more. It only takes minutes to browse and find the exact fit. Easily add to cart and check out fast. Our hassle-free return policy will keep you stress-free. We process orders quickly for swift delivery. Your parts will arrive faster, so you can get back on the road sooner.
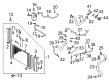
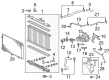
Toyota Sienna Radiator Cap is a minor but important task to ensure that this multi-purpose minivan is prepared to accompany the family on a trip and complete the daily job. Smooth camry based handling, a spacious interior that carries up to eight passengers, ingenious storage bins, and stable engines that are highly fuel-efficient are among the strengths attributed to the Toyota Sienna that leave the owners with little or no fears of long trips and rush trips to school. High safety scores, four zone climate control, and ease of use demonstrate the manner in which it balances comfort with durability and this explains why many families remain loyal to Toyota. In keeping up with such philosophy, the Sienna Radiator Cap coded the cooling system, increased the boiling temperature of the coolant, and made the overflow channel to a reservoir, to ensure that the engine is operated at the optimal temperature at city traffic or mountain ascents. Constructed to factory standards, every Radiator Cap is made of sturdy materials and an accurate spring that makes the Sienna cap stand up to the heat cycles and maintains pressure steady keeping gaskets, hoses, and costly engine components safe. Radiator Cap requires installation, steps and conditions to fit a cap on a Toyota Sienna, park on level ground, allow the engine to cool completely, wipe off the old cap with a cloth, carefully twist the old one off to allow it to release any remaining pressure, ensure the filler neck is clear, replace the old cap positioning it until it snaps and turns, and finally, start up the engine and check for leakages.
Related Toyota Sienna Parts
 Toyota Sienna Thermostat Housing
 Toyota Sienna Coolant Reservoir
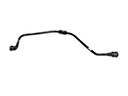 Toyota Sienna Coolant Reservoir Hose
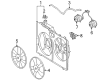
 Toyota Sienna Cooling Fan Assembly
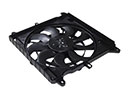 Toyota Sienna Cooling Fan Module
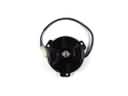 Toyota Sienna Fan Motor
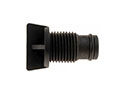 Toyota Sienna Radiator Drain Plug
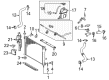
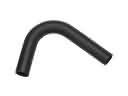 Toyota Sienna Radiator Hose
 Toyota Sienna Thermostat Gasket
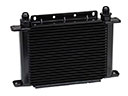 Toyota Sienna Transmission Oil Cooler
 Toyota Sienna Water Pump Gasket
 Toyota Sienna Water Pump Pulley