×
ToyotaParts- Hello
- Login or Register
- Quick Links
- Live Chat
- Track Order
- Parts Availability
- RMA
- Help Center
- Contact Us
- Shop for
- Toyota Parts
- Scion Parts
My Garage
My Account
Cart
OEM Toyota Sequoia Window Regulator
Electric Power Window Regulator- Select Vehicle by Model
- Select Vehicle by VIN
Select Vehicle by Model
orMake
Model
Year
Select Vehicle by VIN
For the most accurate results, select vehicle by your VIN (Vehicle Identification Number).
12 Window Regulators found


Toyota Sequoia Window Regulator, Driver Side Part Number: 69802-0C030
$97.99 MSRP: $137.54You Save: $39.55 (29%)Ships in 1-2 Business Days


Toyota Sequoia Window Regulator, Driver Side Part Number: 69804-0C040
$307.08 MSRP: $438.44You Save: $131.36 (30%)Ships in 1-3 Business Days

Toyota Sequoia Window Regulator, Driver Side Part Number: 69804-0C010
$91.94 MSRP: $129.06You Save: $37.12 (29%)Ships in 1-3 Business Days
Toyota Sequoia Window Regulator, Passenger Side Part Number: 69803-0C010
$91.94 MSRP: $129.06You Save: $37.12 (29%)Ships in 1-3 Business Days
Toyota Sequoia Window Regulator, Passenger Side Part Number: 69801-0C030
$91.23 MSRP: $128.06You Save: $36.83 (29%)Ships in 1-3 Business Days

Toyota Sequoia Window Regulator, Passenger Side Part Number: 69801-0C020
$113.99 MSRP: $160.00You Save: $46.01 (29%)Ships in 1-3 Business Days

Toyota Sequoia Window Regulator, Passenger Side Part Number: 69801-0C041
$93.72 MSRP: $131.55You Save: $37.83 (29%)Ships in 1-2 Business DaysToyota Sequoia Window Regulator, Passenger Side Part Number: 69803-0C040
$316.40 MSRP: $451.75You Save: $135.35 (30%)Ships in 1-3 Business DaysToyota Sequoia Window Regulator, Driver Side Part Number: 69802-0C041
$93.72 MSRP: $131.55You Save: $37.83 (29%)Ships in 1-2 Business Days
Toyota Sequoia Window Regulator, Driver Side Part Number: 69804-0C051
$98.34 MSRP: $138.04You Save: $39.70 (29%)Ships in 1-2 Business Days
Toyota Sequoia Window Regulator, Passenger Side Part Number: 69803-0C051
$98.34 MSRP: $138.04You Save: $39.70 (29%)Ships in 1-2 Business Days
Toyota Sequoia Window Regulator, Driver Side Part Number: 69802-0C020
$113.99 MSRP: $160.00You Save: $46.01 (29%)
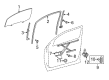
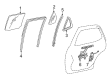
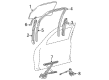
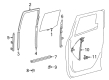
Toyota Sequoia Window Regulator
Choose genuine Window Regulator that pass strict quality control tests. You can trust the top quality and lasting durability. Shopping for OEM Window Regulator for your Toyota Sequoia? Our website is your one-stop destination. We stock an extensive selection of genuine Toyota Sequoia parts. The price is affordable so you can save more. It only takes minutes to browse and find the exact fit. Easily add to cart and check out fast. Our hassle-free return policy will keep you stress-free. We process orders quickly for swift delivery. Your parts will arrive faster, so you can get back on the road sooner.
Toyota Sequoia Window Regulator Parts and Q&A
- Q: How to remove the rear door window regulator on Toyota Sequoia?A:Disconnection of the negative battery cable serves as the first step when removing the rear door window regulator although some systems need an initialization procedure after reconnecting power. The service procedure begins by discarding five components starting with front door lower frame bracket garnish followed by front door inside handle bezel plug and front armrest base upper panel and then front door trim board sub-assembly and outer rear view mirror assembly. Begin by disconnecting the negative battery terminal cable before removing successively the front door glass outer Weather Strip assembly followed by the No. 1 front door trim bracket leading to the front door service hole cover then the front door glass run and front door glass sub-assembly before ending with the front door window regulator sub-assembly. A "TORX" socket wrench T25 is needed to uninstall the motor assembly power window regulator by removing its securing screws (3). Unfasten the rear door frame garnish followed by the rear door armrest base upper panel and rear door inside handle bezel plug, then proceed to remove the rear door trim board sub-assembly and rear door trim No. 2 bracket. Start by removing components that include the rear door service hole cover and other related accessories consisting of rear door window frame rear moulding, rear door glass outer Weather Strip, rear door glass run, rear door window rear lower frame sub-assembly and rear door window front guide sub-assembly, and rear door glass sub-assembly. When replacing the rear door window regulator sub-assembly users should use a "TORX" socket wrench T25 to detach three screws then the power window regulator motor.

Related Toyota Sequoia Parts
 Toyota Sequoia Seat Covers
 Toyota Sequoia Interior Door Handle
 Toyota Sequoia Ashtray
 Toyota Sequoia Center Console Base
 Toyota Sequoia Center Console Latch
 Toyota Sequoia Cigarette Lighter
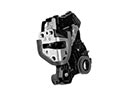 Toyota Sequoia Door Lock
 Toyota Sequoia Door Lock Cylinder
 Toyota Sequoia Emblem
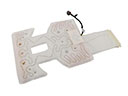 Toyota Sequoia Seat Heater
 Toyota Sequoia Seat Heater Switch
 Toyota Sequoia Weather Strip
Browse Toyota Sequoia Window Regulator by Years
2025
2024
2023
2022
2021
2020
2019
2018
2017
2016
2015
2014
2013
2012
2011
2010
2009
2008
2007
2006
2005
2004
2003
2002
2001