×
ToyotaParts- Hello
- Login or Register
- Quick Links
- Live Chat
- Track Order
- Parts Availability
- RMA
- Help Center
- Contact Us
- Shop for
- Toyota Parts
- Scion Parts
My Garage
My Account
Cart
OEM Toyota RAV4 Grille
Front Grille- Select Vehicle by Model
- Select Vehicle by VIN
Select Vehicle by Model
orMake
Model
Year
Select Vehicle by VIN
For the most accurate results, select vehicle by your VIN (Vehicle Identification Number).
49 Grilles found


Toyota RAV4 Grille, Front Upper Part Number: 53101-42411
$267.47 MSRP: $381.89You Save: $114.42 (30%)Ships in 1-3 Business Days

Toyota RAV4 Grille, Front Upper Part Number: 53101-0R130
$127.01 MSRP: $179.79You Save: $52.78 (30%)Ships in 1-2 Business Days

Toyota RAV4 Lower Grille Part Number: 53113-0R060
$74.76 MSRP: $104.95You Save: $30.19 (29%)Ships in 1-3 Business Days

Toyota RAV4 Upper Grille, Lower Part Number: 53112-0R120
$80.45 MSRP: $112.93You Save: $32.48 (29%)Ships in 1-3 Business Days

Toyota RAV4 Grille Assembly, Front Upper Part Number: 53101-0R010
$116.95 MSRP: $164.16You Save: $47.21 (29%)Ships in 1-3 Business Days
Toyota RAV4 Grille, Front Upper Part Number: 53101-0R120
$190.58 MSRP: $272.11You Save: $81.53 (30%)Ships in 1-3 Business Days

Toyota RAV4 Grille, Lower Part Number: 53113-0R010
$20.42 MSRP: $28.43You Save: $8.01 (29%)Ships in 1-3 Business Days

Toyota RAV4 Grille, Lower Part Number: 53112-42050
$25.32 MSRP: $35.25You Save: $9.93 (29%)Ships in 1-3 Business Days

Toyota RAV4 Grille, Lower Part Number: 53113-42040
$29.15 MSRP: $40.57You Save: $11.42 (29%)Ships in 1-3 Business Days

Toyota RAV4 Grille, Lower Part Number: 53112-0R010
$29.39 MSRP: $40.90You Save: $11.51 (29%)Ships in 1-3 Business Days

Toyota RAV4 Lower Grille Part Number: 53112-0R030
$35.12 MSRP: $48.89You Save: $13.77 (29%)Ships in 1-3 Business Days

Toyota RAV4 Center Grille, Lower Part Number: 53112-0R070
$38.23 MSRP: $53.21You Save: $14.98 (29%)Ships in 1-3 Business Days
Toyota RAV4 Center Grille, Lower Part Number: 53112-0R060
$39.18 MSRP: $54.54You Save: $15.36 (29%)Ships in 1 Business Day
Toyota RAV4 Center Grille, Lower Part Number: 53112-0R100
$50.06 MSRP: $69.68You Save: $19.62 (29%)Ships in 1-3 Business Days


Toyota RAV4 Lower Grille Part Number: 53113-42140
$74.05 MSRP: $103.94You Save: $29.89 (29%)Ships in 1-3 Business Days


Toyota RAV4 Lower Grille Part Number: 53113-0R100
$81.75 MSRP: $114.76You Save: $33.01 (29%)Ships in 1-3 Business Days
Toyota RAV4 Lower Grille Part Number: 53113-0R071
$89.34 MSRP: $125.40You Save: $36.06 (29%)Ships in 1-3 Business Days

Toyota RAV4 Upper Grille, Front Part Number: 53111-0R120
$111.26 MSRP: $156.17You Save: $44.91 (29%)Ships in 1-3 Business Days

Toyota RAV4 Grille Assembly, Front Part Number: 53101-42140
$109.60 MSRP: $153.85You Save: $44.25 (29%)Ships in 1-3 Business Days

Toyota RAV4 Lower Grille, Black Part Number: 53113-0R090
| Page 1 of 3 |Next >
1-20 of 49 Results
Toyota RAV4 Grille
Choose genuine Grille that pass strict quality control tests. You can trust the top quality and lasting durability. Shopping for OEM Grille for your Toyota RAV4? Our website is your one-stop destination. We stock an extensive selection of genuine Toyota RAV4 parts. The price is affordable so you can save more. It only takes minutes to browse and find the exact fit. Easily add to cart and check out fast. Our hassle-free return policy will keep you stress-free. We process orders quickly for swift delivery. Your parts will arrive faster, so you can get back on the road sooner.
Toyota RAV4 Grille Parts and Q&A
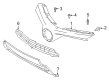
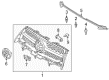
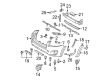
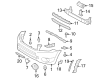
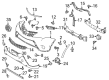
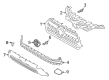
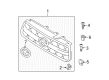
- Q: How to remove and reassemble the radiator grille on Toyota RAV4?A:The process of radiator grille removal begins with unfastening the grille then continuing with the No.1 radiator grille lower followed by the No.2 radiator grille lower. Use a heat light to warm the radiator grille, ornament plate and Emblem but avoid heating the emblem base and emblem beyond required limits. You should start by removing the hood to radiator grille seal by taking out double-side tape and unfastening all 7 clips. Disassembly of the separate-type radiator grille begins by removing its ornament plate with 12 screws. The radiator grille emblem requires a screwdriver to remove its 4 claws while maintaining Emblem Base intact in case for future reuse. Reassembly begins with heating the radiator grille along with the ornament plate and emblem and proceeds by fixing the radiator grille with the 4 claws connected to the emblem base. The final steps involve positioning the 12 screws to secure the radiator grille ornament plate and afterward inserting new double-side tape for hood to radiator grille attachment through the use of 7 clips. Install the hood by starting with the No. 2 radiator grille lower and then moving up to the No. 1 radiator grille lower before placing the radiator grille at the end.
- Q: How to install the radiator grille on Toyota RAV4?A:The radiator grille installation process for the 2AZ-FE starts with placing the No. 2 radiator grille lower before moving on to the No. 1 radiator grille lower. The installation process begins by putting in the radiator grille followed by the hood to radiator grille seal at the end.


Related Toyota RAV4 Parts
 Toyota RAV4 Mud Flaps
 Toyota RAV4 Emblem
 Toyota RAV4 Windshield Wiper
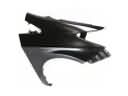 Toyota RAV4 Fender
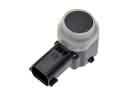 Toyota RAV4 Parking Assist Sensor
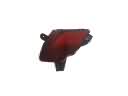 Toyota RAV4 Bumper Reflector
 Toyota RAV4 Fuel Door Hinge
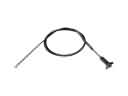 Toyota RAV4 Fuel Door Release Cable
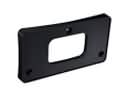 Toyota RAV4 License Plate
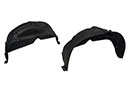 Toyota RAV4 Wheelhouse
 Toyota RAV4 Wiper Arm
 Toyota RAV4 Wiper Linkage