×
ToyotaParts- Hello
- Login or Register
- Quick Links
- Live Chat
- Track Order
- Parts Availability
- RMA
- Help Center
- Contact Us
- Shop for
- Toyota Parts
- Scion Parts
My Garage
My Account
Cart
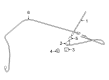
OEM Toyota Prius Antenna
Radio Antenna- Select Vehicle by Model
- Select Vehicle by VIN
Select Vehicle by Model
orMake
Model
Year
Select Vehicle by VIN
For the most accurate results, select vehicle by your VIN (Vehicle Identification Number).
32 Antennas found


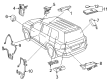
Toyota Prius Antenna, Electrical Key, Rear Part Number: 89997-0E050
$37.63 MSRP: $52.38You Save: $14.75 (29%)Ships in 1-2 Business Days

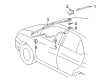
Toyota Prius Antenna Mast Part Number: 86309-12130
$58.78 MSRP: $79.30You Save: $20.52 (26%)Ships in 1-3 Business Days

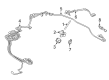
Toyota Prius Antenna Part Number: 86300-47120
$131.82 MSRP: $186.61You Save: $54.79 (30%)Ships in 1-2 Business Days

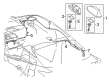
Toyota Prius Antenna Assembly Part Number: 86300-0R090
$172.13 MSRP: $243.67You Save: $71.54 (30%)Ships in 1-3 Business Days
Toyota Prius Antenna Part Number: 86960-47011
$167.31 MSRP: $236.85You Save: $69.54 (30%)Ships in 1 Business Day

Toyota Prius Antenna Mast Part Number: 86309-47020
$55.56 MSRP: $77.33You Save: $21.77 (29%)Ships in 1 Business Day

Toyota Prius Antenna Mast Part Number: 86309-52040
$66.11 MSRP: $92.80You Save: $26.69 (29%)Ships in 1 Business Day

Toyota Prius Antenna Mast Part Number: 86761-47011
$106.28 MSRP: $149.18You Save: $42.90 (29%)Ships in 1-2 Business DaysToyota Prius Antenna Assembly Part Number: 86760-0R030
$219.82 MSRP: $304.19You Save: $84.37 (28%)Ships in 1-2 Business Days
Toyota Prius Antenna Assembly, Telephone Part Number: 86760-0A020
$193.15 MSRP: $267.28You Save: $74.13 (28%)Ships in 1-2 Business DaysToyota Prius Antenna Part Number: 86760-47091
$406.34 MSRP: $595.50You Save: $189.16 (32%)Ships in 1-3 Business Days
Toyota Prius Gps Antenna Part Number: 86860-0E070
$408.36 MSRP: $598.46You Save: $190.10 (32%)Ships in 1-3 Business Days
Toyota Prius Gps Antenna Part Number: 86880-02090
$487.93 MSRP: $715.06You Save: $227.13 (32%)Ships in 1-2 Business Days

Toyota Prius Antenna Assembly Part Number: 86860-47060
$720.24 MSRP: $1055.51You Save: $335.27 (32%)Ships in 1-3 Business Days
Toyota Prius Amplifier Part Number: 86300-47160
$131.82 MSRP: $186.61You Save: $54.79 (30%)Ships in 1 Business Day
Toyota Prius Antenna, Front Part Number: 890G0-V1010
$144.75 MSRP: $204.91You Save: $60.16 (30%)Ships in 1-2 Business Days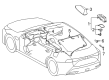
Toyota Prius Antenna Assembly Part Number: 86760-10010
$172.13 MSRP: $243.67You Save: $71.54 (30%)Ships in 1-3 Business DaysToyota Prius Antenna Assembly Part Number: 86960-0R030
$231.36 MSRP: $330.33You Save: $98.97 (30%)Ships in 1-3 Business DaysToyota Prius Antenna Part Number: 86760-47050
$263.05 MSRP: $375.56You Save: $112.51 (30%)Ships in 1-3 Business DaysToyota Prius Antenna Part Number: 86300-0A030
$159.08 MSRP: $225.20You Save: $66.12 (30%)
| Page 1 of 2 |Next >
1-20 of 32 Results
Toyota Prius Antenna
Choose genuine Antenna that pass strict quality control tests. You can trust the top quality and lasting durability. Shopping for OEM Antenna for your Toyota Prius? Our website is your one-stop destination. We stock an extensive selection of genuine Toyota Prius parts. The price is affordable so you can save more. It only takes minutes to browse and find the exact fit. Easily add to cart and check out fast. Our hassle-free return policy will keep you stress-free. We process orders quickly for swift delivery. Your parts will arrive faster, so you can get back on the road sooner.
Toyota Prius Antenna Parts and Q&A
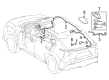
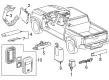
- Q: How to install the navigation antenna assembly and perform the necessary steps afterward on Toyota Prius?A:Mount the navigation antenna assembly by using two screws to fasten it and connecting the three clamps. The installation process of instrument panel sub-assembly should follow next. Then proceed with connecting the cable to the negative terminal of the battery. After finishing the cable and battery terminal procedure users need to execute initialization for systems requiring reset operations.
- Q: How to remove the navigation antenna on Toyota Prius?A:One should begin navigational antenna removal by disconnecting the negative battery cable then waiting for at least 90 seconds before proceeding to avoid Air Bag pretensioner and seatbelt activation. Then remove the instrument panel sub-assembly after taking out the instrument panel safety pad. The last step involves the removal of the navigation antenna assembly when you unscrew its 2 screws while detaching the 3 clamps.


Related Toyota Prius Parts
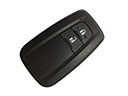 Toyota Prius Key Fob
 Toyota Prius Fuse Box
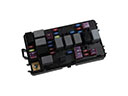 Toyota Prius Fuse
 Toyota Prius Antenna Cable
 Toyota Prius Battery Cable
 Toyota Prius Body Control Module
 Toyota Prius Brake Light Switch
 Toyota Prius Car Key
 Toyota Prius Fuel Pump Relay
 Toyota Prius Headlight Relay
 Toyota Prius Horn Relay
 Toyota Prius Turn Signal Relay