×
ToyotaParts- Hello
- Login or Register
- Quick Links
- Live Chat
- Track Order
- Parts Availability
- RMA
- Help Center
- Contact Us
- Shop for
- Toyota Parts
- Scion Parts
My Garage
My Account
Cart
OEM Toyota Highlander Turn Signal Flasher
Turn Signal Indicator Flasher- Select Vehicle by Model
- Select Vehicle by VIN
Select Vehicle by Model
orMake
Model
Year
Select Vehicle by VIN
For the most accurate results, select vehicle by your VIN (Vehicle Identification Number).
1 Turn Signal Flasher found


Toyota Highlander Flasher Relay Part Number: 81980-53020
$81.52 MSRP: $114.42You Save: $32.90 (29%)Ships in 1-3 Business Days
Toyota Highlander Turn Signal Flasher
Choose genuine Turn Signal Flasher that pass strict quality control tests. You can trust the top quality and lasting durability. Shopping for OEM Turn Signal Flasher for your Toyota Highlander? Our website is your one-stop destination. We stock an extensive selection of genuine Toyota Highlander parts. The price is affordable so you can save more. It only takes minutes to browse and find the exact fit. Easily add to cart and check out fast. Our hassle-free return policy will keep you stress-free. We process orders quickly for swift delivery. Your parts will arrive faster, so you can get back on the road sooner.
Toyota Highlander Turn Signal Flasher Parts and Q&A
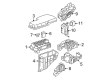
- Q: How to install the turn signal flasher assembly and related components on Toyota Highlander?A:You should begin the installation of the turn signal flasher assembly by connecting its connector before securing it with the claw. After installing the power steering ECU assembly the technician must connect the instrument panel junction block assembly through a total of 3 nuts with a torque setting of 8.4 Nm (86 kgf-cm, 74 in-lbf). After connecting the instrument panel safety pad, one must continue with the installation of the pad for both pole antenna and glass antenna configurations. The installation follows connect the instrument panel wire assembly after installing the front No. 2 speaker assembly for the LH side and the No. 1 instrument panel speaker panel sub-assembly and then the front No. 2 speaker assembly for the RH side. Put on the No. 2 instrument panel speaker panel sub-assembly followed by the front pillar garnish on the right-hand side and then attach the front door opening trim Weather Strip on the right-hand side. Perform the same installation process on the LH front pillar garnish and then attach the front door opening trim Weather Strip LH. The Smart Key System engine switch must be installed first before adding the front No. 2 console box insert and the front No. 1 console box insert. Stuff the console box assembly with optional rear air conditioning, then fit lower rear console box followed by the No. 2 console box duct that does not support rear air conditioning. The upper console panel sub-assembly and lower instrument panel finish panel sub-assembly for manual and automatic air conditioning systems and the cowl side trim sub-assemblies and front door scuff plates should be installed for both sides. The radio receiver assembly with bracket gets installed without the navigation system or navigation receiver assembly with bracket in case of equipment availability. The heater control assembly with its accessories goes into place for the manual air conditioning system but the automatic air conditioning system receives the air conditioning control assembly. The assembly order includes center instrument cluster finish panel with optional Smart Key System and center instrument panel register combined with combination meter and instrument cluster finish panel. Install the steering column cover following front wheel alignment while using the turn signal switch assembly and its spiral cable sub-assembly. Finish the installation of the Steering Wheel assembly after adjusting the spiral cable sub-assembly and check the steering wheel center point. Attach the steering pad followed by install of lower No. 2 and No. 3 steering wheel covers. After terminating the cable to the negative battery terminal one must note that some systems need system initialization after reconnection while also checking the steering pad and SRS warning light.

Related Toyota Highlander Parts
 Toyota Highlander Speedometer
 Toyota Highlander Body Control Module
 Toyota Highlander Daytime Running Light Relay
 Toyota Highlander Flasher Relay
 Toyota Highlander Fuel Pump Relay
 Toyota Highlander Fuse
 Toyota Highlander Headlight Relay
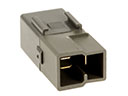 Toyota Highlander Horn Relay
 Toyota Highlander Mirror Switch
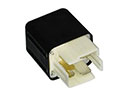 Toyota Highlander Overload Relay
 Toyota Highlander Radiator Fan Relay
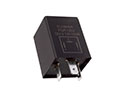 Toyota Highlander Turn Signal Relay