×
ToyotaParts- Hello
- Login or Register
- Quick Links
- Live Chat
- Track Order
- Parts Availability
- RMA
- Help Center
- Contact Us
- Shop for
- Toyota Parts
- Scion Parts
My Garage
My Account
Cart
OEM 2009 Toyota Venza Fuel Door Release Cable
Gas Door Safety Release Cable- Select Vehicle by Model
- Select Vehicle by VIN
Select Vehicle by Model
orMake
Model
Year
Select Vehicle by VIN
For the most accurate results, select vehicle by your VIN (Vehicle Identification Number).
1 Fuel Door Release Cable found

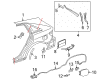
2009 Toyota Venza Release Cable, Rear
Part Number: 77035-0T010$35.48 MSRP: $49.39You Save: $13.91 (29%)Ships in 1-3 Business DaysProduct Specifications- Other Name: Cable Sub-Assembly, Fuel Lid Lock Control; Fuel Filler Door Release Cable, Rear; Fuel Door Release Cable
- Position: Rear
- Part Name Code: 77035
- Item Weight: 0.90 Pounds
- Item Dimensions: 14.9 x 12.5 x 1.2 inches
- Condition: New
- Fitment Type: Direct Replacement
- SKU: 77035-0T010
- Warranty: This genuine part is guaranteed by Toyota's factory warranty.
2009 Toyota Venza Fuel Door Release Cable
Looking for affordable OEM 2009 Toyota Venza Fuel Door Release Cable? Explore our comprehensive catalogue of genuine 2009 Toyota Venza Fuel Door Release Cable. All our parts are covered by the manufacturer's warranty. Plus, our straightforward return policy and speedy delivery service ensure an unparalleled shopping experience. We look forward to your visit!
2009 Toyota Venza Fuel Door Release Cable Parts Q&A
- Q: How to install the fuel door release cable sub-assembly and related components on 2009 Toyota Venza?A: The fuel lid lock control cable sub-assembly needs installation through the insertion of 8 clamps and 2 claws before its connection can be made. Secondly install the fuel lid lock control cable sub-assembly while connecting it to the fuel lid lock open lever sub-assembly through a bolt tightened to 5.5 Nm (56 kgf-cm, 49 in-lbf). Complete installation by attaching the deck trim side panel assembly LH and join the rear seat outer belt assembly LH while also adding the luggage hold belt striker assembly LH. Continue with the installation of the reclining remote control bezel LH, rear seat assembly LH, rear seat No. 2 reclining control cable sub-assembly, rear seat outer track bracket cover LH, rear seat inner track bracket cover LH, rear seat headrest assembly LH, rear floor finish plate, rear seat sub floor panel assembly, No. 1 deck board, deck side trim box LH, No. 3 deck board sub-assembly, deck side trim box RH, No. 2 deck board sub-assembly, deck board assembly, tonneau cover assembly (w/ Tonneau Cover), lower center pillar garnish LH, connect the front seat outer belt assembly LH, install the lap belt outer anchor cover LH, rear door opening trim Weather Strip LH, rear door scuff plate LH, front door opening trim Weather Strip LH, cowl side trim sub-assembly LH, front door scuff plate LH, and front seat assembly LH (for Manual Seat and for Power Seat). The work process involves checking the front seat slide adjuster lock (for Manual Seat) then adding the front seat rear inner track cover LH (for Manual Seat and for Power Seat) before putting the front seat rear outer track cover LH (for Manual Seat and for Power Seat) and installing the front seat headrest assembly LH (for Manual Seat and for Power Seat). The battery-negativE cable connection process ends with monitoring the SRS warning indicator and system initialization requirements after reconnecting the seat (for Manual Seat).
Related 2009 Toyota Venza Parts
 2009 Toyota Venza Sunroof
 2009 Toyota Venza A/C Switch
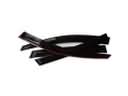 2009 Toyota Venza Air Deflector
 2009 Toyota Venza Door Lock Cylinder
 2009 Toyota Venza Fuel Door
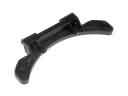 2009 Toyota Venza Fuel Door Hinge
 2009 Toyota Venza Glove Box
 2009 Toyota Venza Instrument Cluster
 2009 Toyota Venza Instrument Panel Light Bulb
 2009 Toyota Venza Trunk Lid Latch
 2009 Toyota Venza Weather Strip
 2009 Toyota Venza Wiper Linkage