×
ToyotaParts- Hello
- Login or Register
- Quick Links
- Live Chat
- Track Order
- Parts Availability
- RMA
- Help Center
- Contact Us
- Shop for
- Toyota Parts
- Scion Parts
My Garage
My Account
Cart
OEM 2009 Toyota Matrix Antenna Cable
Radio Antenna Cable- Select Vehicle by Model
- Select Vehicle by VIN
Select Vehicle by Model
orMake
Model
Year
Select Vehicle by VIN
For the most accurate results, select vehicle by your VIN (Vehicle Identification Number).
3 Antenna Cables found

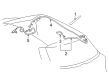
2009 Toyota Matrix Antenna Cable
Part Number: 86101-02340$157.44 MSRP: $222.88You Save: $65.44 (30%)Ships in 1-3 Business DaysProduct Specifications- Other Name: Cord Sub-Assembly, Antenna
- Manufacturer Note: AUDIO-AM/FM CD CHANGER XM JBL-7SP BLUETOOTH
- Part Name Code: 86101
- Item Weight: 1.10 Pounds
- Item Dimensions: 15.7 x 6.0 x 2.1 inches
- Condition: New
- Fitment Type: Direct Replacement
- SKU: 86101-02340
- Warranty: This genuine part is guaranteed by Toyota's factory warranty.
2009 Toyota Matrix Antenna Cable
Part Number: 86101-02350$130.06 MSRP: $184.12You Save: $54.06 (30%)Ships in 1-3 Business DaysProduct Specifications- Other Name: Cord Sub-Assembly, Antenna
- Part Name Code: 86101
- Item Weight: 1.10 Pounds
- Item Dimensions: 15.7 x 6.1 x 2.1 inches
- Condition: New
- Fitment Type: Direct Replacement
- SKU: 86101-02350
- Warranty: This genuine part is guaranteed by Toyota's factory warranty.

2009 Toyota Matrix Antenna Cable
Part Number: 86808-02050$63.71 MSRP: $89.42You Save: $25.71 (29%)Ships in 1-3 Business DaysProduct Specifications- Other Name: Cord Sub-Assembly, Navigation Antenna; GPS Navigation System Antenna Cable
- Part Name Code: 86808
- Item Weight: 1.00 Pounds
- Condition: New
- Fitment Type: Direct Replacement
- SKU: 86808-02050
- Warranty: This genuine part is guaranteed by Toyota's factory warranty.
2009 Toyota Matrix Antenna Cable
Looking for affordable OEM 2009 Toyota Matrix Antenna Cable? Explore our comprehensive catalogue of genuine 2009 Toyota Matrix Antenna Cable. All our parts are covered by the manufacturer's warranty. Plus, our straightforward return policy and speedy delivery service ensure an unparalleled shopping experience. We look forward to your visit!
2009 Toyota Matrix Antenna Cable Parts Q&A
- Q: How to install the antenna cable sub-assembly without a sliding roof on 2009 Toyota Matrix?A: Begin the antenna cord sub-assembly installation by placing tape on specified positions to secure the cord to roof headlining assembly which should start from the vehicle's front position. When tape adhesion becomes weak you should apply packing tape to provide a secure fastening of the cord. Place tape at the right corner section on the antenna cord according to markings and shorten its length by folding the cord inward. The installation with its sliding roof needs you to activate all three clamps before applying tape according to the documented method. The next step includes roof headlining assembly installation, visor holder fitting, rear assist grip assembly together with front assist grip sub-assembly. Both side operations should mirror each other accordingly. Install the required components including visor assemblies, sunroof opening trim moulding, room light assemblies, map light assemblies, inner rear view mirror cover, roof side inner garnish, quarter pillar garnish, side deck trim panel assemblies, rear combination light service covers, luggage compartment trim hooks, luggage hold belt striker assemblies, rear seat components and various garnish and trim pieces then connect both sides of rear seat 3-point type belt assemblies. The installation procedure should continue with jack assembly tasks and deck boards then move to install the tonneau cover assembly and rear seatback assemblies and headrest assemblies. Afterward, pillar garnishes and door opening trim Weather Strips and scuff plates need to be added along with the combination meter assembly and meter hood sub-assembly and instrument cluster finish panels. The last steps include adjusting the spiral cable followed by installing the steering wheel assembly and steering pad alongside connecting the negative battery terminal while conducting inspections on the steering wheel center point and SRS warning light.
Related 2009 Toyota Matrix Parts
 2009 Toyota Matrix Antenna
 2009 Toyota Matrix Antenna Mast
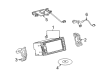
 2009 Toyota Matrix Body Control Module
 2009 Toyota Matrix Car Key
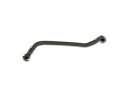 2009 Toyota Matrix Crankcase Breather Hose
 2009 Toyota Matrix Door Jamb Switch
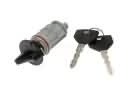 2009 Toyota Matrix Ignition Lock Cylinder
 2009 Toyota Matrix Mirror Switch
 2009 Toyota Matrix Relay Block
 2009 Toyota Matrix Seat Belt
 2009 Toyota Matrix Spark Plug
 2009 Toyota Matrix TPMS Sensor