×
ToyotaParts- Hello
- Login or Register
- Quick Links
- Live Chat
- Track Order
- Parts Availability
- RMA
- Help Center
- Contact Us
- Shop for
- Toyota Parts
- Scion Parts
My Garage
My Account
Cart
OEM 2009 Toyota Land Cruiser Oil Filter
Engine Oil filter- Select Vehicle by Model
- Select Vehicle by VIN
Select Vehicle by Model
orMake
Model
Year
Select Vehicle by VIN
For the most accurate results, select vehicle by your VIN (Vehicle Identification Number).
1 Oil Filter found


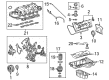
2009 Toyota Land Cruiser Oil Filter
Part Number: 04152-YZZA4$4.70 MSRP: $6.57You Save: $1.87 (29%)Ships in 1-3 Business DaysProduct Specifications- Other Name: Replaceable Element; Engine Oil Filter Element; Filter Change Maintenance Kit; Engine Oil Filter; Coolant Filter; Filter Element; Filter Assembly; Element; Filter
- Replaces: 04152-38020
- Item Weight: 0.80 Pounds
- Item Dimensions: 3.6 x 3.6 x 6.0 inches
- Condition: New
- SKU: 04152-YZZA4
- Warranty: This genuine part is guaranteed by Toyota's factory warranty.
2009 Toyota Land Cruiser Oil Filter
Looking for affordable OEM 2009 Toyota Land Cruiser Oil Filter? Explore our comprehensive catalogue of genuine 2009 Toyota Land Cruiser Oil Filter. All our parts are covered by the manufacturer's warranty. Plus, our straightforward return policy and speedy delivery service ensure an unparalleled shopping experience. We look forward to your visit!
2009 Toyota Land Cruiser Oil Filter Parts Q&A
- Q: How to Properly Replace an Oil Filter on 2009 Toyota Land Cruiser?A: Engine oil replacement starts with filling the oil into a jar by removing the oil filler cap then the No. 2 engine under cover bolts and the oil pan drain plug with its gasket while draining oil before reinstalling the drain plug along with a new gasket that requires a 40 Nm (408 kgf-cm, 30 ft-lbf) torque. First disconnect both left and right front fender splash shields then proceed to remove the No. 1 engine under cover sub-assembly. The procedure to extract the oil filter element requires users to connect a pipe with 15 mm (0.591 in.) inner diameter to the drain plug before removing it and applying the pipe to the oil filter cap while collecting the draining oil into a container. Drain oil completion should be verified before disconnecting the pipe while also removing the O-ring. Special Service Tool: 09228-06501 allows users to detach the oil filter cap while keeping the oil filter bracket clip intact so they can remove the oil filter element as well as its O-ring while hand-removing the cap O-ring to avoid damage. The first step for installation requires a clean oil filter cap and a thin layer of engine oil on a new O-ring before setting the cap onto position followed by new oil filter element insertion. Clean the installation area of the engine and slather additional oil on the O-ring before fixing the oil filter cap in place while leaving the bracket clip undisturbed. Secure the filter using Special Service Tool: 09228-06501 until the torque reaches 25 Nm (255 kgf-cm, 18 ft-lbf) while ensuring both the filter stays tight and the O-ring remains undamaged. The maintenance procedure includes installing the new drain plug O-ring followed by oil filter drain plug tightening to 13 Nm (127 kgf-cm, 9 ft-lbf) while sealing the No. 2 engine under cover with its 2 bolts torqued to 10 Nm (102 kgf-cm, 7 ft-lbf). The maintenance ends by putting new oil into the tank before replacing the oil filler cap. Engine operation checks for leaks followed by monitoring engine oil levels before reinstalling both front fender splash shield sub-assemblies along with the No. 1 engine under cover sub-assembly.
Related 2009 Toyota Land Cruiser Parts
 2009 Toyota Land Cruiser Crankshaft Gear
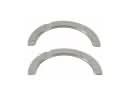 2009 Toyota Land Cruiser Crankshaft Thrust Washer Set
 2009 Toyota Land Cruiser Cylinder Head Gasket
 2009 Toyota Land Cruiser Dipstick
 2009 Toyota Land Cruiser Exhaust Valve
 2009 Toyota Land Cruiser Intake Valve
 2009 Toyota Land Cruiser Oil Filler Cap
 2009 Toyota Land Cruiser Piston
 2009 Toyota Land Cruiser Piston Ring Set
 2009 Toyota Land Cruiser Rocker Arm
 2009 Toyota Land Cruiser Timing Chain Tensioner
 2009 Toyota Land Cruiser Valve Stem Seal