×
ToyotaParts- Hello
- Login or Register
- Quick Links
- Live Chat
- Track Order
- Parts Availability
- RMA
- Help Center
- Contact Us
- Shop for
- Toyota Parts
- Scion Parts
My Garage
My Account
Cart
OEM 2008 Toyota Tacoma Windshield
Glass Windshield- Select Vehicle by Model
- Select Vehicle by VIN
Select Vehicle by Model
orMake
Model
Year
Select Vehicle by VIN
For the most accurate results, select vehicle by your VIN (Vehicle Identification Number).
1 Windshield found

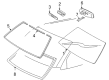
2008 Toyota Tacoma Windshield, Front
Part Number: 56101-04021$533.78 MSRP: $782.25You Save: $248.47 (32%)Ships in 1-3 Business DaysProduct Specifications- Other Name: Glass Sub-Assembly, Windshield; Windshield Glass, Front; Glass, Windshield
- Manufacturer Note: *HSEAL,T=5.36,GREEN
- Position: Front
- Replaces: 56101-04020
- Part Name Code: 56111
- Item Weight: 1.40 Pounds
- Condition: New
- Fitment Type: Direct Replacement
- SKU: 56101-04021
- Warranty: This genuine part is guaranteed by Toyota's factory warranty.
2008 Toyota Tacoma Windshield
Looking for affordable OEM 2008 Toyota Tacoma Windshield? Explore our comprehensive catalogue of genuine 2008 Toyota Tacoma Windshield. All our parts are covered by the manufacturer's warranty. Plus, our straightforward return policy and speedy delivery service ensure an unparalleled shopping experience. We look forward to your visit!
2008 Toyota Tacoma Windshield Parts Q&A
- Q: How to remove the windshield glass on 2008 Toyota Tacoma?A: A car technician should start windshield glass removal by unplugging the cable from the battery terminal. Start the windshield glass removal by taking off the front wiper arm head cap then proceeding with the front wiper arm LH and RH. Lift the front fender to cowl side seal from the LH side and duplicate the procedure on the RH side. First disconnect the cowl top ventilator louver sub-assembly from its mounting position along with the inner rear view mirror assembly. The next step involves detaching the front door opening trim Weather Strip LH with enough separation to remove the front pillar garnish before proceeding to the RH side. Remove the front pillar garnish from Regular Cab, Access Cab and Double Cab when applicable to the model. Proceed by taking off the roof console box assembly for Access Cab and Double Cab and then the assist grip plug with curtain shield Air Bag as well as the assist grip sub-assembly for Double Cab. The removal procedure for the visor assembly LH applies first to Regular Cab and Access Cab while covering the RH side next for Regular Cab and Access Cab and Double Cab. The process follows the exact steps for each assembly. Separate the visor holders from each Regular, Access and Double Cab model type. Begin by carefully cutting the windshield upper molding outer with a knife without damaging the body of the vehicle and afterward remove it. Protective tape should be applied to the windshield glass perimeter followed by piano wires threaded between the body and glass from inside before tying handles to the installed wires. Use protective tape to cover important vehicle parts while avoiding paint damage or decoration damage. Install a plastic sheet next to the safety pad and piano wire elements to avoid scratches. Cut through the windshield adhesive while pulling the piano wire then disengage the stoppers after which you can remove the glass using suction cups while attempting to retain maximum adhesive material on the vehicle.
Related 2008 Toyota Tacoma Parts
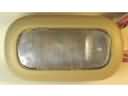 2008 Toyota Tacoma Dome Light
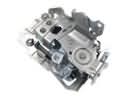 2008 Toyota Tacoma Door Latch Assembly
 2008 Toyota Tacoma Door Lock Actuator
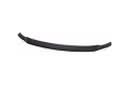 2008 Toyota Tacoma Spoiler
 2008 Toyota Tacoma Washer Reservoir
 2008 Toyota Tacoma Wiper Linkage
 2008 Toyota Tacoma A/C Switch
 2008 Toyota Tacoma Car Mirror
 2008 Toyota Tacoma Center Console Base
 2008 Toyota Tacoma Lift Support
 2008 Toyota Tacoma Window Crank Handles
 2008 Toyota Tacoma Window Run