×
ToyotaParts- Hello
- Login or Register
- Quick Links
- Live Chat
- Track Order
- Parts Availability
- RMA
- Help Center
- Contact Us
- Shop for
- Toyota Parts
- Scion Parts
My Garage
My Account
Cart
OEM 2007 Toyota Solara Exhaust Pipe
Exhaust Tail Pipe- Select Vehicle by Model
- Select Vehicle by VIN
Select Vehicle by Model
orMake
Model
Year
Select Vehicle by VIN
For the most accurate results, select vehicle by your VIN (Vehicle Identification Number).
9 Exhaust Pipes found

2007 Toyota Solara Center Pipe
Part Number: 17420-0A300$372.84 MSRP: $500.45You Save: $127.61 (26%)Ships in 1-3 Business DaysProduct Specifications- Other Name: Pipe Assembly, Exhaust; Exhaust Intermediate Pipe; Exhaust Pipe; Pipe Assembly, Exhaust, Center
- Position: Center
- Part Name Code: 17420
- Item Weight: 17.50 Pounds
- Item Dimensions: 52.9 x 19.8 x 9.3 inches
- Condition: New
- Fitment Type: Direct Replacement
- SKU: 17420-0A300
- Warranty: This genuine part is guaranteed by Toyota's factory warranty.

2007 Toyota Solara Intermed Pipe, Center
Part Number: 17420-0A290$323.63 MSRP: $423.21You Save: $99.58 (24%)Ships in 1-3 Business DaysProduct Specifications- Other Name: Pipe Assembly, Exhaust; Exhaust Intermediate Pipe; Exhaust Pipe; Center Pipe; Pipe Assembly, Exhaust, Center
- Position: Center
- Part Name Code: 17420
- Item Weight: 17.40 Pounds
- Item Dimensions: 50.4 x 20.4 x 9.0 inches
- Condition: New
- Fitment Type: Direct Replacement
- SKU: 17420-0A290
- Warranty: This genuine part is guaranteed by Toyota's factory warranty.

2007 Toyota Solara Center Pipe
Part Number: 17420-0H220$310.58 MSRP: $406.15You Save: $95.57 (24%)Ships in 1-3 Business DaysProduct Specifications- Other Name: Pipe Assembly, Exhaust; Exhaust Intermediate Pipe; Exhaust Pipe; Pipe Assembly, Exhaust, Center
- Position: Center
- Part Name Code: 17420
- Item Weight: 16.30 Pounds
- Item Dimensions: 50.9 x 19.6 x 9.4 inches
- Condition: New
- Fitment Type: Direct Replacement
- SKU: 17420-0H220
- Warranty: This genuine part is guaranteed by Toyota's factory warranty.

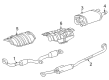
2007 Toyota Solara Front Pipe
Part Number: 17410-0A370$1477.42 MSRP: $1983.12You Save: $505.70 (26%)Ships in 1-3 Business DaysProduct Specifications- Other Name: Pipe Assembly, Exhaust; Catalytic Converter; Exhaust Pipe; Converter & Pipe; Pipe Assembly, Exhaust, Front
- Position: Front
- Part Name Code: 17410
- Item Weight: 7.30 Pounds
- Item Dimensions: 30.2 x 2.3 x 19.3 inches
- Condition: New
- Fitment Type: Direct Replacement
- SKU: 17410-0A370
- Warranty: This genuine part is guaranteed by Toyota's factory warranty.

2007 Toyota Solara Front Pipe
Part Number: 17410-0H180$1115.13 MSRP: $1496.83You Save: $381.70 (26%)Ships in 1-3 Business DaysProduct Specifications- Other Name: Pipe Assembly, Exhaust; Catalytic Converter; Exhaust Pipe; Converter & Pipe; Pipe Assembly, Exhaust, Front
- Position: Front
- Part Name Code: 17410
- Item Weight: 11.80 Pounds
- Item Dimensions: 47.7 x 18.4 x 9.5 inches
- Condition: New
- Fitment Type: Direct Replacement
- SKU: 17410-0H180
- Warranty: This genuine part is guaranteed by Toyota's factory warranty.

2007 Toyota Solara Muffler
Part Number: 17430-0A300$535.82 MSRP: $719.22You Save: $183.40 (26%)Ships in 1-3 Business DaysProduct Specifications- Other Name: Pipe Assembly, Exhaust Tail; Exhaust Muffler; Pipe Assembly, Exhaust, Tail
- Part Name Code: 17430
- Item Weight: 10.80 Pounds
- Item Dimensions: 42.8 x 12.7 x 9.0 inches
- Condition: New
- Fitment Type: Direct Replacement
- SKU: 17430-0A300
- Warranty: This genuine part is guaranteed by Toyota's factory warranty.
2007 Toyota Solara Muffler
Part Number: 17430-0A310$426.18 MSRP: $572.06You Save: $145.88 (26%)Ships in 1-3 Business DaysProduct Specifications- Other Name: Pipe Assembly, Exhaust Tail; Exhaust Muffler; Pipe Assembly, Exhaust, Tail
- Manufacturer Note: SPORT PACKAGE(HID HEAD LAMP)
- Part Name Code: 17430
- Item Weight: 10.90 Pounds
- Item Dimensions: 43.2 x 12.3 x 9.0 inches
- Condition: New
- Fitment Type: Direct Replacement
- SKU: 17430-0A310
- Warranty: This genuine part is guaranteed by Toyota's factory warranty.

2007 Toyota Solara Muffler
Part Number: 17430-0H240$474.08 MSRP: $636.35You Save: $162.27 (26%)Ships in 1-3 Business DaysProduct Specifications- Other Name: Pipe Assembly, Exhaust Tail; Exhaust Muffler; Exhaust Muffler Assembly; Pipe Assembly, Exhaust, Tail
- Part Name Code: 17430
- Item Weight: 10.20 Pounds
- Item Dimensions: 43.6 x 12.7 x 9.1 inches
- Condition: New
- Fitment Type: Direct Replacement
- SKU: 17430-0H240
- Warranty: This genuine part is guaranteed by Toyota's factory warranty.
2007 Toyota Solara Muffler
Part Number: 17430-0H250$396.82 MSRP: $532.65You Save: $135.83 (26%)Ships in 1-3 Business DaysProduct Specifications- Other Name: Pipe Assembly, Exhaust Tail; Exhaust Muffler; Pipe Assembly, Exhaust, Tail
- Manufacturer Note: SPORT PACKAGE(HID HEAD LAMP)
- Part Name Code: 17430
- Item Weight: 10.60 Pounds
- Item Dimensions: 42.8 x 12.6 x 9.2 inches
- Condition: New
- Fitment Type: Direct Replacement
- SKU: 17430-0H250
- Warranty: This genuine part is guaranteed by Toyota's factory warranty.
2007 Toyota Solara Exhaust Pipe
Looking for affordable OEM 2007 Toyota Solara Exhaust Pipe? Explore our comprehensive catalogue of genuine 2007 Toyota Solara Exhaust Pipe. All our parts are covered by the manufacturer's warranty. Plus, our straightforward return policy and speedy delivery service ensure an unparalleled shopping experience. We look forward to your visit!
2007 Toyota Solara Exhaust Pipe Parts Q&A
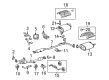
- Q: How to service the exhaust pipe on 2007 Toyota Solara?A: Service of the exhaust pipe starts with removing old gaskets before inspecting bolts and nuts for replacement. The service starts with removing the 2 bolts which hold the floor panel brace rear. Detach the exhaust pipe damper through bolt removal of its two fasteners. Proceed with removing the center exhaust pipe assembly by first removing two bolts from the front exhaust pipe assembly and two nuts from the same component along with two nuts from the tail exhaust pipe assembly and finally detach it from its 2 exhaust pipe supports. The heated oxygen sensor (bank 1 sensor 2) must be disconnected before its removal. Remove the front exhaust pipe No.1 support bracket through two nut removal and then remove the rear exhaust pipe No.1 support bracket by unscrewing two bolts. Start by unfastening two surrounding nuts on the front exhaust pipeassembly before completely removing it from the three exhaust pipe supports. Use a plastic hammer for even tapping and uninstall of the tail pipe baffle. To install the baffle properly position its keyway into the tailpipe key location then carefully hit it into place with a plastic hammer. First install the tail exhaust pipe assembly with its 3 exhaust pipe supports and then install the front exhaust pipe assembly with a new gasket to the exhaust manifold converter before torquing 2 nuts to 62 Nm (632 kgf-cm, 46 ft.lbf). The rear exhaust pipe No.1 support bracket requires two bolts with 33 Nm (337 kgf-cm, 24 ft.lbf) torque before installing it so it faces the proper orientation. For installation of the front exhaust pipe No.1 support bracket use 2 nuts which must receive torque to 33 Nm (337 kgf-cm, 24 ft.lbf). Install the heated oxygen sensor (bank 1 sensor 2) to the front exhaust pipe assembly while torquing it to 44 Nm (449 kgf-cm, 32 ft.lbf) and connect its connector. Use new gaskets for installing the front exhaust pipe assembly to the center exhaust pipe assembly using 2 bolts and 2 nuts torqued to 56 Nm (571 kgf-cm, 41 ft.lbf) before installing it to the tail exhaust pipe assembly using 2 nuts torqued to the same torque value. Use 2 bolts to mount the exhaust pipe damper and torque them to 19 Nm (194 kgf-cm, 14 ft.lbf), mind the correct orientation, then join the floor panel brace rear section through 2 bolts at 19.5 Nm (199 kgf-cm, 14 ft.lbf). A thorough inspection for exhaust gas leaks should be performed before applying additional tightening to problematic areas while replacing broken components when necessary.
Related 2007 Toyota Solara Parts
 2007 Toyota Solara Catalytic Converter
 2007 Toyota Solara Muffler
 2007 Toyota Solara Canister Purge Valve
 2007 Toyota Solara Diverter Valve
 2007 Toyota Solara Exhaust Heat Shield
 2007 Toyota Solara Exhaust Manifold
 2007 Toyota Solara Exhaust Manifold Gasket
 2007 Toyota Solara PCV Valve
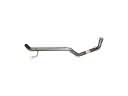 2007 Toyota Solara Tail Pipe
 2007 Toyota Solara Vapor Canister