×
ToyotaParts- Hello
- Login or Register
- Quick Links
- Live Chat
- Track Order
- Parts Availability
- RMA
- Help Center
- Contact Us
- Shop for
- Toyota Parts
- Scion Parts
My Garage
My Account
Cart
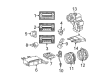
OEM 2007 Toyota Corolla Car Speakers
Audio Speakers- Select Vehicle by Model
- Select Vehicle by VIN
Select Vehicle by Model
orMake
Model
Year
Select Vehicle by VIN
For the most accurate results, select vehicle by your VIN (Vehicle Identification Number).
8 Car Speakers found

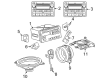
2007 Toyota Corolla Tweeter, Driver Side
Part Number: 86160-02250$80.95 MSRP: $110.12You Save: $29.17 (27%)Ships in 1-3 Business DaysProduct Specifications- Other Name: Speaker Assembly, Radio; Speaker, Left; Speaker Assembly, Front
- Manufacturer Note: W(JBL AM/FM CD CHANGER 8SPEAKER)
- Position: Driver Side
- Part Name Code: 86160P
- Item Weight: 0.70 Pounds
- Condition: New
- Fitment Type: Direct Replacement
- SKU: 86160-02250
- Warranty: This genuine part is guaranteed by Toyota's factory warranty.
2007 Toyota Corolla Tweeter, Passenger Side
Part Number: 86160-02190$80.95 MSRP: $110.12You Save: $29.17 (27%)Ships in 1-3 Business DaysProduct Specifications- Other Name: Speaker Assembly, Radio; Speaker, Left, Right; Speaker Assembly, Front
- Manufacturer Note: W(JBL AM/FM CD CHANGER 8SPEAKER)
- Position: Passenger Side
- Part Name Code: 86160P
- Item Weight: 0.90 Pounds
- Condition: New
- Fitment Type: Direct Replacement
- SKU: 86160-02190
- Warranty: This genuine part is guaranteed by Toyota's factory warranty.

2007 Toyota Corolla Front Driver Speaker
Part Number: 86160-02610$133.36 MSRP: $182.98You Save: $49.62 (28%)Ships in 1-3 Business DaysProduct Specifications- Other Name: Speaker Assembly, Radio; Speaker, Center Front; Speaker Assembly, Front
- Part Name Code: 86160
- Item Weight: 2.40 Pounds
- Condition: New
- Fitment Type: Direct Replacement
- Require Quantity: 2
- SKU: 86160-02610
- Warranty: This genuine part is guaranteed by Toyota's factory warranty.

2007 Toyota Corolla Rear Speaker
Part Number: 86160-AA410$217.09 MSRP: $300.41You Save: $83.32 (28%)Ships in 1-3 Business DaysProduct Specifications- Other Name: Speaker Assembly, Radio; Speaker, Rear; Package Tray Speaker; Speaker Assembly, Rear
- Position: Rear
- Part Name Code: 86160B
- Item Weight: 3.60 Pounds
- Condition: New
- Fitment Type: Direct Replacement
- Require Quantity: 2
- SKU: 86160-AA410
- Warranty: This genuine part is guaranteed by Toyota's factory warranty.
2007 Toyota Corolla Front Driver Speaker
Part Number: 86160-02450$171.22 MSRP: $242.39You Save: $71.17 (30%)Ships in 1-3 Business DaysProduct Specifications- Other Name: Speaker Assembly, Radio; Speaker, Center Front, Front; Speaker Assembly, Front
- Part Name Code: 86160
- Item Weight: 2.20 Pounds
- Condition: New
- Fitment Type: Direct Replacement
- Require Quantity: 2
- SKU: 86160-02450
- Warranty: This genuine part is guaranteed by Toyota's factory warranty.
2007 Toyota Corolla Package Tray Speaker, Rear
Part Number: 86160-02460$109.70 MSRP: $153.98You Save: $44.28 (29%)Ships in 1 Business DayProduct Specifications- Other Name: Speaker Assembly, Radio; Radio Bracket; Speaker, Rear; Speaker Assembly, Rear
- Position: Rear
- Part Name Code: 86160B
- Item Weight: 4.20 Pounds
- Item Dimensions: 13.7 x 12.6 x 8.2 inches
- Condition: New
- Fitment Type: Direct Replacement
- Require Quantity: 2
- SKU: 86160-02460
- Warranty: This genuine part is guaranteed by Toyota's factory warranty.
2007 Toyota Corolla Tweeter, Driver Side
Part Number: 86160-02480$109.19 MSRP: $153.26You Save: $44.07 (29%)Ships in 1-3 Business DaysProduct Specifications- Other Name: Speaker Assembly, Radio; Speaker, Left; Speaker Assembly, Front
- Manufacturer Note: LH
- Position: Driver Side
- Replaces: 86160-1A170
- Part Name Code: 86160P
- Item Weight: 0.80 Pounds
- Condition: New
- Fitment Type: Direct Replacement
- SKU: 86160-02480
- Warranty: This genuine part is guaranteed by Toyota's factory warranty.
2007 Toyota Corolla Tweeter, Passenger Side
Part Number: 86160-02470$109.19 MSRP: $153.26You Save: $44.07 (29%)Ships in 1-3 Business DaysProduct Specifications- Other Name: Speaker Assembly, Radio; Speaker, Left, Right; Speaker Assembly, Front
- Manufacturer Note: RH
- Position: Passenger Side
- Replaces: 86160-1A160
- Part Name Code: 86160P
- Item Weight: 0.80 Pounds
- Condition: New
- Fitment Type: Direct Replacement
- SKU: 86160-02470
- Warranty: This genuine part is guaranteed by Toyota's factory warranty.
2007 Toyota Corolla Car Speakers
Looking for affordable OEM 2007 Toyota Corolla Car Speakers? Explore our comprehensive catalogue of genuine 2007 Toyota Corolla Car Speakers. All our parts are covered by the manufacturer's warranty. Plus, our straightforward return policy and speedy delivery service ensure an unparalleled shopping experience. We look forward to your visit!
2007 Toyota Corolla Car Speakers Parts Q&A
- Q: How to remove and install the front side Car Speakers on 2007 Toyota Corolla?A: The removal procedure of front side speakers begins by stripping away the front armrest assembly LH followed by the power window regulator master switch assembly when power windows exist in the vehicle. Begin by unstowing the front armrest base panel upper LH section after removing its rivets when power windows are absent then detach the front door window regulator handle assembly which only exists for vehicles without power windows. The front No. 1 speaker cannot be reached until the front door lower frame bracket garnish LH along with the front door trim board subassembly LH are detached. Start by disconnecting the connector before cutting out rivets with an air drill and a rivet cutter then removing the front No. 1 speaker while paying attention to not damage the rivet holes or discard the hot cut rivets improperly. A vacuum cleaner should remove all drilled rivets along with dust so they clear out of the door interior space. To replace the front No. 2 speaker users should expose the service hole cover then disconnect the connector before unscrewing both holding nuts. Start by installing the front No. 2 speaker and tighten its two nuts to 8.0 N.m using 82 kgf.cm or 71 in.lbf. You must install the front No. 1 speaker by operating an air riveter with nose piece No. 1 to drive rivets into the door panel following a precise order to prevent damaging the riveter. Begin the installation process by connecting the connector to the front No. 1 speaker before reinstalling the front door trim board subassembly LH and following it with the front door lower frame bracket garnish LH and the front door window regulator handle assembly for non-power window models and the front armrest base panel upper LH for non-power window models and if equipped with the power window regulator master switch assembly and ending with the front armrest assembly LH.
Related 2007 Toyota Corolla Parts
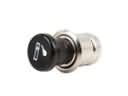 2007 Toyota Corolla Cigarette Lighter
 2007 Toyota Corolla Door Hinge
 2007 Toyota Corolla Door Lock Actuator
 2007 Toyota Corolla Door Lock Cylinder
 2007 Toyota Corolla Instrument Cluster
 2007 Toyota Corolla Window Regulator
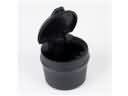 2007 Toyota Corolla Ashtray
 2007 Toyota Corolla Car Mirror
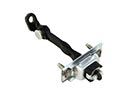 2007 Toyota Corolla Door Check
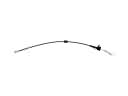 2007 Toyota Corolla Door Latch Cable
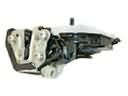 2007 Toyota Corolla Rear Passenger Door Handle Latch
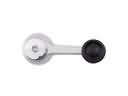 2007 Toyota Corolla Window Crank Handles