×
ToyotaParts- Hello
- Login or Register
- Quick Links
- Live Chat
- Track Order
- Parts Availability
- RMA
- Help Center
- Contact Us
- Shop for
- Toyota Parts
- Scion Parts
My Garage
My Account
Cart
OEM 2007 Toyota Camry Car Speakers
Audio Speakers- Select Vehicle by Model
- Select Vehicle by VIN
Select Vehicle by Model
orMake
Model
Year
Select Vehicle by VIN
For the most accurate results, select vehicle by your VIN (Vehicle Identification Number).
9 Car Speakers found


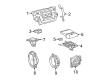
2007 Toyota Camry Tweeter
Part Number: 86160-33740$93.11 MSRP: $126.67You Save: $33.56 (27%)Ships in 1-3 Business DaysProduct Specifications- Other Name: Speaker Assembly, Radio; Speaker, Front, Upper; Speaker Assembly, Front
- Part Name Code: 86160P
- Item Weight: 1.20 Pounds
- Condition: New
- Fitment Type: Direct Replacement
- Require Quantity: 2
- SKU: 86160-33740
- Warranty: This genuine part is guaranteed by Toyota's factory warranty.


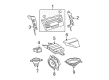
2007 Toyota Camry Front Driver Speaker
Part Number: 86160-0WE90$237.07 MSRP: $328.05You Save: $90.98 (28%)Ships in 1-2 Business DaysProduct Specifications- Other Name: Speaker Assembly, Radio; Speaker, Front; Speaker Assembly, Front
- Part Name Code: 86160
- Item Weight: 4.30 Pounds
- Item Dimensions: 15.3 x 13.7 x 6.4 inches
- Condition: New
- Fitment Type: Direct Replacement
- Require Quantity: 2
- SKU: 86160-0WE90
- Warranty: This genuine part is guaranteed by Toyota's factory warranty.


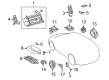
2007 Toyota Camry Rear Speaker
Part Number: 86160-06360$172.53 MSRP: $244.22You Save: $71.69 (30%)Ships in 1-3 Business DaysProduct Specifications- Other Name: Speaker Assembly, Radio; Speaker, Rear; Package Tray Speaker; Speaker Assembly, Rear
- Position: Rear
- Replaces: 86160-06370, 86160-33720
- Part Name Code: 86160B
- Item Weight: 2.50 Pounds
- Item Dimensions: 12.7 x 8.2 x 7.4 inches
- Condition: New
- Fitment Type: Direct Replacement
- Require Quantity: 2
- SKU: 86160-06360
- Warranty: This genuine part is guaranteed by Toyota's factory warranty.


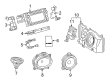
2007 Toyota Camry Instrument Panel Speaker
Part Number: 86160-AA440$188.36 MSRP: $268.93You Save: $80.57 (30%)Ships in 1-3 Business DaysProduct Specifications- Other Name: Speaker Assembly, Radio; Speaker, Center, Center Front, Front, Front Lower; Front Driver Speaker; Speaker; Speaker Assembly, Front
- Part Name Code: 86160
- Item Weight: 2.40 Pounds
- Item Dimensions: 12.4 x 9.5 x 7.3 inches
- Condition: New
- Fitment Type: Direct Replacement
- Require Quantity: 2
- SKU: 86160-AA440
- Warranty: This genuine part is guaranteed by Toyota's factory warranty.
2007 Toyota Camry Front Driver Speaker
Part Number: 86160-33670$135.35 MSRP: $185.70You Save: $50.35 (28%)Ships in 1-3 Business DaysProduct Specifications- Other Name: Speaker Assembly, Radio; Speaker, Front; Speaker Assembly, Front
- Part Name Code: 86160
- Item Weight: 4.20 Pounds
- Item Dimensions: 15.1 x 13.7 x 6.9 inches
- Condition: New
- Fitment Type: Direct Replacement
- Require Quantity: 2
- SKU: 86160-33670
- Warranty: This genuine part is guaranteed by Toyota's factory warranty.

2007 Toyota Camry Instrument Panel Speaker
Part Number: 86160-0WE80$154.27 MSRP: $211.66You Save: $57.39 (28%)Ships in 1-3 Business DaysProduct Specifications- Other Name: Speaker Assembly, Radio; Speaker, Front, Upper; Speaker; Tweeter; Speaker Assembly, Front
- Part Name Code: 86160P
- Item Weight: 1.00 Pounds
- Condition: New
- Fitment Type: Direct Replacement
- Require Quantity: 2
- SKU: 86160-0WE80
- Warranty: This genuine part is guaranteed by Toyota's factory warranty.
- Product Specifications
- Other Name: Speaker Assembly, Radio; Speaker, Rear; Package Tray Speaker; Speaker Assembly, Rear
- Position: Rear
- Part Name Code: 86160B
- Item Weight: 5.40 Pounds
- Item Dimensions: 17.2 x 14.1 x 7.4 inches
- Condition: New
- Fitment Type: Direct Replacement
- Require Quantity: 2
- SKU: 86160-0WF00
- Warranty: This genuine part is guaranteed by Toyota's factory warranty.

2007 Toyota Camry Instrument Panel Speaker
Part Number: 86160-0WF60$134.56 MSRP: $190.50You Save: $55.94 (30%)Ships in 1-3 Business DaysProduct Specifications- Other Name: Speaker Assembly, Radio; Speaker, Front, Upper; Front Driver Speaker; Tweeter; Speaker Assembly, Front
- Part Name Code: 86160P
- Item Weight: 1.20 Pounds
- Condition: New
- Fitment Type: Direct Replacement
- Require Quantity: 2
- SKU: 86160-0WF60
- Warranty: This genuine part is guaranteed by Toyota's factory warranty.

2007 Toyota Camry Front Driver Speaker
Part Number: 86160-AA420$207.66 MSRP: $296.49You Save: $88.83 (30%)Ships in 1-3 Business DaysProduct Specifications- Other Name: Speaker Assembly, Radio; Speaker, Front, Front Lower Outer; Speaker Assembly, Front
- Part Name Code: 86160
- Item Weight: 4.30 Pounds
- Item Dimensions: 15.0 x 13.3 x 6.6 inches
- Condition: New
- Fitment Type: Direct Replacement
- Require Quantity: 2
- SKU: 86160-AA420
- Warranty: This genuine part is guaranteed by Toyota's factory warranty.
2007 Toyota Camry Car Speakers
Looking for affordable OEM 2007 Toyota Camry Car Speakers? Explore our comprehensive catalogue of genuine 2007 Toyota Camry Car Speakers. All our parts are covered by the manufacturer's warranty. Plus, our straightforward return policy and speedy delivery service ensure an unparalleled shopping experience. We look forward to your visit!
2007 Toyota Camry Car Speakers Parts Q&A
- Q: How to remove and install the front side Car Speakers on 2007 Toyota Camry?A: The procedure to take out the front side speaker starts by removing the front door lower frame bracket garnish followed by removing the front door inside handle bezel plug and assistant grip cover as well as the courtesy light assembly and front door trim board sub-assembly. Before moving on, disconnect the connector for the front door inner glass Weather Strip and the front No. 1 speaker assembly then remove the 4 bolts while avoiding contact with the speaker cone. The next step requires removing the front pillar garnish after disengaging 6 claws and 2 clips to also remove the instrument panel No. 2 speaker panel sub-assembly. You can remove the front No. 2 speaker assembly when you detach its connector and remove its two bolts. Installation starts by connecting the connector followed by bolt installation for the front No. 2 speaker assembly then you should engage the 6 claws and 2 clips to finalize the instrument panel No. 2 speaker panel sub-assembly installation. First install the front pillar garnish followed by fitting the front No. 1 speaker assembly with its provided 4 bolts and restore the connector. The production sequence ends with an installation of the front door inner glass Weather Strip followed by the front door trim board sub-assembly then the courtesy light assembly then the assist grip cover then the front door inside handle bezel plug then the front door lower frame bracket garnish.
Related 2007 Toyota Camry Parts
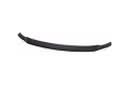 2007 Toyota Camry Spoiler
 2007 Toyota Camry Emblem
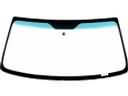 2007 Toyota Camry Windshield
 2007 Toyota Camry Grille
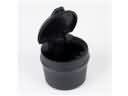 2007 Toyota Camry Ashtray
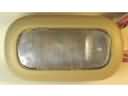 2007 Toyota Camry Dome Light
 2007 Toyota Camry Instrument Cluster
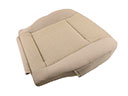 2007 Toyota Camry Seat Cushion
 2007 Toyota Camry Windshield Washer Nozzle
 2007 Toyota Camry Wiper Motor
 2007 Toyota Camry Sunroof Cable
 2007 Toyota Camry Wiper Linkage