×
ToyotaParts- Hello
- Login or Register
- Quick Links
- Live Chat
- Track Order
- Parts Availability
- RMA
- Help Center
- Contact Us
- Shop for
- Toyota Parts
- Scion Parts
My Garage
My Account
Cart
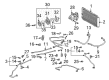
OEM 2005 Toyota MR2 Spyder A/C Clutch
Air Conditioning Clutch- Select Vehicle by Model
- Select Vehicle by VIN
Select Vehicle by Model
orMake
Model
Year
Select Vehicle by VIN
For the most accurate results, select vehicle by your VIN (Vehicle Identification Number).
1 A/C Clutch found

2005 Toyota MR2 Spyder Clutch
Part Number: 88410-17090$185.24 MSRP: $245.00You Save: $59.76 (25%)Ships in 1-3 Business DaysProduct Specifications- Other Name: Clutch Assembly, Magnet; A/C Compressor Clutch
- Part Name Code: 88410
- Item Weight: 4.70 Pounds
- Item Dimensions: 7.9 x 6.8 x 4.5 inches
- Condition: New
- Fitment Type: Direct Replacement
- SKU: 88410-17090
- Warranty: This genuine part is guaranteed by Toyota's factory warranty.
2005 Toyota MR2 Spyder A/C Clutch
Looking for affordable OEM 2005 Toyota MR2 Spyder A/C Clutch? Explore our comprehensive catalogue of genuine 2005 Toyota MR2 Spyder A/C Clutch. All our parts are covered by the manufacturer's warranty. Plus, our straightforward return policy and speedy delivery service ensure an unparalleled shopping experience. We look forward to your visit!
2005 Toyota MR2 Spyder A/C Clutch Parts Q&A
- Q: How to service and repair the A/C Clutch on 2005 Toyota MR2 Spyder?A: You should start compressor clutch servicing and repairs with a compressor and magnetic clutch disassembly process. Start by using Special Service Tool: 07112-76050 and a socket wrench on the shaft bolt until it removes then attach Special Service Tool: 07112-66040 onto the pressure plate for removal with same tools. When the pressure plate is removed you should proceed to remove the shims. Use Special Service Tool: 95994-10020 to extract the snap ring while taking off the rotor until it frees from the shaft. After that use a plastic hammer to tap the rotor off the shaft carefully without damaging the pulley. To remove the stator release the connector followed by using Special Service Tool: 95994-10020 to remove the snap ring. Take out both bolts and the stator under which the wire harness and lock sensor assembly resides. Reassembly begins with installing the wire harness combined with the lock sensor assembly using the 2 bolts before installing the stator while using Special Service Tool: 95994-10020 to place the snap ring with the beveled side attributed face upward followed by connecting the stator connector. Follow this step by placing the rotor then fastening it in position with the snap ring ordered to face upwards with its beveled end. The shaft bolt installation requires tool 07112-66040, 07112-76060 along with a torque wrench to achieve 13.2 N.m (135 kgf.cm, 10 ft.lbf) so install the pressure plate onto the rotor. The final inspection checks magnetic clutch clearance after setting the dial indicator to the pressure plate and while connecting the positive terminal to terminal 3 then the negative terminal to ground, you should measure the clearance between pressure plate and rotor. Standard clearance measurement should fall between 0.45 plus or minus 0.10 mm (0.018 plus or minus 0.004 in.). To reach this standard apply shims of 0.1 mm (0.004 in.), 0.3 mm (0.012 in.), or 0.5 mm (0.020 in.) according to the measurement.
Related 2005 Toyota MR2 Spyder Parts
 2005 Toyota MR2 Spyder A/C Accumulator
 2005 Toyota MR2 Spyder A/C Compressor
 2005 Toyota MR2 Spyder A/C Compressor Cut-Out Switches
 2005 Toyota MR2 Spyder A/C Condenser
 2005 Toyota MR2 Spyder A/C Expansion Valve
 2005 Toyota MR2 Spyder A/C Hose
 2005 Toyota MR2 Spyder A/C Service Cap
 2005 Toyota MR2 Spyder A/C System Valve Core
 2005 Toyota MR2 Spyder Ambient Temperature Sensor
 2005 Toyota MR2 Spyder Evaporator
 2005 Toyota MR2 Spyder HVAC Pressure Switch
 2005 Toyota MR2 Spyder Heater Core