×
ToyotaParts- Hello
- Login or Register
- Quick Links
- Live Chat
- Track Order
- Parts Availability
- RMA
- Help Center
- Contact Us
- Shop for
- Toyota Parts
- Scion Parts
My Garage
My Account
Cart
OEM 2005 Toyota Corolla Engine Control Module
Engine Control Computer- Select Vehicle by Model
- Select Vehicle by VIN
Select Vehicle by Model
orMake
Model
Year
Select Vehicle by VIN
For the most accurate results, select vehicle by your VIN (Vehicle Identification Number).
3 Engine Control Modules found


2005 Toyota Corolla ECM
Part Number: 89661-02K53$347.87 MSRP: $509.80You Save: $161.93 (32%)Ships in 1-3 Business DaysProduct Specifications- Other Name: Computer, Engine Control; Engine Control Module
- Replaces: 89661-02K54, 89661-02D12, 89661-02K50, 89661-02D11, 89661-02K51, 89661-02K52
- Item Weight: 4.10 Pounds
- Item Dimensions: 12.6 x 9.8 x 4.1 inches
- Condition: New
- SKU: 89661-02K53
- Warranty: This genuine part is guaranteed by Toyota's factory warranty.


 Product Specifications
- Other Name: Computer, Engine Control; Engine Control Module
- Replaces: 89661-02K21, 89661-02D02, 89661-02K20, 89661-02D01, 89661-02K22
- Item Weight: 1.70 Pounds
- Item Dimensions: 9.9 x 7.7 x 3.4 inches
- Condition: New
- SKU: 89661-02K23
- Warranty: This genuine part is guaranteed by Toyota's factory warranty.
- Product Specifications
- Other Name: Computer, Engine Control; Engine Control Module
- Manufacturer Note: PART NUMBER LABEL=89661-02C50
- Part Name Code: 89661
- Item Weight: 2.20 Pounds
- Item Dimensions: 12.8 x 10.3 x 4.0 inches
- Condition: New
- Fitment Type: Direct Replacement
- SKU: 89661-02C50
- Warranty: This genuine part is guaranteed by Toyota's factory warranty.
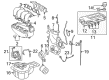
2005 Toyota Corolla Engine Control Module
Looking for affordable OEM 2005 Toyota Corolla Engine Control Module? Explore our comprehensive catalogue of genuine 2005 Toyota Corolla Engine Control Module. All our parts are covered by the manufacturer's warranty. Plus, our straightforward return policy and speedy delivery service ensure an unparalleled shopping experience. We look forward to your visit!
2005 Toyota Corolla Engine Control Module Parts Q&A
- Q: How to replace the Engine Control Module (ECM) on 2005 Toyota Corolla?A: Before replacing the Engine Control Module (ECM) users must disconnect the negative terminal of the battery. Begin by unscrewing the glove compartment door stoppers then bend the top part of the door to free the stoppers before lifting the door out from its holders. The ECM removal process begins with a clip remover device that removes two clips and allows access to the cover after disconnecting four ECM connectors from the clamp. Finally, the ECM is extracted through the unfastening of the claw and clip. Firmer grip on the ECM is possible before dismantling its cover. The Delco-made ECM bracket requires complete removal of its four screws yet Denso-made brackets need screw removal from both No. 2 and No. 3 sections. The ECM bracket installation begins with No. 3 bracket receiving 2 screws torqued to 3.2 Nm (33 kgf.cm, 28 in.lbf) followed by No. 2 bracket getting 2 screws torqued to the same value and finishing with main Denso bracket having 2 screws torqued to 3.2 Nm and ending with Delco bracket receiving 4 screws torqued to 3.2 Nm. The installation of new ECM covers requires the ECM to be secured with 2 screws reaching 3.0 Nm (31 kgf.cm, 27 in.lbf) torque while reconnecting all 4 ECM connectors before securing the clamp and applying 2 clips to the cover. The installation required reinstalling the glove compartment door assembly while connecting the battery negative terminal securely at 5.4 Nm (55 kgf.cm, 48 in.lbf). Register the VINs for the 1ZZ-FE and 2ZZ-GE engines as the last step.
Related 2005 Toyota Corolla Parts
 2005 Toyota Corolla Ignition Coil
 2005 Toyota Corolla Crankshaft Position Sensor
 2005 Toyota Corolla Antenna
 2005 Toyota Corolla Brake Light Switch
 2005 Toyota Corolla Camshaft Position Sensor
 2005 Toyota Corolla Coolant Temperature Sensor
 2005 Toyota Corolla Dimmer Switch
 2005 Toyota Corolla MAP Sensor
 2005 Toyota Corolla Relay
 2005 Toyota Corolla Antenna Mast
 2005 Toyota Corolla Back Up Light Switch
 2005 Toyota Corolla Hazard Warning Switch