×
ToyotaParts- Hello
- Login or Register
- Quick Links
- Live Chat
- Track Order
- Parts Availability
- RMA
- Help Center
- Contact Us
- Shop for
- Toyota Parts
- Scion Parts
My Garage
My Account
Cart
OEM 2005 Toyota Avalon Blower Motor
A/C Heater Blower Motor- Select Vehicle by Model
- Select Vehicle by VIN
Select Vehicle by Model
orMake
Model
Year
Select Vehicle by VIN
For the most accurate results, select vehicle by your VIN (Vehicle Identification Number).
1 Blower Motor found


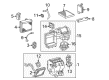
2005 Toyota Avalon Motor Sub-Assembly, Blower W/Fan, Front
Part Number: 87103-0E040$145.92 MSRP: $206.58You Save: $60.66 (30%)Ships in 1-3 Business DaysProduct Specifications- Other Name: Motor Sub-Assembly, Blower; HVAC Blower Motor; Blower Motor
- Position: Front
- Replaces: 87103-48080, 87103-07040
- Part Name Code: 87103B
- Item Weight: 4.20 Pounds
- Item Dimensions: 10.2 x 9.8 x 7.8 inches
- Condition: New
- Fitment Type: Direct Replacement
- SKU: 87103-0E040
- Warranty: This genuine part is guaranteed by Toyota's factory warranty.
2005 Toyota Avalon Blower Motor
Looking for affordable OEM 2005 Toyota Avalon Blower Motor? Explore our comprehensive catalogue of genuine 2005 Toyota Avalon Blower Motor. All our parts are covered by the manufacturer's warranty. Plus, our straightforward return policy and speedy delivery service ensure an unparalleled shopping experience. We look forward to your visit!
2005 Toyota Avalon Blower Motor Parts Q&A
- Q: How to overhaul the blower motor on 2005 Toyota Avalon?A: The first step for blower motor overhaul requires disconnecting the negative cable terminal while waiting 90 seconds to avoid Air Bag activation. Start by unmounting both LH and RH front wiper arm and blade assemblies together with the cowl top ventilator louver (RH), windshield wiper motor and link assembly, plus the panel sub-assembly for the cowl ventilator. Discharge the refrigerant from the refrigeration system using Special Service Tool: 07110-58060 (07117-58080, 07117-58090, 07117-78050, 07117-88060, 07117-88070, 07117-88080), then disconnect the suction hose sub-assembly, air conditioner tube and accessory, heater water outlet hose A, and heater water inlet hose A. Remove the instrument panel safety pad sub-assembly with the front passenger Air Bag assembly, air duct sub-assembly No.1, separate the steering intermediate shaft assembly, and remove the steering column assembly, heater to register duct No.2, heater to register duct assembly No.6, console box duct No.1, floor carpet brackets (LH and RH), and the instrument panel reinforcement assembly. Air duct sub-assembly No.2 along with the blower assembly must be removed after disconnecting wire harness connections and removing all six screws. First disconnect the evaporator temperature sensor then remove the cooler expansion valve with a 4 mm hexagon wrench and remove cooler evaporator sub-assembly No.1 with its O-rings. The first step involves cleaning the air filter while removing the air inlet servomotor alongside air duct sub-assembly No.3. Uninstall the cooling unit motor sub-assembly that has a built-in fan component. The installation requires application of ND-OIL 8 compressor oil on both new O-rings and the fitting surface before placing in cooler evaporator sub-assembly No.1. Secure the cooler expansion valve through two hexagon bolts while tightening them to 3.5 N.m (35 kgf.cm, 30 in.lbf). Connect the evaporator temperature sensor by wrapping the tube with grommet before uniting it with the blower assembly through six screw connections. The instrument panel reinforcement assembly needs to be reinstalld alongside the steering intermediate shaft assembly, steering column assembly, instrument panel safety pad sub-assembly with front passenger Air Bag assembly. Reconnect the air conditioner tube and accessory as well as the suction hose sub-assembly while connecting the cable to the negative battery terminal. A front power seat control system initialization must be performed whenever the battery disconnects or when users replace the D/C CUT fuse or power seat switch or assembly and remove them. You must initialize the power seat ECU through complete seat movement from forward and elevated to rear and lowered positions. To complete the task add engine coolant before checking for leaks followed by using Special Service Tool: 07110-58060 along with specified amount of 450 to 550 g (15.9 to 19.4 oz.) to charge the refrigerant. Verify refrigerant leakage and reinstall the windshield wiper motor and link assembly and front wiper arms and blades (RH and LH).
Related 2005 Toyota Avalon Parts
 2005 Toyota Avalon Cabin Air Filter
 2005 Toyota Avalon A/C Accumulator
 2005 Toyota Avalon A/C Clutch
 2005 Toyota Avalon A/C Compressor
 2005 Toyota Avalon A/C Condenser
 2005 Toyota Avalon A/C Expansion Valve
 2005 Toyota Avalon A/C Hose
 2005 Toyota Avalon Ambient Temperature Sensor
 2005 Toyota Avalon Blend Door Actuator
 2005 Toyota Avalon Evaporator
 2005 Toyota Avalon HVAC Pressure Switch
 2005 Toyota Avalon Heater Core