×
ToyotaParts- Hello
- Login or Register
- Quick Links
- Live Chat
- Track Order
- Parts Availability
- RMA
- Help Center
- Contact Us
- Shop for
- Toyota Parts
- Scion Parts
My Garage
My Account
Cart
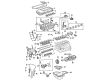
OEM 2004 Toyota Matrix Cylinder Head Gasket
Engine Cylinder Head Gasket- Select Vehicle by Model
- Select Vehicle by VIN
Select Vehicle by Model
orMake
Model
Year
Select Vehicle by VIN
For the most accurate results, select vehicle by your VIN (Vehicle Identification Number).
2 Cylinder Head Gaskets found


2004 Toyota Matrix Head Gasket
Part Number: 11115-22050$64.45 MSRP: $90.47You Save: $26.02 (29%)Ships in 1 Business DayProduct Specifications- Other Name: Gasket, Cylinder Head; Engine Cylinder Head Gasket; Cylinder Head Gasket; Engine Gasket Set
- Replaces: 11115-22030, 11115-22031, 11115-22040, 11115-22041
- Part Name Code: 11115
- Item Weight: 0.70 Pounds
- Item Dimensions: 25.2 x 8.8 x 0.1 inches
- Condition: New
- Fitment Type: Direct Replacement
- SKU: 11115-22050
- Warranty: This genuine part is guaranteed by Toyota's factory warranty.

 Product Specifications
- Other Name: Gasket, Cylinder Head; Engine Cylinder Head Gasket; Cylinder Head Gasket; Engine Gasket Set
- Part Name Code: 11115
- Item Weight: 0.70 Pounds
- Item Dimensions: 24.7 x 9.0 x 0.1 inches
- Condition: New
- Fitment Type: Direct Replacement
- SKU: 11115-22060
- Warranty: This genuine part is guaranteed by Toyota's factory warranty.
2004 Toyota Matrix Cylinder Head Gasket
Looking for affordable OEM 2004 Toyota Matrix Cylinder Head Gasket? Explore our comprehensive catalogue of genuine 2004 Toyota Matrix Cylinder Head Gasket. All our parts are covered by the manufacturer's warranty. Plus, our straightforward return policy and speedy delivery service ensure an unparalleled shopping experience. We look forward to your visit!
2004 Toyota Matrix Cylinder Head Gasket Parts Q&A
- Q: How to replace the cylinder head gasket on 2004 Toyota Matrix?A: The first step to replace the cylinder head gasket involves stopping gas spillage before you begin by removing the engine under cover RH then draining the coolant. The first step requires removal of both nuts and 2 clips leading to the extraction of cylinder head cover No.2. Separate the accelerator control cable assembly from its bracket by first removing the nut and then remove the air cleaner hose by unfastening the 2 clamp bolts. The technician needs to disconnect water bypass hoses from throttle body followed by removing EFI fuel pipe clamp while using Special Service Tool: 09268-21010 to disconnect the fuel tube sub-assembly. Disconnect both the heater inlet water hose and radiator hose inlet from the cylinder head location. Separate the vane pump assembly while keeping the hose connected by turning the V-ribbed belt tensioner clockwise until the V-belt releases from the fan and generator. The exhaust pipe assembly front should be removed with the generator assembly by unfastening the two bolts and the gasket. To remove the engine mounting insulator sub-assembly RH begin by first taking off the PS oil pump reservoir followed by placement of a wooden block between jack and engine and then proceeding to remove 4 bolts and 2 nuts. Separate the engine wire through 5 clamp removal followed by unconnection of 4 ignition coil connectors and bolt and nut deinstallation. Obtain the ignition coil assembly by first removing all bolts and coils present then unfasten ventilation hoses attached to the cylinder head cover. The cylinder head cover sub-assembly needs to be removed after dissembling its 9 bolts, 2 seal washers, 2 nuts and 3 clamp brackets. Align the crankshaft groove to timing mark "0" and the camshaft timing sprocket marks on No.1 cylinder by rotating the crankshaft pulley to achieve TDC/compression position. To access the components starting with the crankshaft pulley users need Special Service Tool: 09960-10010 (09962-01000, 09963-01000) which allows them to proceed with the belt tensioner assembly before moving on to the water pump assembly and transverse engine mounting bracket. The chain tensioner from assembly no.1 and bearing sensor must be taken out but the crankshaft should be maintained stationary. The service technician must detach the timing chain or belt cover sub-assembly together with the timing gear cover oil seal and the crankshaft position sensor plate No.1. Continue by subtracting the chain tensioner slipper and chain vibration damper No.1 before moving on to the timing chain removal. The technician disconnects the intake manifold after removing water and vacuum hoses to remove the intake manifold and throttle body assembly jointed to the gasket. Begin this step by taking away the water by-pass pipe Number 1 along with the oil level gauge sub-assembly guide. Start by removing the camshaft through the process of removing 19 bearing cap bolts and 9 bearing caps with all their fasteners loose. Start by taking off the camshaft timing oil control valve assembly and after removing this component proceed with the removal of the manifold stay in accordance with drive type specifications. The procedure starts with evenly loosening 10 cylinder head bolts and their plate washers before removing the cylinder head sub-assembly and both gasket and head from the engine block. The cylinder block requires a new gasket installed in the direction where the Lot No. stamp faces upward. Use vernier calipers to check the cylinder head set bolts for length dimensions followed by replacements of any bolts surpassing the maximum value. Apply engine oil to the bolts and under their heads of the cylinder head before uniformly tightening them starting from the specified sequence up to a torque of 49 Nm (500 kgf-cm, 36 ft. lbs.) while marking the front bolt faces with paint before red-torqueing them 90 degrees in this order. Begin handling the manifold stay by following drive type instructions before fitting the camshaft timing oil control valve assembly that comes with a new O-ring while the camshaft needs engine oil lubrication for proper installation. The maintenance technician will install all components including Water By-pass Pipe No.1 alongside the Oil Level Gauge Guide and Intake Manifold with its new gasket while confirming proper connection points. After repositioning Cylinder No.1 at TDC/compression the technician must install the timing chain followed by the chain vibration damper along with tensioner slipper and complete torque specifications for each component. The installation process requires you to place crankshaft position sensor plate No.1 together with timing gear cover oil seal and timing chain or belt cover sub-assembly that needs proper seal packing. Remote assembly and transverse engine mounting must be installed with the crank position sensor and water pump assembly and V-ribbed belt tensioner assembly as all bolts require correct torquing. The sequence of final installation includes the crankshaft pulley together with the cylinder head cover sub-assembly and ignition coil assembly along with engine wire and engine mounting insulator sub-assembly RH followed by front exhaust pipe assembly and cylinder head cover No.2 and then the front wheel RH. Add coolant to the system then perform compression testing assisted by Special Service Tool: 09992-00500 after which you can check CO/HC content before evaluating ignition timing with Special Service Tool: 09843-18040 and inspect for any leaks of engine coolant or oil.
Related 2004 Toyota Matrix Parts
 2004 Toyota Matrix Engine Mount
 2004 Toyota Matrix Valve Cover Gasket
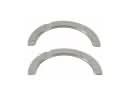 2004 Toyota Matrix Crankshaft Thrust Washer Set
 2004 Toyota Matrix Cylinder Head
 2004 Toyota Matrix Dipstick Tube
 2004 Toyota Matrix Oil Pump Gasket
 2004 Toyota Matrix Piston
 2004 Toyota Matrix Rocker Arm
 2004 Toyota Matrix Rod Bearing
 2004 Toyota Matrix Spool Valve
 2004 Toyota Matrix Timing Cover
 2004 Toyota Matrix Valve Stem Seal