×
ToyotaParts- Hello
- Login or Register
- Quick Links
- Live Chat
- Track Order
- Parts Availability
- RMA
- Help Center
- Contact Us
- Shop for
- Toyota Parts
- Scion Parts
My Garage
My Account
Cart
OEM 2004 Toyota Echo Shock Absorber
Suspension Shock Absorber- Select Vehicle by Model
- Select Vehicle by VIN
Select Vehicle by Model
orMake
Model
Year
Select Vehicle by VIN
For the most accurate results, select vehicle by your VIN (Vehicle Identification Number).
2 Shock Absorbers found

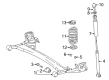
2004 Toyota Echo Shock Absorber
Part Number: 48530-59895$59.83 MSRP: $83.98You Save: $24.15 (29%)Ships in 1-3 Business DaysProduct Specifications- Other Name: Absorber Assembly, Shock; Shock Absorber, Rear; Suspension Strut Assembly Kit; Strut Shock Kit; Complete Strut; Shock; Absorber Assembly, Shock, Rear Passenger Side; Absorber Assembly, Shock, Rear Driver Side
- Manufacturer Note: MARK 48530-52880
- Replaces: 48530-59715
- Item Weight: 6.90 Pounds
- Item Dimensions: 25.8 x 6.8 x 5.8 inches
- Condition: New
- Fitment Type: Direct Replacement
- SKU: 48530-59895
- Warranty: This genuine part is guaranteed by Toyota's factory warranty.

 Product Specifications
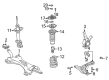
- Other Name: Absorber Assembly, Shock; Front Suspension Strut; Strut Assembly Kit; Complete Strut; Shock Absorber; Absorber Assembly, Shock, Front Passenger Side; Absorber Assembly, Shock, Front Driver Side
- Manufacturer Note: MARK 48510-52A20
- Replaces: 48510-59665
- Item Weight: 9.60 Pounds
- Item Dimensions: 26.4 x 8.4 x 7.5 inches
- Condition: New
- Fitment Type: Direct Replacement
- SKU: 48510-59855
- Warranty: This genuine part is guaranteed by Toyota's factory warranty.
2004 Toyota Echo Shock Absorber
Looking for affordable OEM 2004 Toyota Echo Shock Absorber? Explore our comprehensive catalogue of genuine 2004 Toyota Echo Shock Absorber. All our parts are covered by the manufacturer's warranty. Plus, our straightforward return policy and speedy delivery service ensure an unparalleled shopping experience. We look forward to your visit!
2004 Toyota Echo Shock Absorber Parts Q&A
- Q: How to service and repair the Shock Absorber on 2004 Toyota Echo?A: The coil spring disassembly begins by securely fastening Special Service Tool: 09727-30021 (09727-00010, 09727-00021, 09727-00031) onto the shock absorber in a vise with 2 nuts and a bolt. When using this tool do not use an impact wrench since it could damage the tool. A cap from the suspension support can now be removed while placing it between two nuts and a screwdriver which removes the center nut without breaking the suspension support stud bolts. Begin by removing the suspension support followed by the dust seal and then proceed to remove the spring upper seat together with the upper insulator before removing the spring bumper and coil spring. During inspection compress and extend the shock absorber rod to identify any abnormal resistance or unusual sounds after which you should change the shock absorber. Before discarding the shock absorber extend its rod completely while drilling a hole in the cylinder to release gas while maintaining safety from flying debris and remembering that the gas possesses no color, odor, or poisonous properties. Reinstall the spring bumper onto the piston rod followed by coil spring compression through the same special service tool to insert the bottom section of the spring into its designated slot on the spring lower seat. Begin installation of components by placing the upper insulator with its "a" mark facing away from the center, followed by the spring upper seat bearing the "OUT" label while facing to the outside as well, then place the dust seal followed by the suspension support at the last step. Fasten the new center nut through two nuts while using a screwdriver at 33 Nm torque while preserving the suspension support stud bolts from damage. Mount the special service tool before applying MP grease to the suspension support then add the cap.
Related 2004 Toyota Echo Parts
 2004 Toyota Echo Control Arm
 2004 Toyota Echo Alignment Bolt
 2004 Toyota Echo Axle Beam Mount
 2004 Toyota Echo Bump Stop
 2004 Toyota Echo Coil Springs
 2004 Toyota Echo Front Cross-Member
 2004 Toyota Echo Shock And Strut Mount
 2004 Toyota Echo Shock and Strut Boot
 2004 Toyota Echo Steering Knuckle
 2004 Toyota Echo Sway Bar Bracket
 2004 Toyota Echo Sway Bar Kit
 2004 Toyota Echo Trailing Arm Bushing