×
ToyotaParts- Hello
- Login or Register
- Quick Links
- Live Chat
- Track Order
- Parts Availability
- RMA
- Help Center
- Contact Us
- Shop for
- Toyota Parts
- Scion Parts
My Garage
My Account
Cart
OEM 2003 Toyota Sienna Windshield
Glass Windshield- Select Vehicle by Model
- Select Vehicle by VIN
Select Vehicle by Model
orMake
Model
Year
Select Vehicle by VIN
For the most accurate results, select vehicle by your VIN (Vehicle Identification Number).
2 Windshields found

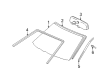
2003 Toyota Sienna Windshield, Front
Part Number: 56101-08040-83$647.76 MSRP: $949.29You Save: $301.53 (32%)Ships in 1-3 Business DaysProduct Specifications- Other Name: Glass Sub-Assembly, Windshield; Windshield Glass, Front
- Position: Front
- Replaces: 56101-08040
- Condition: New
- SKU: 56101-08040-83
- Warranty: This genuine part is guaranteed by Toyota's factory warranty.
- Product Specifications
- Other Name: Glass Sub-Assembly, Windshield; Windshield Glass, Front
- Position: Front
- Replaces: 56101-08030
- Condition: New
- SKU: 56101-08030-83
- Warranty: This genuine part is guaranteed by Toyota's factory warranty.
2003 Toyota Sienna Windshield
Looking for affordable OEM 2003 Toyota Sienna Windshield? Explore our comprehensive catalogue of genuine 2003 Toyota Sienna Windshield. All our parts are covered by the manufacturer's warranty. Plus, our straightforward return policy and speedy delivery service ensure an unparalleled shopping experience. We look forward to your visit!
2003 Toyota Sienna Windshield Parts Q&A
- Q: How to remove and install a windshield on 2003 Toyota Sienna?A: The first step requires you to detach the front door scuff plates together with the cowl side boards along with front door opening trim covers and front pillar garnish using a screwdriver that must have tape around the tip. The tweeter speaker requires disconnecting its connector when present. Begin by dismantling sun visors with their holders and assist grip as well as the sliding roof opening trim moulding if present and removing the roof drip side channels and roof console box elements through lens extraction and screw removal followed by connector disconnect. First, detach the glasses box using screw removal then continue by taking out screws from the front side of the roof headlining and wiper arms followed by the removal of clips from the hood to cowl top seal and cowl top ventilator louvers followed by disconnecting the washer hoses. Use a rivet cutter on your drill to properly cut the flanges of rivets before removing the exterior moulding which you should duplicate on the other side. Well-cut the top outside exterior piece with a knife yet protect the auto body from any harm. Install windshield glass removal by inserting a piano wire through body and glass from inside followed by end block attachment before cutting adhesive while watching for paint and ornament damage. Keep a maximum amount of adhesive material on the body. Begin the installation process by cleaning the contact surface area of the body along with shaping it to maintain adequate adhesive amount. Next clean the glass by removing adhesive while using cleaner to treat the surface without contacting it directly. The installation process requires cleanups of all damaged stoppers and dams followed by the application of adhesive tape for new replacements. Place the glass at the correct position while ensuring an equal contact between glass and rim then make reference marks on the glass before cleaning the adhesive from its surface. Cover the body surface with Primer M for three minutes of drying time followed by glass treatment with Primer G then wiping it clean before drying. Install the glass while aligning reference marks and use Part No. 08850-00801 or equivalent adhesive before applying contact to the rim while protecting it with tape until full adhesive formation. When the adhesive reaches its final state run a leak test before using Part No. 08833-00030 or similar sealing material on found leaks. Set the adhesive on the installation zone first then position the upper outside moulding through gentle impact until settled before securing the outside moulding by using a handheld or air-powered riveting tool. Reassemble the vehicle by incorporating these components: wiper arms at specified torque, hood to cowl top seal, sliding roof opening trim moulding and assist grip when present, sun visors followed by holders and front pillar garnishes before installing front door opening trim covers, cowl side boards and front door scuff plates and front side of roof headlining, roof drip side channels, glasses box, roof console box and cowl top ventilator louver.
Related 2003 Toyota Sienna Parts
 2003 Toyota Sienna Windshield Washer Nozzle
 2003 Toyota Sienna Wiper Arm
 2003 Toyota Sienna Car Mirror
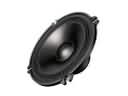 2003 Toyota Sienna Car Speakers
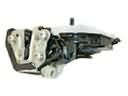 2003 Toyota Sienna Rear Passenger Door Handle Latch
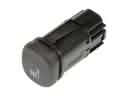 2003 Toyota Sienna Seat Heater Switch
 2003 Toyota Sienna Washer Pump
 2003 Toyota Sienna Washer Reservoir
 2003 Toyota Sienna Windshield Wiper
 2003 Toyota Sienna Wiper Blade
 2003 Toyota Sienna Wiper Linkage
 2003 Toyota Sienna Wiper Motor