×
ToyotaParts- Hello
- Login or Register
- Quick Links
- Live Chat
- Track Order
- Parts Availability
- RMA
- Help Center
- Contact Us
- Shop for
- Toyota Parts
- Scion Parts
My Garage
My Account
Cart
OEM 2003 Toyota Sequoia Differential
Front Differential- Select Vehicle by Model
- Select Vehicle by VIN
Select Vehicle by Model
orMake
Model
Year
Select Vehicle by VIN
For the most accurate results, select vehicle by your VIN (Vehicle Identification Number).
4 Differentials found


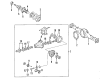
2003 Toyota Sequoia Differential Carrier, Rear
Part Number: 41110-35751$1750.95 MSRP: $2566.04You Save: $815.09 (32%)Ships in 1-3 Business DaysProduct Specifications- Other Name: Carrier Assembly, Differential; Differential Carrier, Rear; Carrier Assembly; Carrier Assembly, Differential, Rear; Differential
- Manufacturer Note: *FGR=41:10=4.100
- Position: Rear
- Replaces: 41110-35750
- Part Name Code: 41110
- Item Weight: 75.60 Pounds
- Item Dimensions: 16.2 x 11.3 x 11.3 inches
- Condition: New
- Fitment Type: Direct Replacement
- SKU: 41110-35751
- Warranty: This genuine part is guaranteed by Toyota's factory warranty.

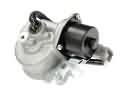
2003 Toyota Sequoia Differential Case
Part Number: 41311-34020$371.36 MSRP: $544.23You Save: $172.87 (32%)Ships in 1-3 Business DaysProduct Specifications- Other Name: Case, Differential; Case, Front Differential; Differential
- Replaces: 41311-35060
- Part Name Code: 41311
- Item Weight: 6.40 Pounds
- Item Dimensions: 7.0 x 6.7 x 6.1 inches
- Condition: New
- Fitment Type: Direct Replacement
- SKU: 41311-34020
- Warranty: This genuine part is guaranteed by Toyota's factory warranty.


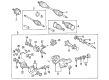
2003 Toyota Sequoia Axle Assembly, Front
Part Number: 41110-34280$1716.11 MSRP: $2514.97You Save: $798.86 (32%)Product Specifications- Other Name: Carrier Assembly, Differential; Drive Axle Assembly, Front; Axle Shaft; Differential Assembly; Carrier Assembly, Differential, Front; Differential
- Manufacturer Note: *FGR=41:10=4.100
- Position: Front
- Part Name Code: 41110F
- Item Weight: 82.50 Pounds
- Item Dimensions: 29.6 x 25.9 x 18.4 inches
- Condition: New
- Fitment Type: Direct Replacement
- SKU: 41110-34280
- Warranty: This genuine part is guaranteed by Toyota's factory warranty.
 Product Specifications
- Other Name: Carrier Assembly, Differential; Differential Carrier, Rear; Carrier Assembly; Carrier Assembly, Differential, Rear; Differential
- Manufacturer Note: *FGR=41:10=4.100
- Position: Rear
- Part Name Code: 41110
- Item Weight: 81.00 Pounds
- Item Dimensions: 30.1 x 26.4 x 18.4 inches
- Condition: New
- Fitment Type: Direct Replacement
- SKU: 41110-34270
- Warranty: This genuine part is guaranteed by Toyota's factory warranty.
2003 Toyota Sequoia Differential
Looking for affordable OEM 2003 Toyota Sequoia Differential? Explore our comprehensive catalogue of genuine 2003 Toyota Sequoia Differential. All our parts are covered by the manufacturer's warranty. Plus, our straightforward return policy and speedy delivery service ensure an unparalleled shopping experience. We look forward to your visit!
2003 Toyota Sequoia Differential Parts Q&A
- Q: What Are the Key Steps in Differential Carrier Service and Repair on 2003 Toyota Sequoia?A: Inspect the companion flange runout with a dial indicator before starting service work on the differential carrier because any reading above 0.10 mm (0.0039 inch) requires a replacement companion flange. The ring gear backlash should be measured using Special Service Tool: 09564-32011 together with a dial indicator at various points to achieve 0.1 - 0.18 mm (0.0039 - 0.0071 inch) backlash. Adjust the side bearing preload as needed. A torque wrench should be used to measure the drive pinion preload with a recommended torque range between 0.6 Nm and 1.0 Nm (6 - 10 kgf-cm and 5.2 - 8.7 inch lbs.) at the beginning of the process. When both drive pinion and ring gear components are in contact, the total preload measurement should fall between 0.4 - 0.6 Nm (4 - 6 kgf-cm, 3.5 - 5.2 inch lbs.). Uninstall the A.D.D. actuator through 4 bolt removal followed by a hammer handle pullout. A torx socket (E14) should be used first to remove the 4 torx bolts on the differential tube before using a plastic hammer to tap it out and finally removing the sleeve and O-ring. The process to remove the clutch case begins by using torx socket (E14) to uninstall the two bolts and then tapping it out. The side oil seal needs Special Service Tool: 09308-00010 for removal before intermediate shaft No.1 extraction with Special Service Tool: 09350-20015 (09369-20040) and 09950-40011 (09951-04010, 09952-04010, 09953-04020, 09954-04010, 09955-04011, 09957-04010, 09958-04011). Subsequently, the snap ring should be taken out. Use a chisel and hammer to unshaken the companion flange nut before holding the flange with Special Service Tool: 09330-00021 and removing the nut through Special Service Tool: 09950-30012 (09951-03010, 09953-03010, 09954-03010, 09955-03030, 09956-03020). The technician uses Special Service Tool: 09308-10010 to remove the oil seal and oil slinger before taking out the rear bearing with Special Service Tool: 09556-22010 and then the bearing spacer. Start by removing the 10 retaining bolts on the side bearing retainer followed by gently tapping it out with a plastic hammer. Afterward remove the differential case assembly together with the drive pinion from the differential carrier. You can remove the drive pinion front bearing together with its washer by using Special Service Tool: 09950-00020 in a press operation before taking out the bearing outer races through a combination of Special Service Tool: 09502-12010, 09612-65014 (09612-01020, 09612-01050) and a brass bar and hammer for the front race and rear race. Start by removing each side bearing outer race and labeling them before extracting the ring gear through plastic hammer tapping. First unstake the five lock plates and discard the ten bolts to remove the ring gear. Use Special Service Tool: 09950-40011 and 09950-60010 to remove the side bearings and separate the differential case assembly by taking out the straight pin alongside the pinion shaft, pinion gears, thrust washers, side gears, and thrust washers during disassembly. Use a brass bar along with a hammer to eliminate the bearings from their slots. To install the companion flange dust deflector use Special Service Tool 09950-00020 while intermediate shaft No. 2 needs replacement through clutch hub removal using Special Service Tool 09308-00010 before uninstalling intermediate shaft No. 2 and its bearing. You should install a new intermediate shaft No. 2 bearing with Special Service Tool: 09309-07010 and a press and finish by putting on the shaft and new oil seal with Special Service Tool: 09223-15020. Reassemble the differential case by installing new bearings using Special Service Tool: 09950-60010 (09951-00380) along with a press while maintaining space between the straight pin for correct alignment. The differential case requires stick-riveting afterward straight-pin installation then operators can begin ring-gear installation after doing surface clean-up followed by pin-staking of lock plates. Mount side bearings and outer races as the first step and then position drive pinion front and rear bearing outer races using Special Service Tool: 09570-22011. The installation procedure starts by placing the drive pinion front bearing before short-term preload adjustment so you can add the differential case into the differential carrier. Measure the ring gear backlash and check total preload until proper tooth contact between the ring gear and drive pinion is achieved. The rear bearing should be installed alongside the oil slinger before installing the oil seal through Special Service Tool: 09550-22010. Place the companion flange while adjusting its nut torque and inspect the drive pinion preload before necessary changes are made. The side bearing retainer installation requires Part No. 08826-00090 FIPG together with proper torque measurements before finishing the assembly with the four bolts of the A.D.D. actuator.
Related 2003 Toyota Sequoia Parts
 2003 Toyota Sequoia 4WD Actuator
 2003 Toyota Sequoia Drive Shaft
 2003 Toyota Sequoia CV Joint Companion Flange
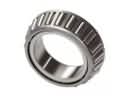 2003 Toyota Sequoia Differential Bearing
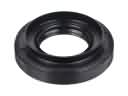 2003 Toyota Sequoia Differential Seal
 2003 Toyota Sequoia Pinion Bearing
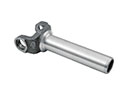 2003 Toyota Sequoia Slip Yoke
 2003 Toyota Sequoia Transfer Case Bearing
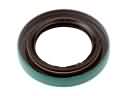 2003 Toyota Sequoia Transfer Case Seal
 2003 Toyota Sequoia Universal Joint