×
ToyotaParts- Hello
- Login or Register
- Quick Links
- Live Chat
- Track Order
- Parts Availability
- RMA
- Help Center
- Contact Us
- Shop for
- Toyota Parts
- Scion Parts
My Garage
My Account
Cart
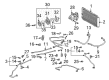
OEM 2003 Toyota MR2 Spyder A/C Clutch
Air Conditioning Clutch- Select Vehicle by Model
- Select Vehicle by VIN
Select Vehicle by Model
orMake
Model
Year
Select Vehicle by VIN
For the most accurate results, select vehicle by your VIN (Vehicle Identification Number).
1 A/C Clutch found

2003 Toyota MR2 Spyder Clutch
Part Number: 88410-17090$185.24 MSRP: $245.00You Save: $59.76 (25%)Ships in 1-3 Business DaysProduct Specifications- Other Name: Clutch Assembly, Magnet; A/C Compressor Clutch
- Part Name Code: 88410
- Item Weight: 4.70 Pounds
- Item Dimensions: 7.9 x 6.8 x 4.5 inches
- Condition: New
- Fitment Type: Direct Replacement
- SKU: 88410-17090
- Warranty: This genuine part is guaranteed by Toyota's factory warranty.
2003 Toyota MR2 Spyder A/C Clutch
Looking for affordable OEM 2003 Toyota MR2 Spyder A/C Clutch? Explore our comprehensive catalogue of genuine 2003 Toyota MR2 Spyder A/C Clutch. All our parts are covered by the manufacturer's warranty. Plus, our straightforward return policy and speedy delivery service ensure an unparalleled shopping experience. We look forward to your visit!
2003 Toyota MR2 Spyder A/C Clutch Parts Q&A
- Q: How to service and repair the A/C Clutch on 2003 Toyota MR2 Spyder?A: The service and repair process of the compressor clutch should begin with running the engine at idle speed while enabling the A/C for 10 minutes followed by switching off the engine and removing the negative (-) terminal cable from the battery. Drain the refrigeration system of its refrigerant then remove the under cover panel from the front engine area alongside the drive belt. Detach the compressor from the vehicle by removing its connector and wire harness clamp and three bolts without damaging the discharge and suction hose. To protect the system use the provided caps for immediate coverage of open fittings after you remove their two securing bolts. When connecting hoses for installation start by applying compressor oil to two new O-rings before installing the hoses with their matching bolts while torquing to 9.8 N.m (100 kgf.cm, 7 ft.lbf) and doing so right after removing the caps from both fittings. Use the 3 bolts to install the compressor after torquing them at 24.5 N.m (250 kgf.cm, 18 ft.lbf) and reconnect the connector. The drive belt installation must be checked before connecting the negative (-) terminal battery cable. The technician must eliminate air pressure within the refrigeration system before adding the mentioned amount of 500 plus or minus 30 g (17.64 plus or minus 1.06 oz.) refrigerant. The technician must check for refrigerant leakage with a gas leak detector and check joint torques while also inspecting A/C operation in case of leakage detection.
Related 2003 Toyota MR2 Spyder Parts
 2003 Toyota MR2 Spyder A/C Accumulator
 2003 Toyota MR2 Spyder A/C Compressor
 2003 Toyota MR2 Spyder A/C Compressor Cut-Out Switches
 2003 Toyota MR2 Spyder A/C Condenser
 2003 Toyota MR2 Spyder A/C Expansion Valve
 2003 Toyota MR2 Spyder A/C Hose
 2003 Toyota MR2 Spyder A/C Service Cap
 2003 Toyota MR2 Spyder A/C System Valve Core
 2003 Toyota MR2 Spyder Ambient Temperature Sensor
 2003 Toyota MR2 Spyder Evaporator
 2003 Toyota MR2 Spyder HVAC Pressure Switch
 2003 Toyota MR2 Spyder Heater Core